Learn how to use
your Jets.com app
The Jets.com app puts your account, your trips, and your team at your fingertips. This guide provides simple, step-by-step instructions for the app's most common tasks, from claiming your account to requesting a charter flight.
A one-time activation code from your welcome email gets you started with your Jets.com app. From there, it's a quick setup — password, profile, notification preferences, and an introduction to your dedicated team that will support every journey.
For Access Pass and Access+ Jet Card holders, requesting a flight is simple. Enter your trip details, pick your preferred aircraft, and submit. Once confirmed, you'll see your updated Jet Card balance right in the app.
Need a flight your Jet Card doesn't cover, or flying without one? Here's how to book an on-demand charter flight — any aircraft, any location, any time.
Every flight needs a complete passenger list before takeoff. Here's how to add travelers, designate a lead passenger, and securely upload ID — your travelers are saved to your account, making future bookings even faster.
Some trips call for a little extra coordination. Here's how the app connects you with your Private Aviation Expert when you need it.
Explore Jets.com's Access Pass and Access+ programs and pick the one that fits your travel needs. This guide walks you through selecting and purchasing a program
Forgot your password? Request a reset email, enter the code we email you, and choose a new one.
Onboarding
Your welcome email includes a one-time activation code. Enter it in the Jets.com app to activate your account and complete a quick setup, including creating your password, personalizing your profile, choosing your notification preferences, and meeting your dedicated team that will support every journey.
Onboarding · Steps 1 – 4
Activate your account, set a password, tell us who you are.
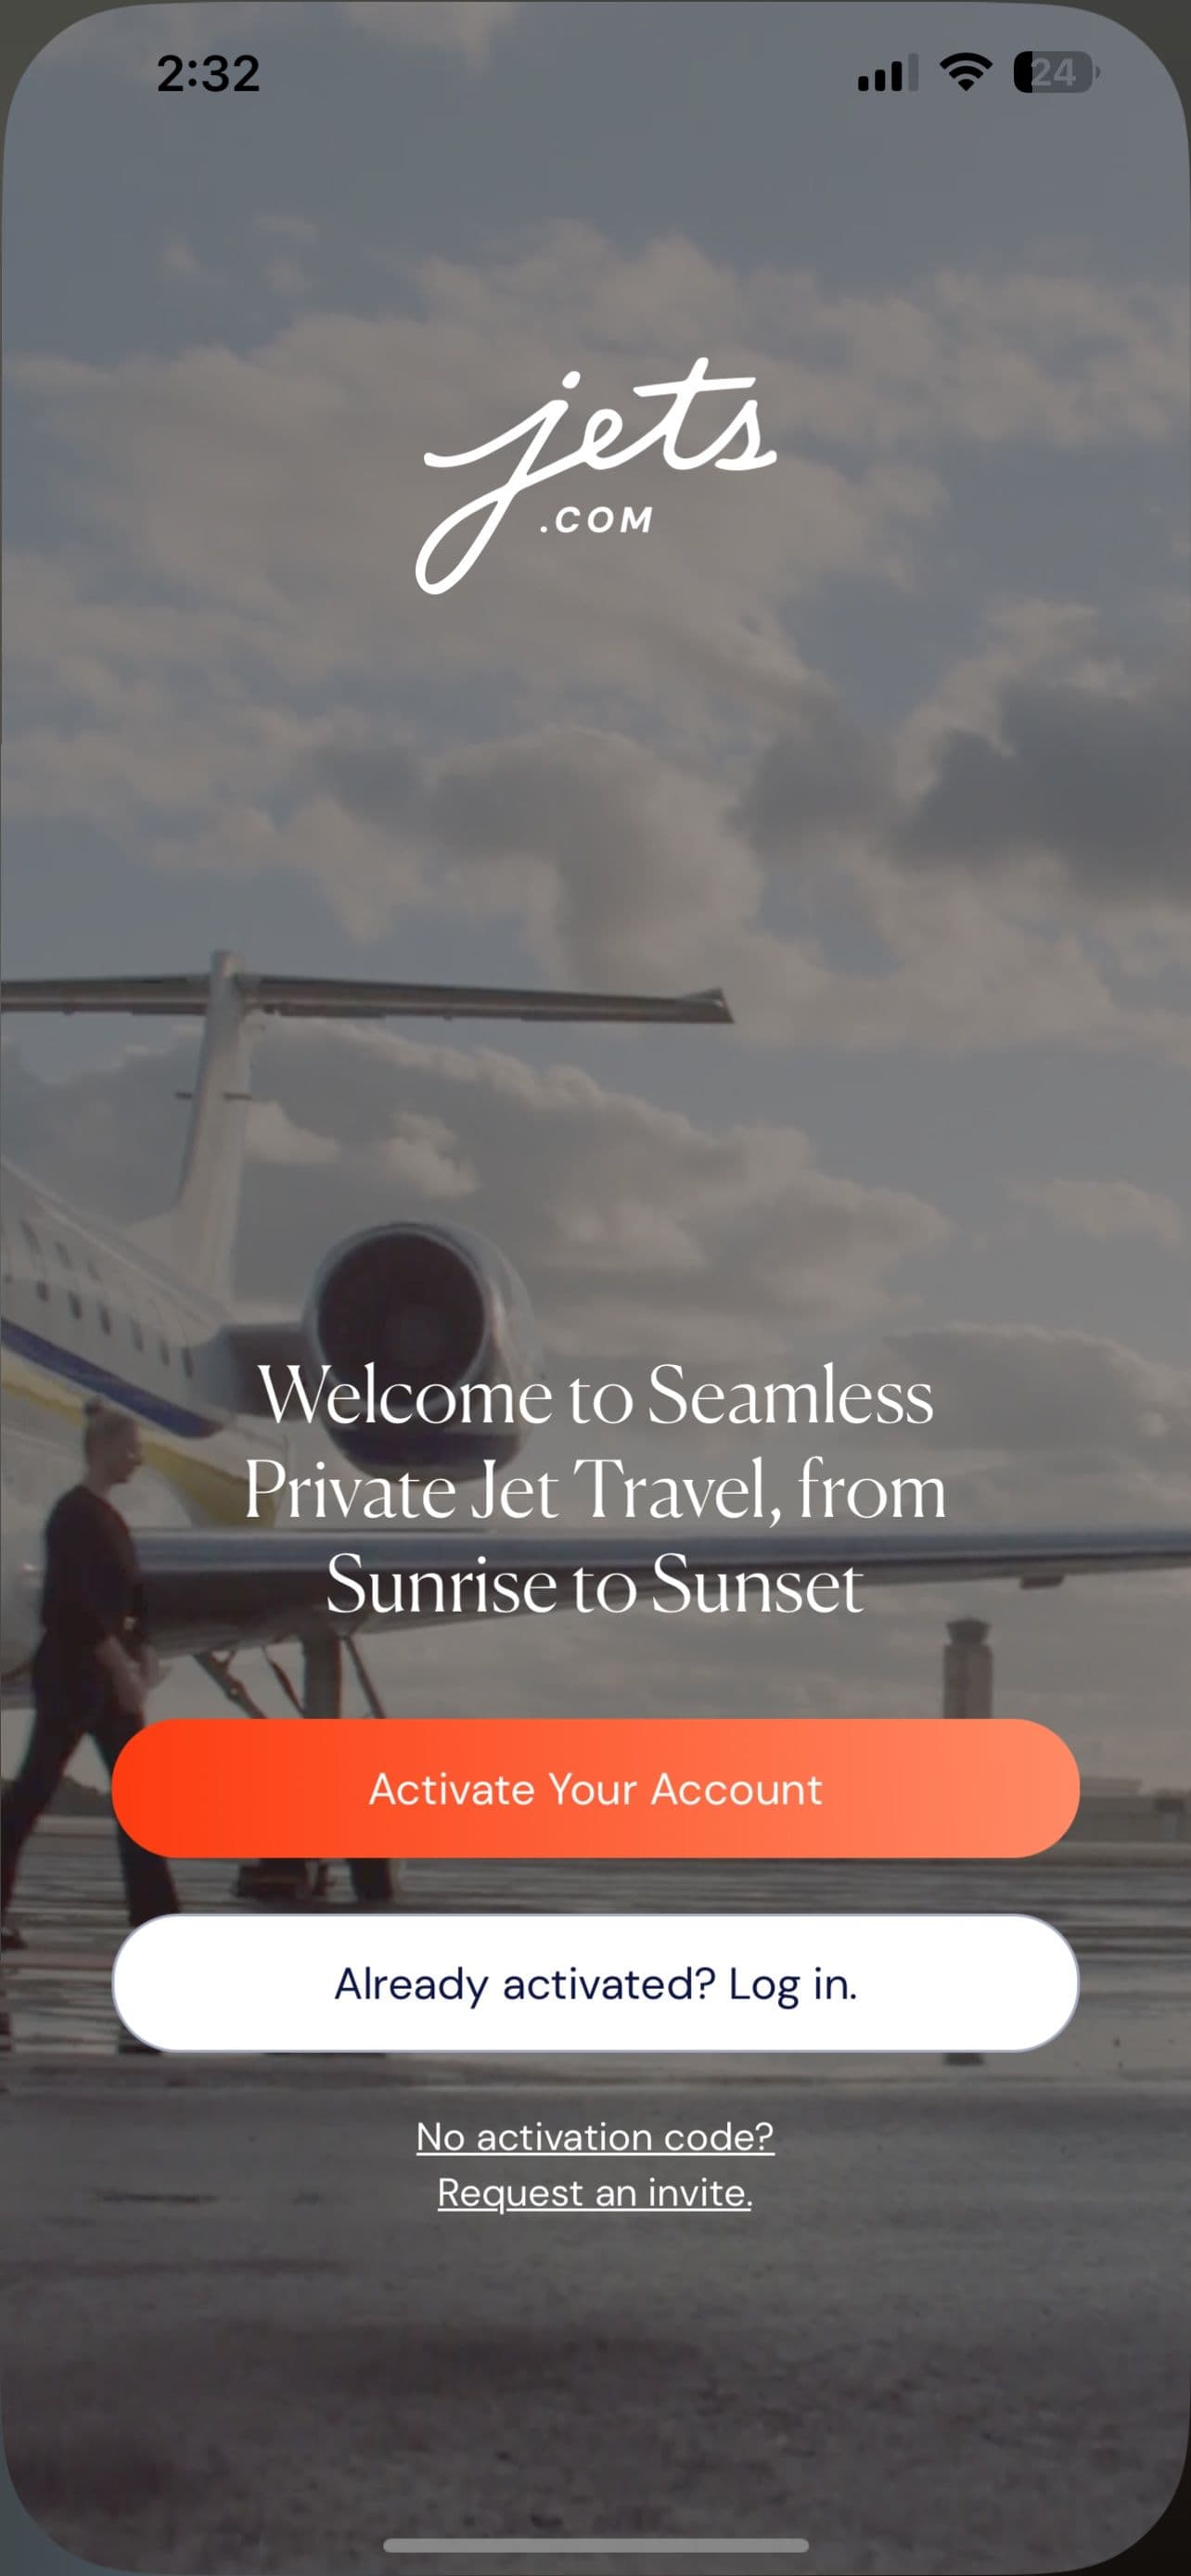
Welcome Splash
Activate Your Account.
This is where you'll get started.
- New to the Jets.com app? Tap Activate Your Account.
- Already activated? Tap Log In.
- New to Jets.com and need an invitation? Tap Request an Invite. (The app is currently exclusive to Jets.com clients. Request an invite to get early access.)
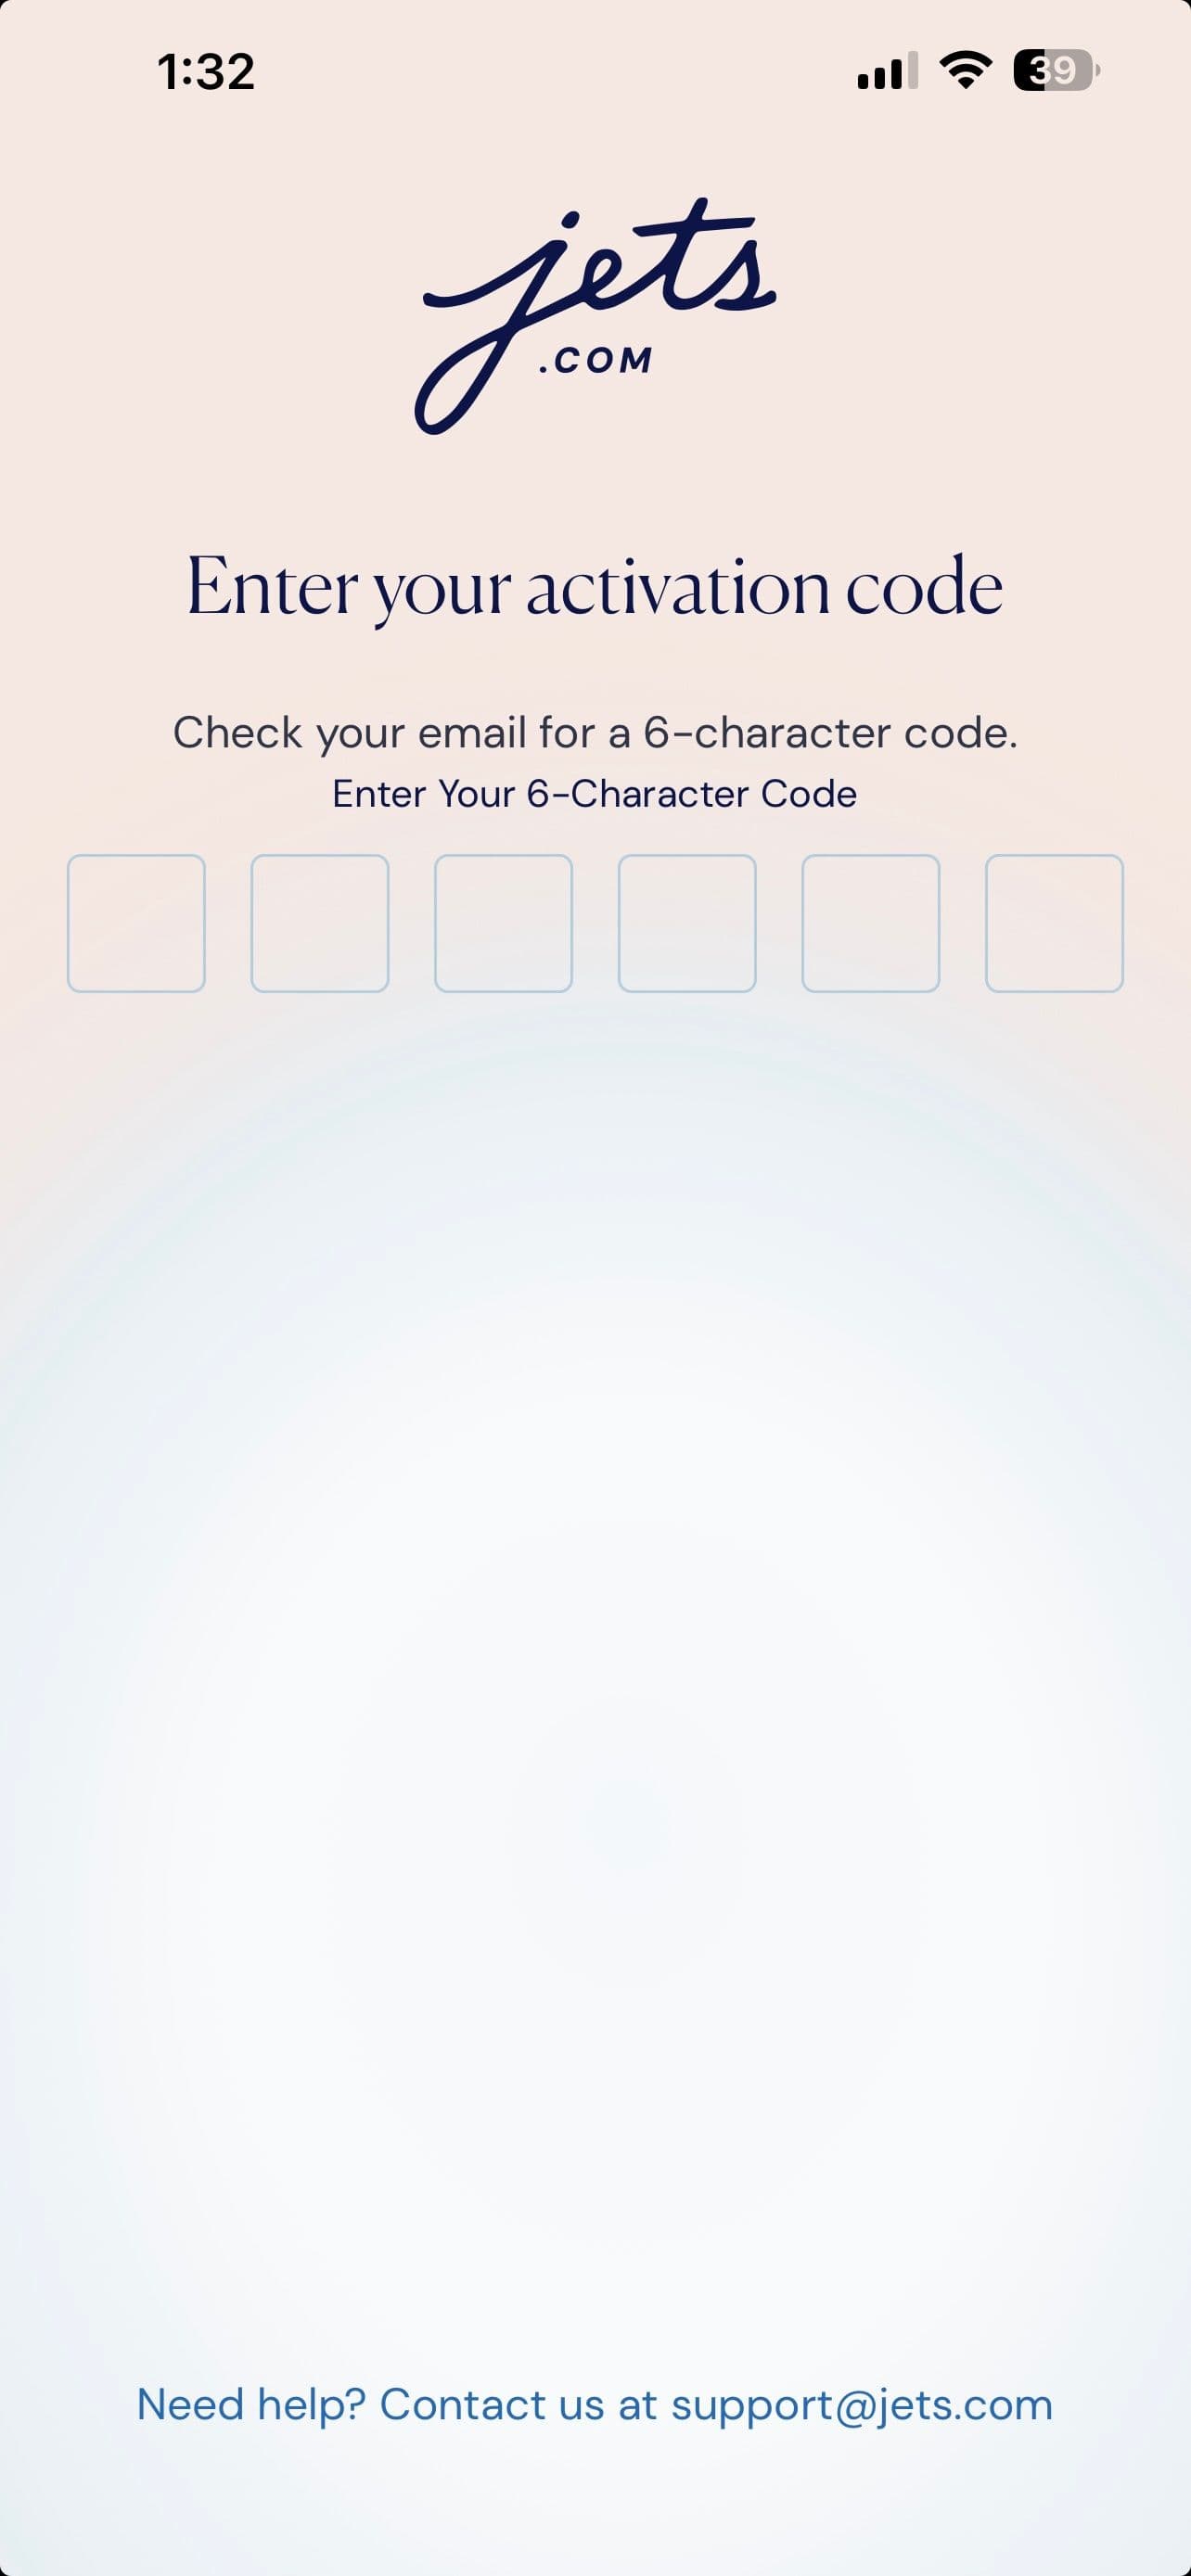
Activation Code
Enter your activation code.
Your welcome email contains a six-character activation code. Enter it manually, or tap Claim Your Account in the email to populate it automatically.
- Your activation code expires after 48 hours.
- Need help? Contact [email protected].
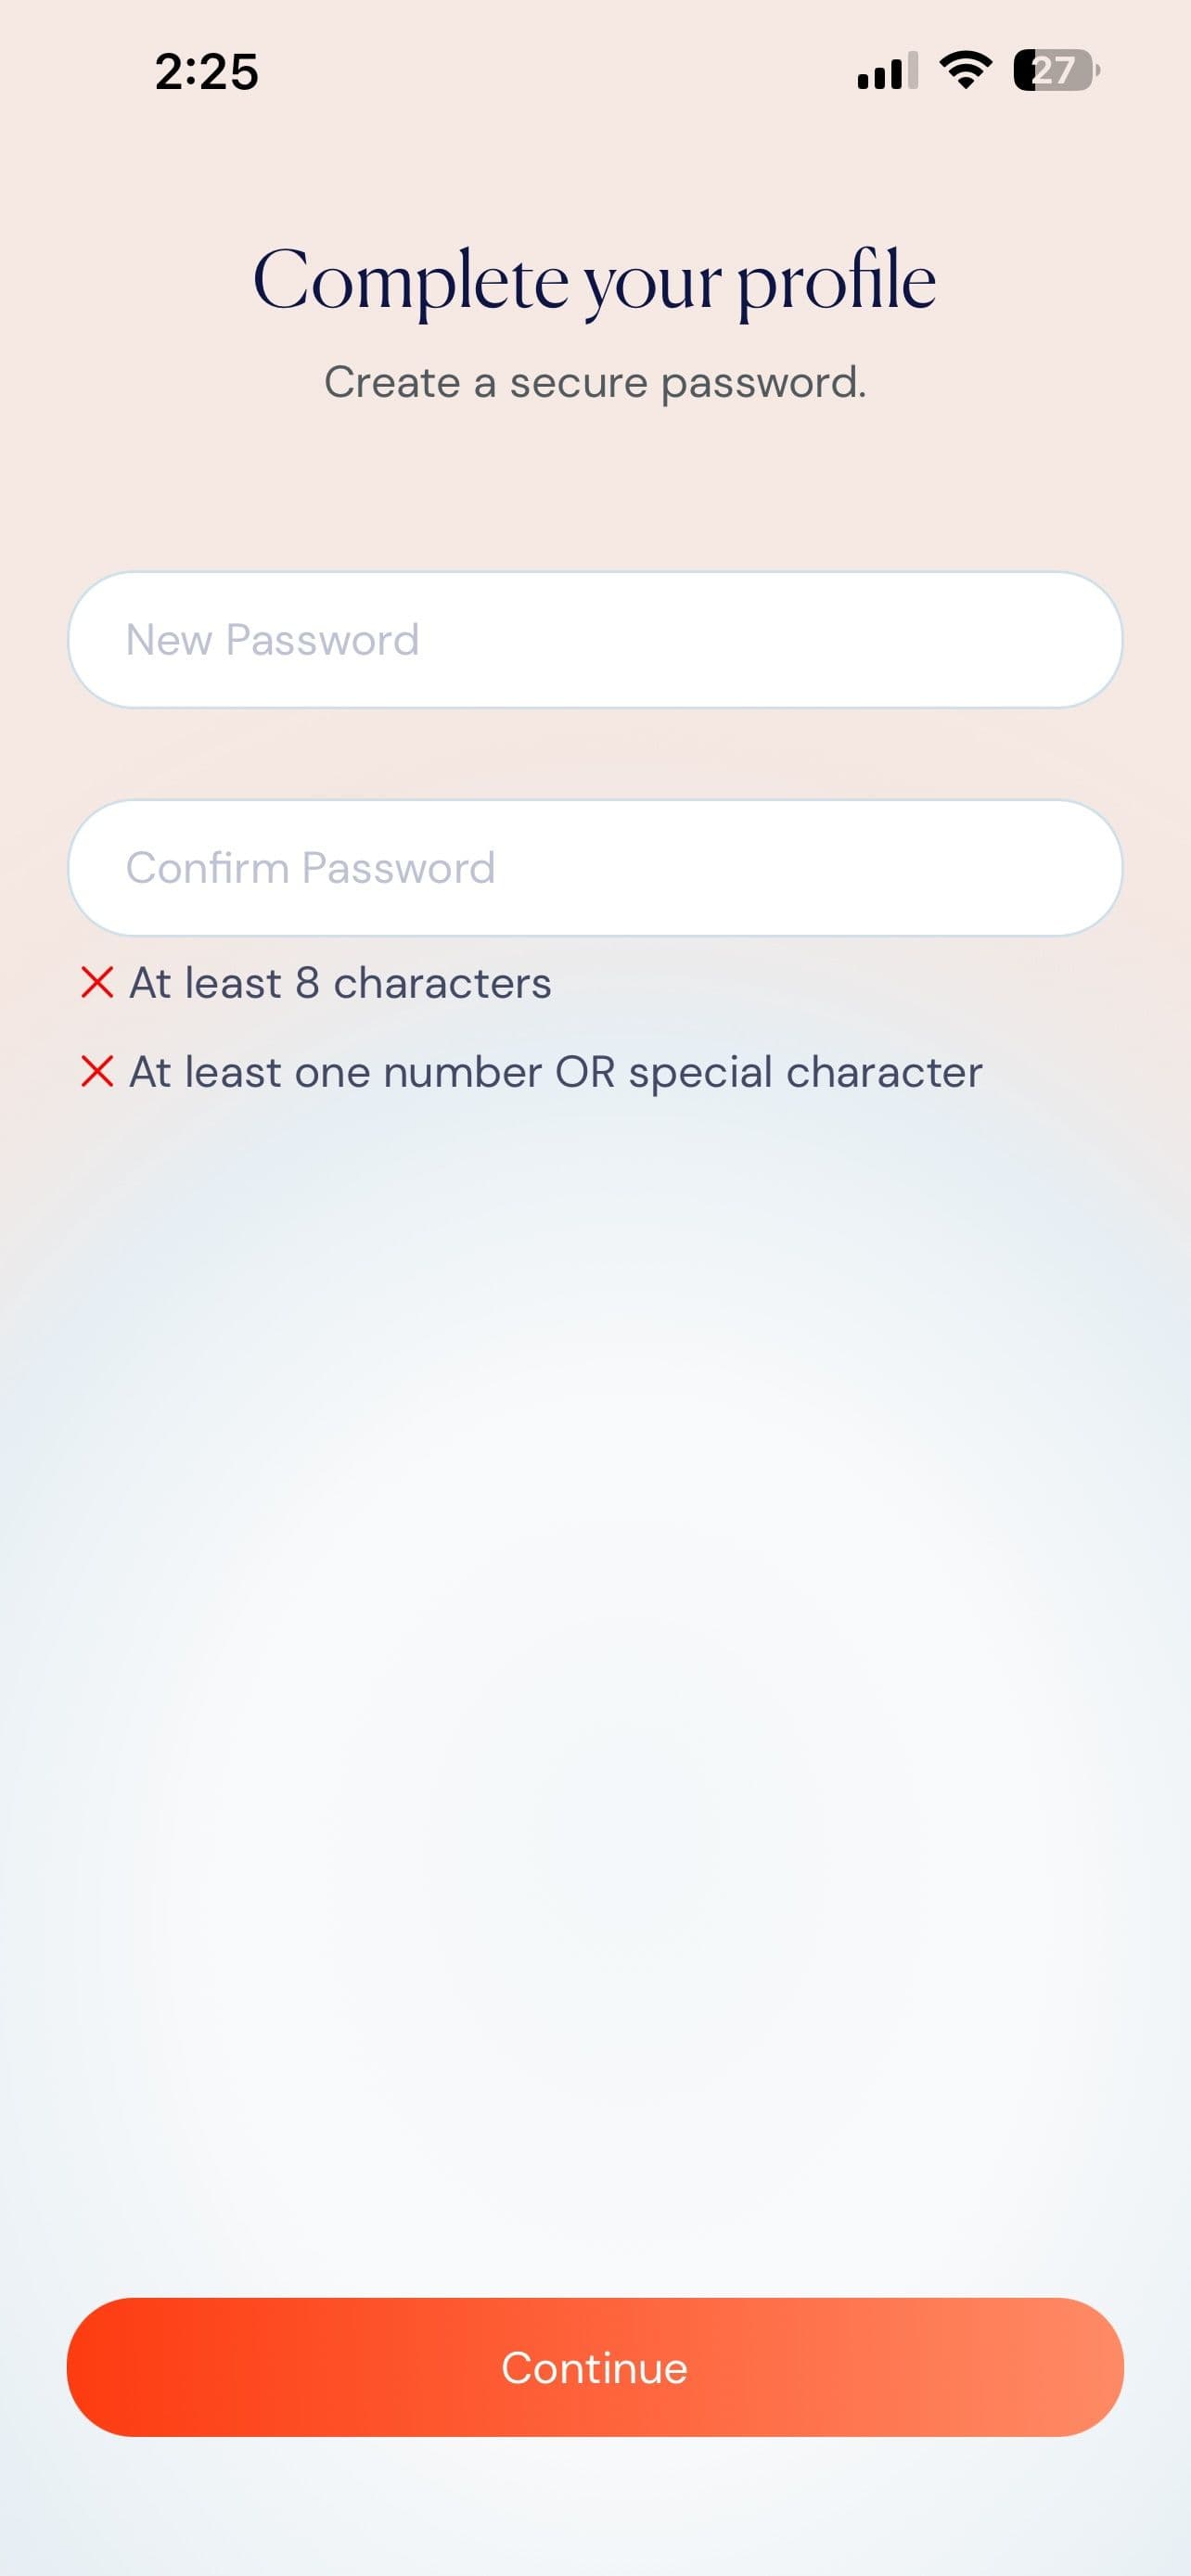
Create Password
Create your password.
Create a secure password to protect your account.
- Minimum of eight characters
- Include at least one number or special character
- Re-enter your password to confirm
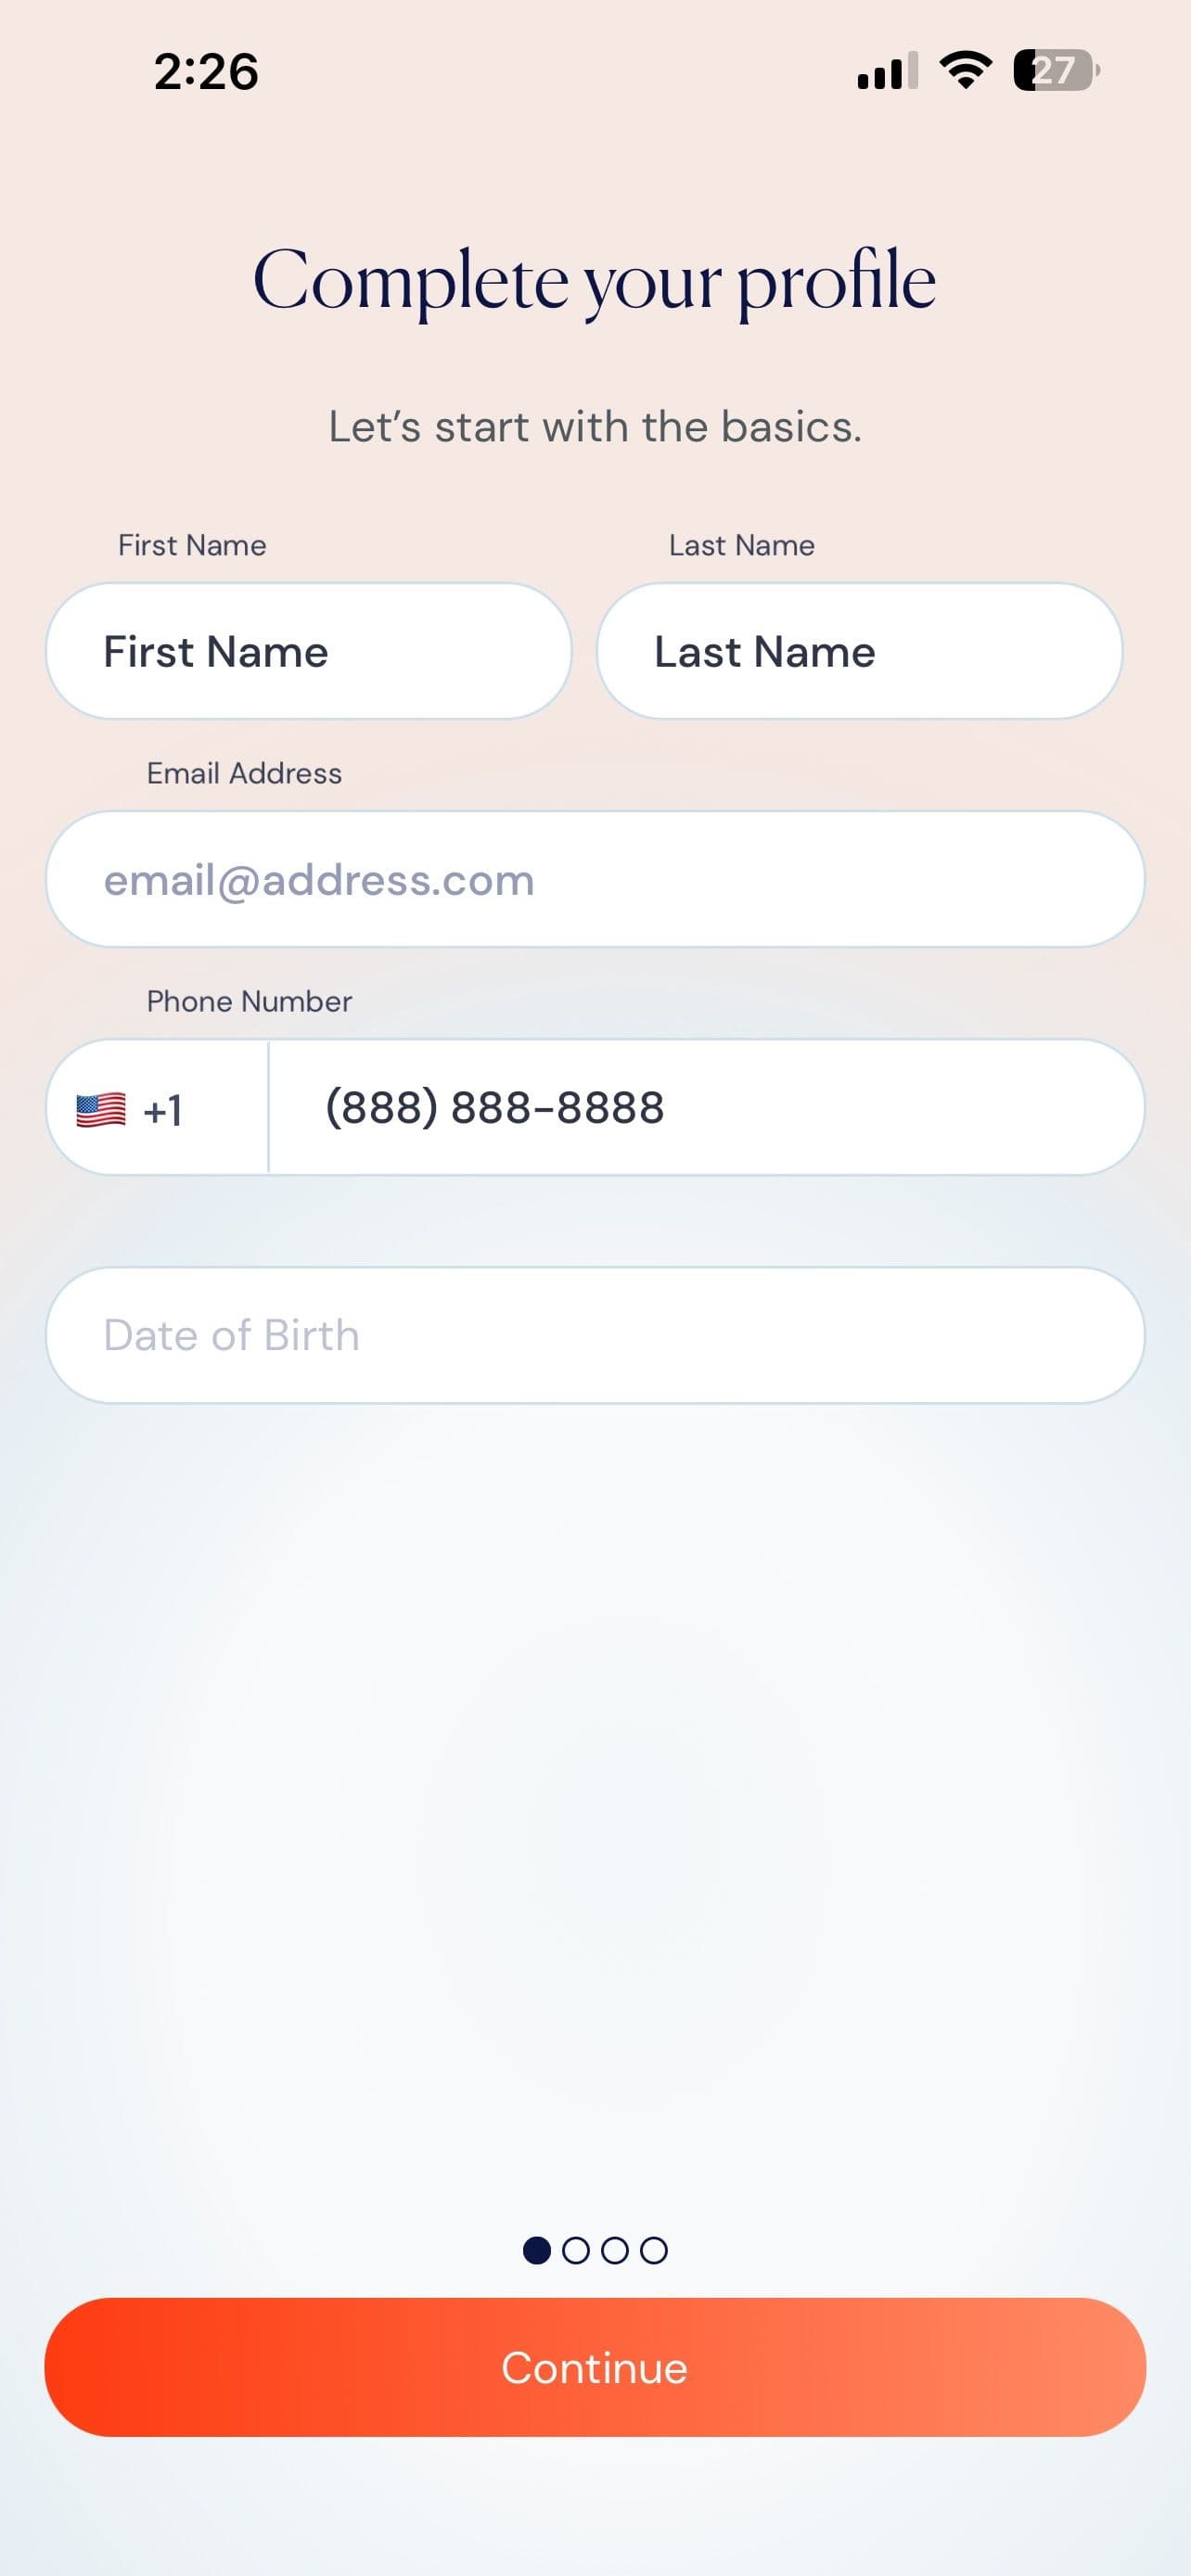
Personal Information
Tell us about yourself.
Enter the information we'll use to manage your account and personalize your travel experience.
- Name
- Email address
- Mobile phone number
- Date of birth
Tip: Once your account is set up, you can enable Face ID or Touch ID for faster, secure sign-in.
Onboarding · Steps 5 – 8
Complete your profile and meet your team.
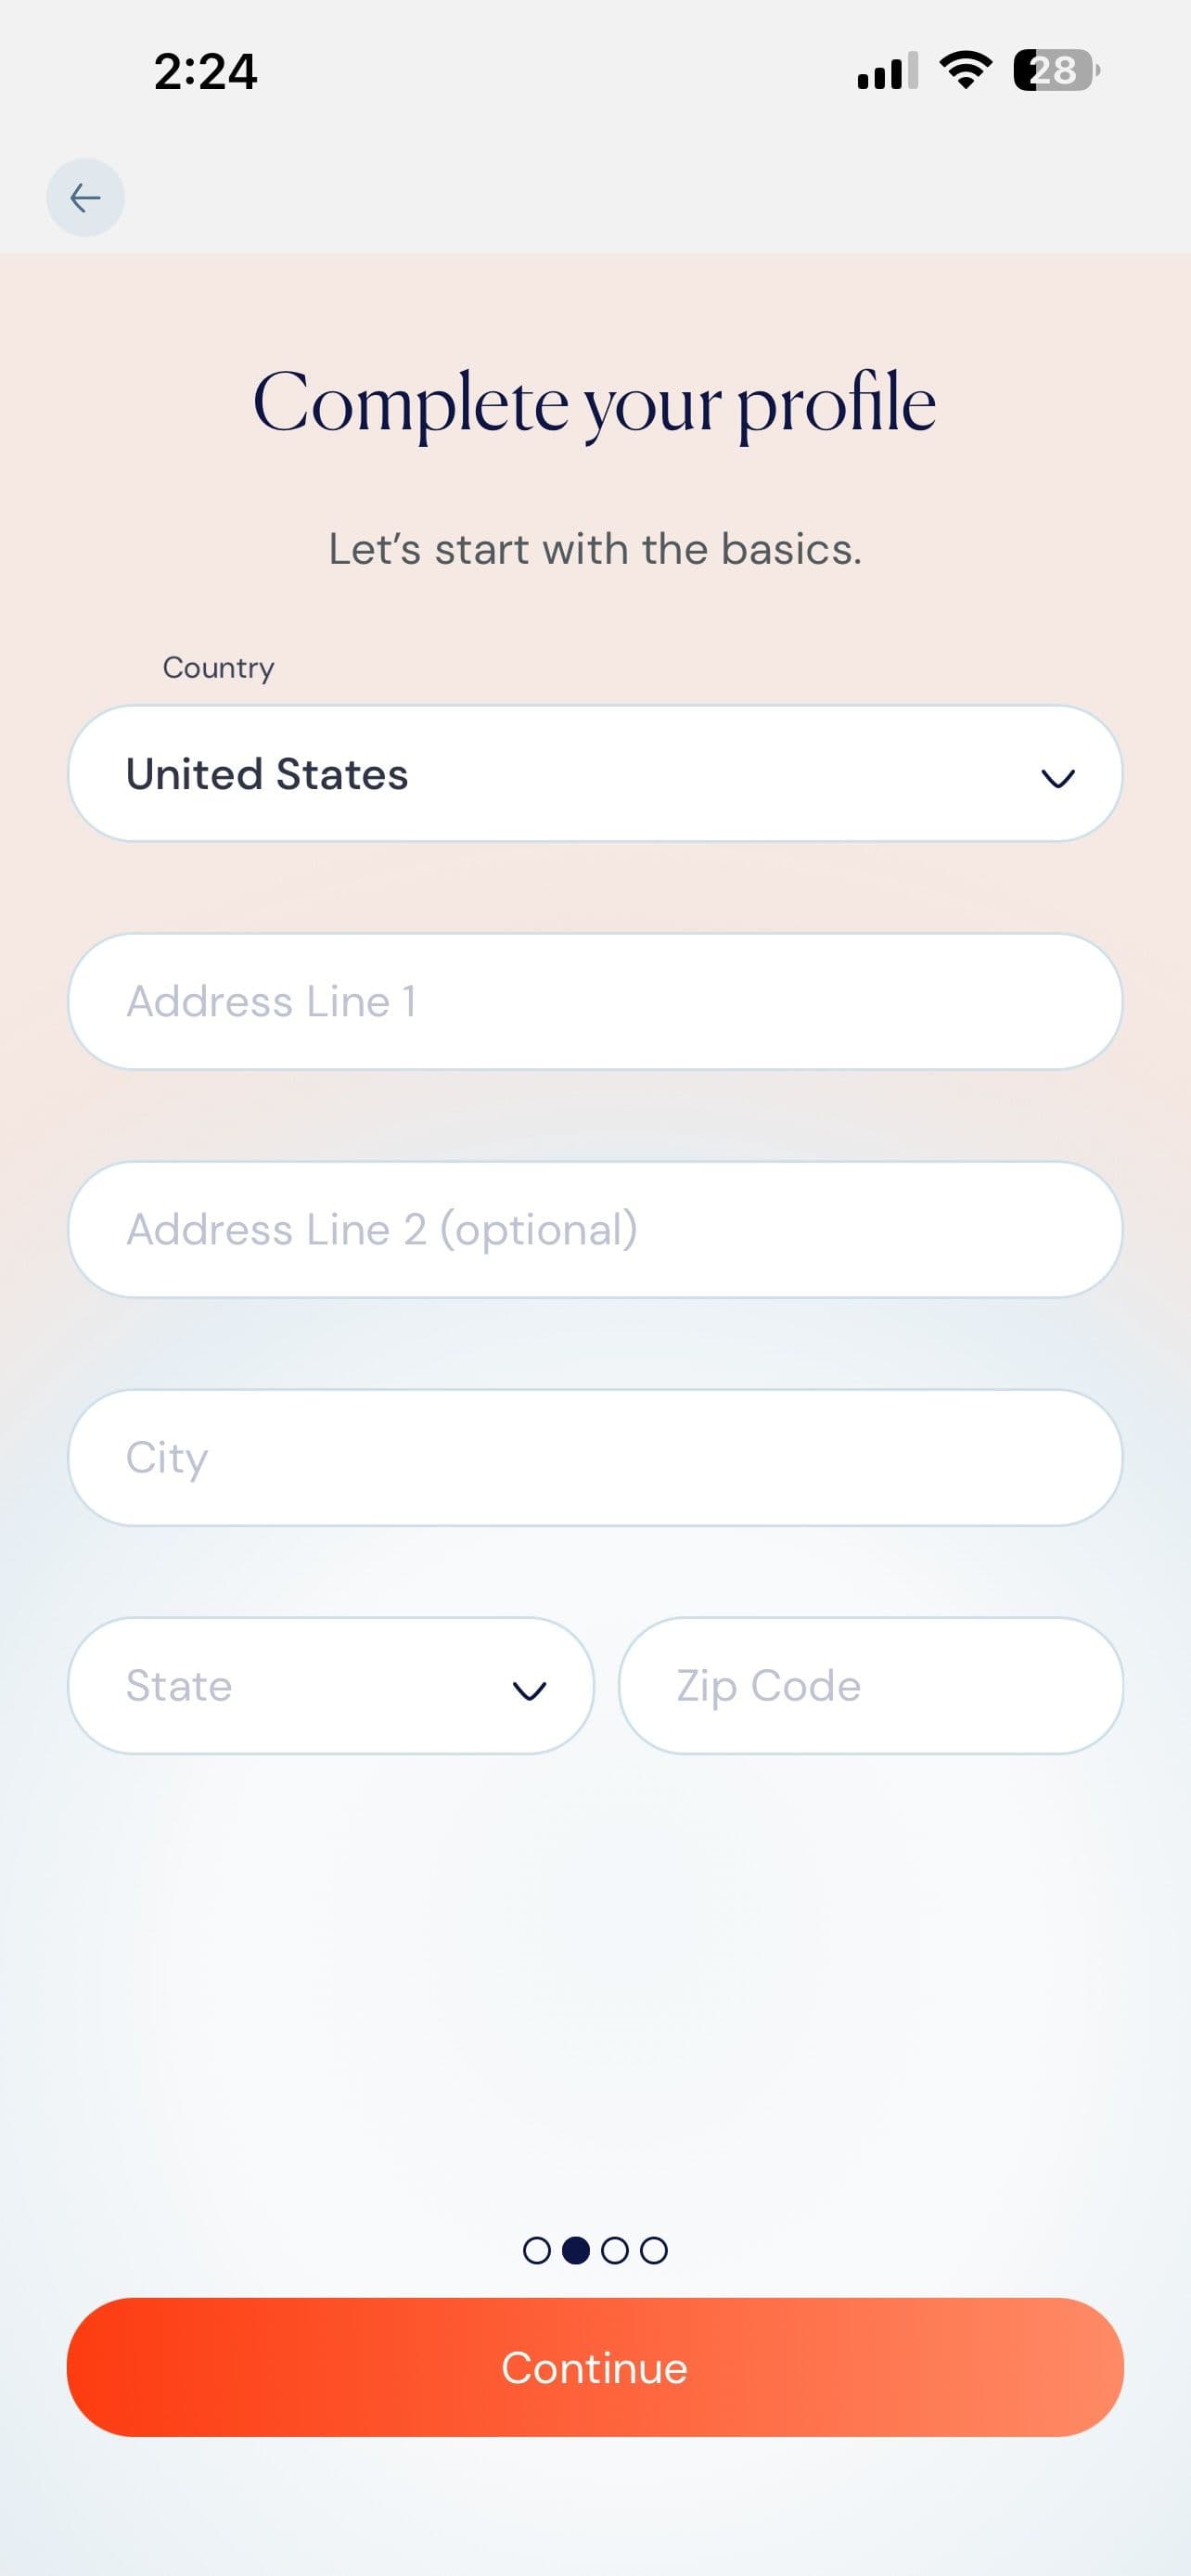
Profile · Address
Confirm your address.
We’ll use this to verify your account and keep your travel information up to date.
- U.S. is selected by default.
- Address Line 2 is optional.
- Review your details before continuing
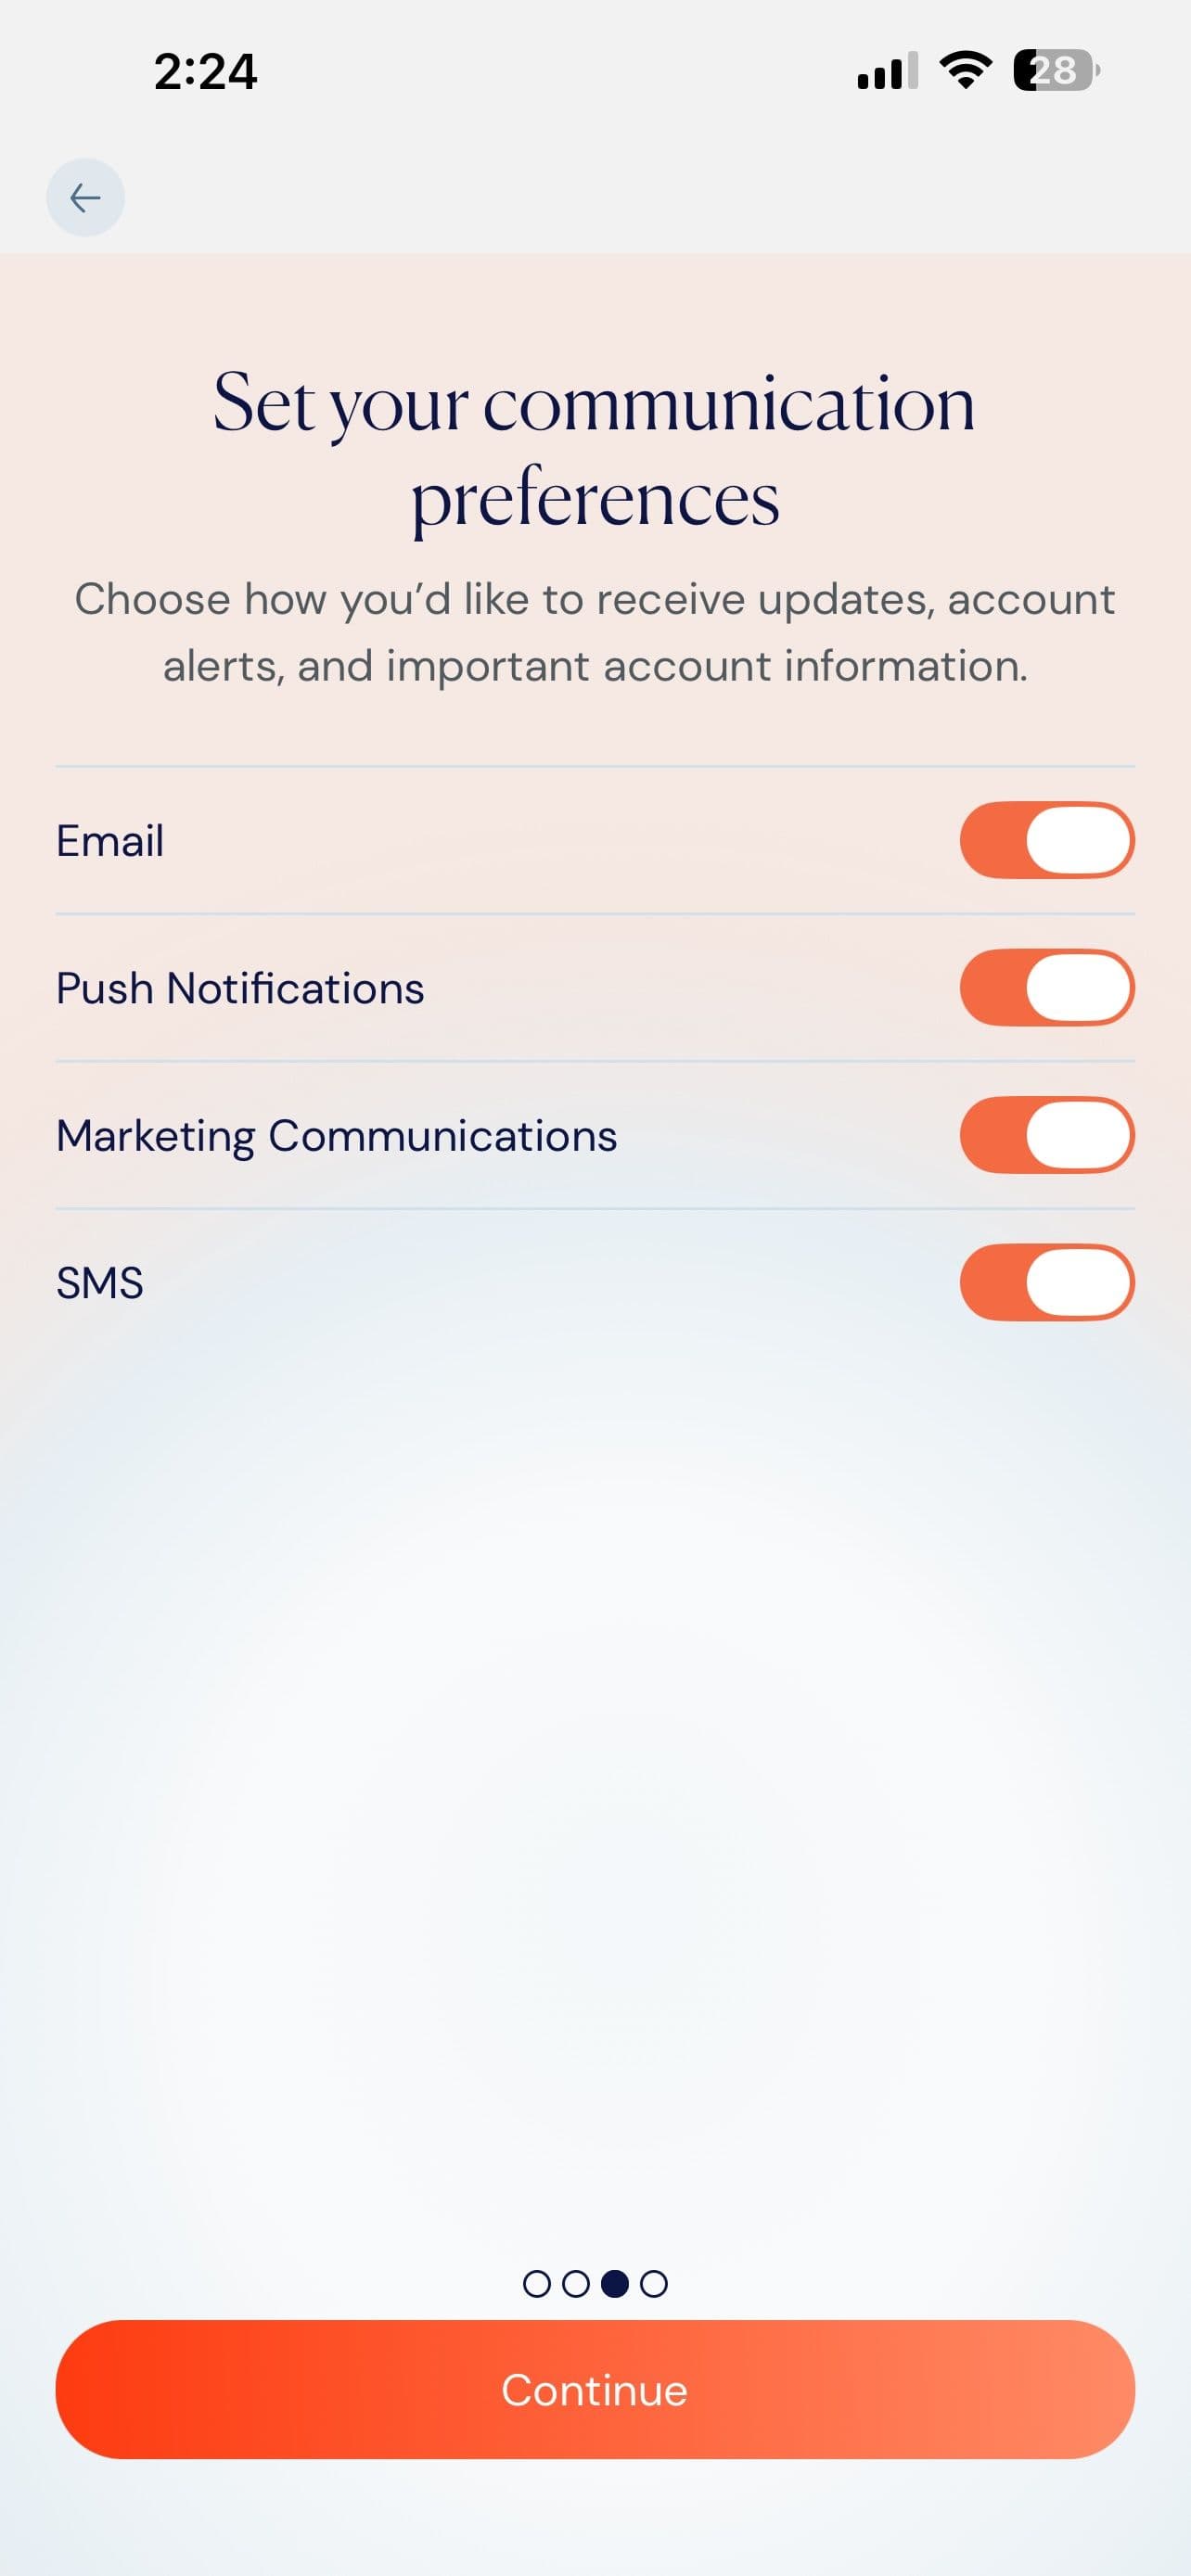
Communication Preferences
Pick your channels.
Choose how you'd like to receive trip updates, account notifications, and optional marketing communications.
- Email – trip confirmations and account updates
- In-App Push Notifications – real-time travel alerts
- SMS & Marketing –offers and news
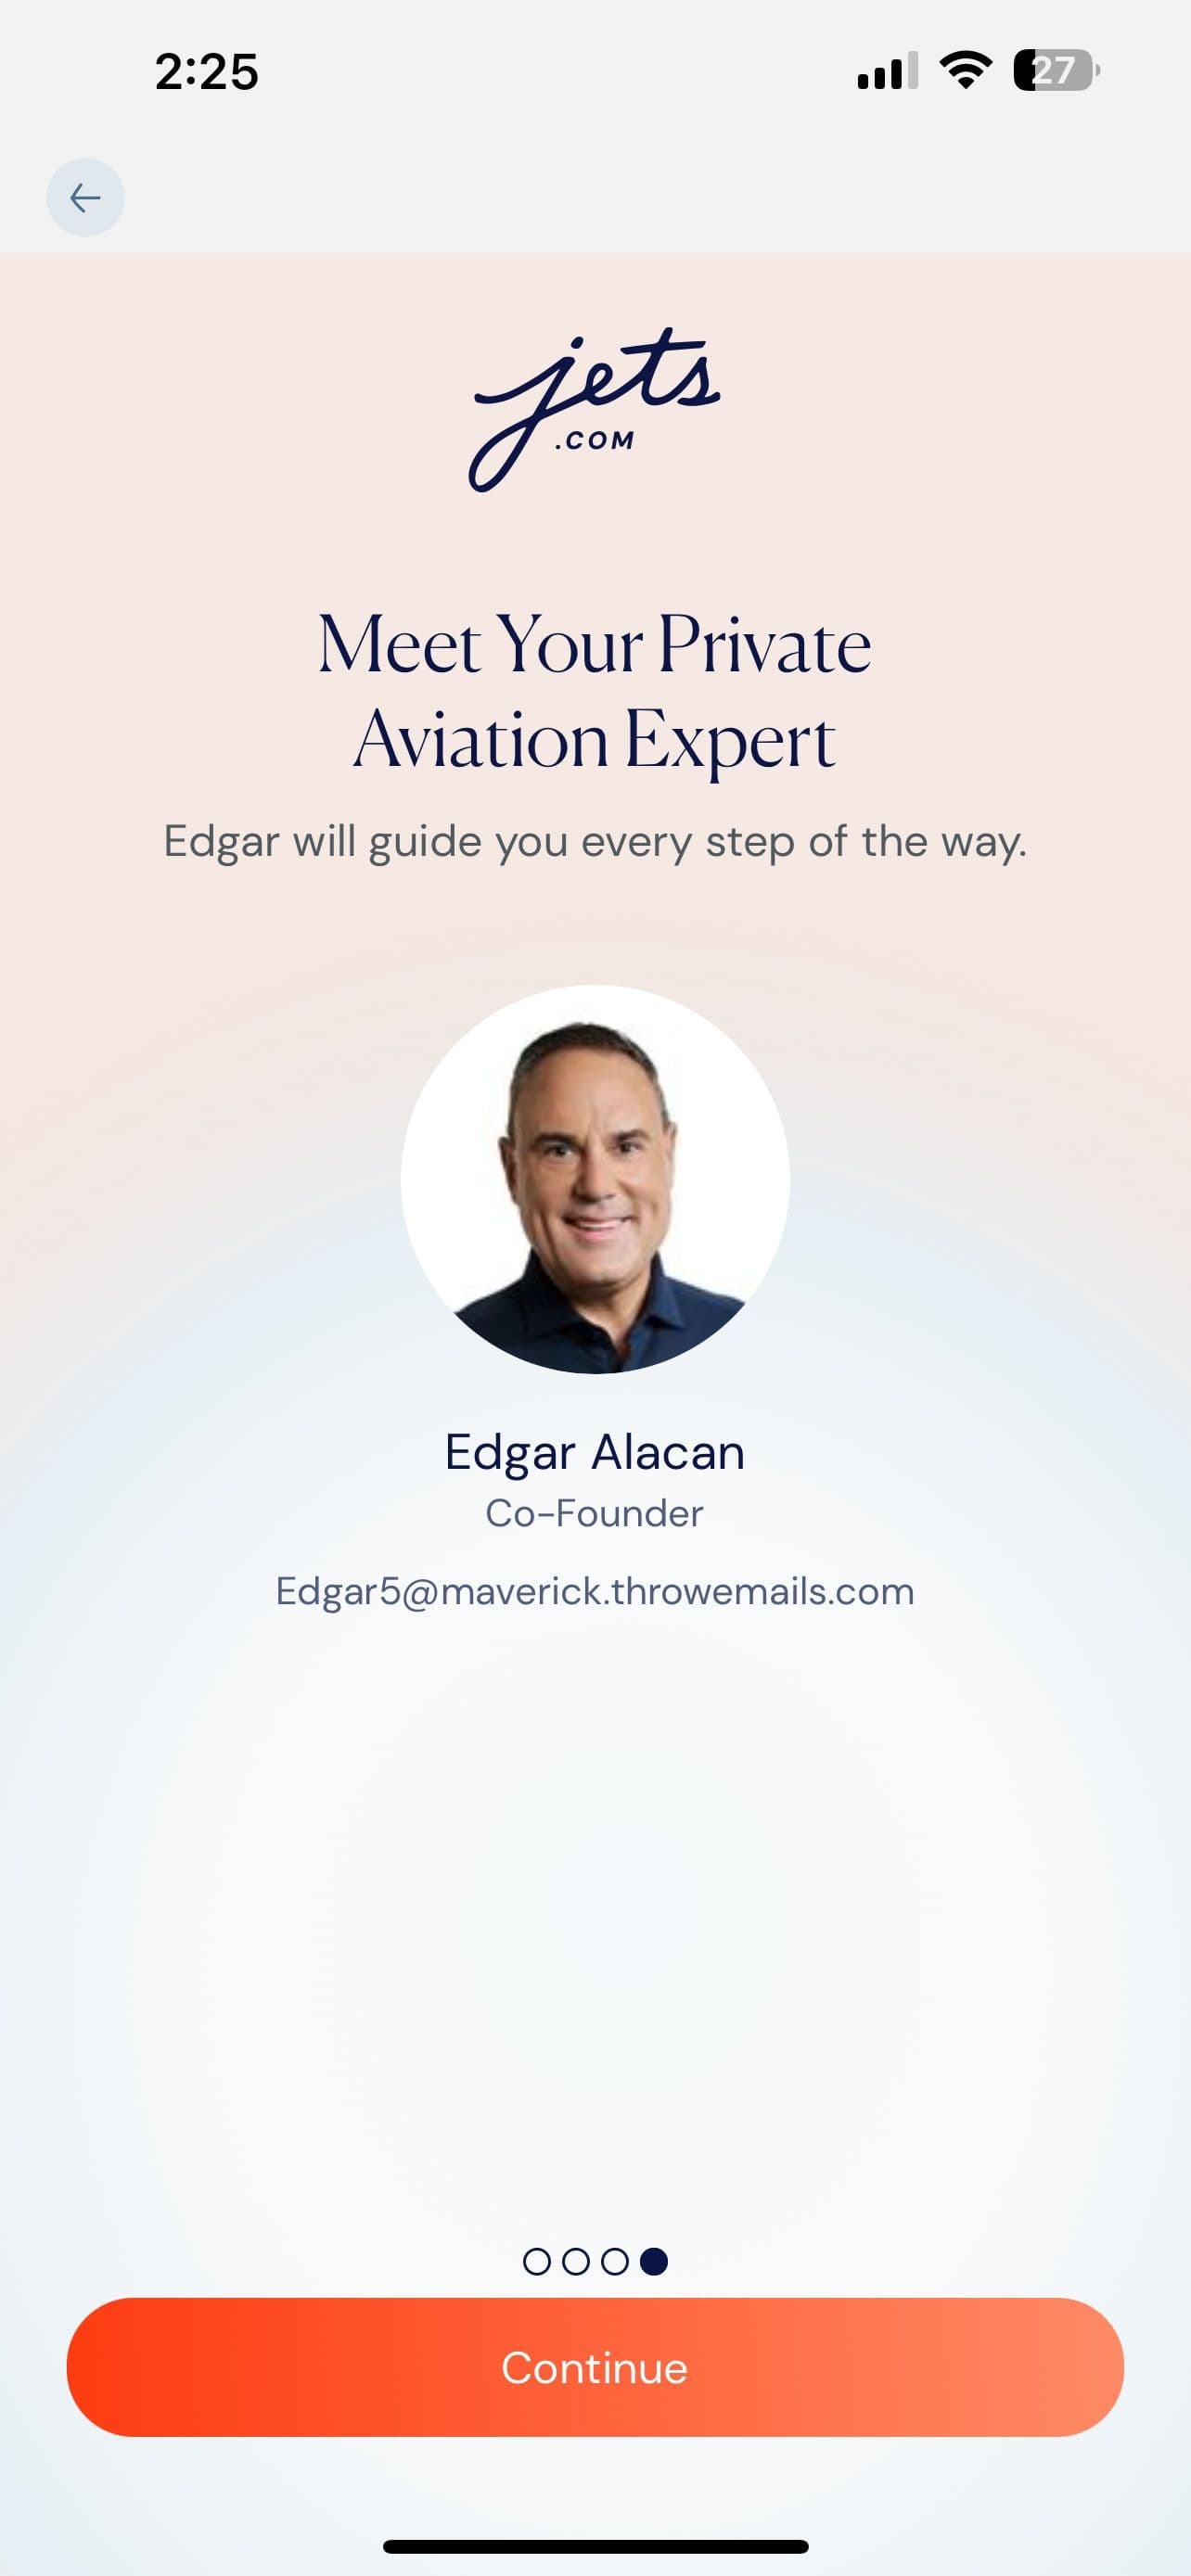
Meet Your Team
Your team is here to help.
Every Jets.com client is supported by a dedicated team committed to making every journey seamless. You'll always know who to reach — just a tap away in the app.
- Your Private Aviation Expert is your primary point of contact.
- Our Client Experience team is always available to support.

Welcome Aboard
Your account is ready.
Congratulations —your account is ready. Tap Continue to finish onboarding and begin exploring the Jets.com app.
- Your profile has been successfully set up.
- Tap Continue to complete setup.
- Your dedicated team is always just a tap away whenever you need assistance.
You're ready to go. From here, everything starts on the Home screen. Whether you're requesting a Jet Card flight or an on-demand charter, booking your next journey is just a tap away.
Request a Jet Card Flight
For Access Pass and Access+ Jet Card holders, requesting a flight is simple. Select your trip details, add any preferences, choose your aircraft, and review your request before submitting. Your trip will be priced using your Jet Card’s fixed hourly rate and deducted from your available flight hours or funds. Once submitted, you’ll see your trip summary and updated balance right in the app.
Jet Card Trip Booking · Steps 1 – 3
Start from the Home screen, then select the Jet Card you'd like to use for your trip.
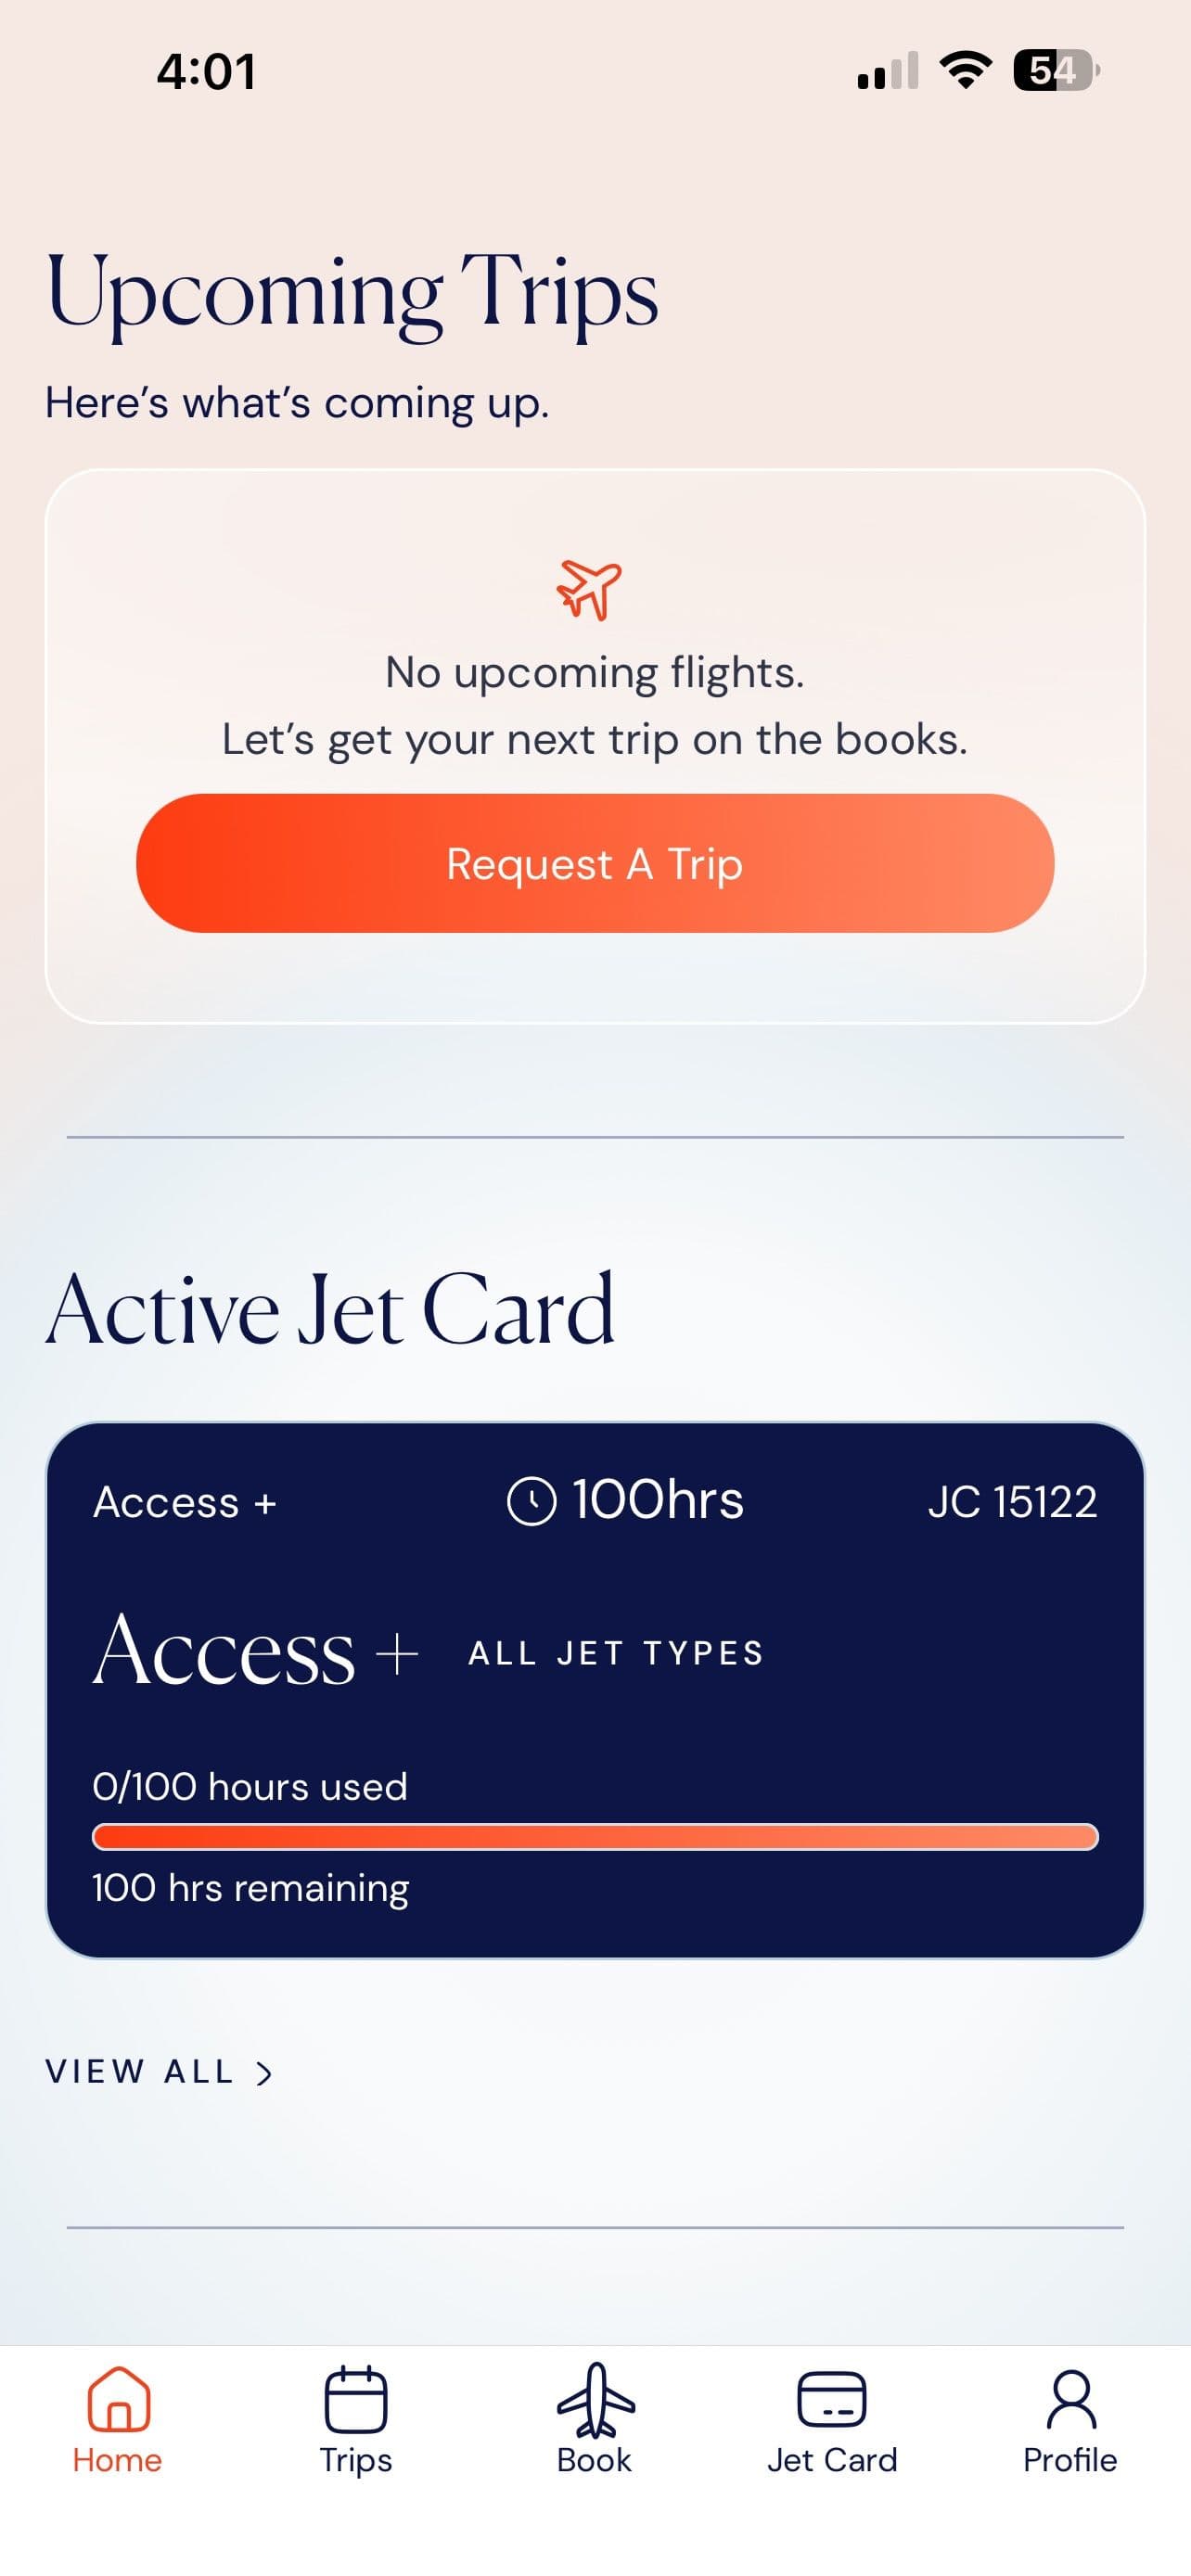
Getting Started
Start from your Home screen.
Your Home Screen gives you quick access to upcoming trips and your Active Jet Cards. Tap Request a Trip to begin.
- View upcoming trips.
- Check your remaining hours.
- Tap View All for additional Jet Cards.
- Tap Request a Trip to start booking.
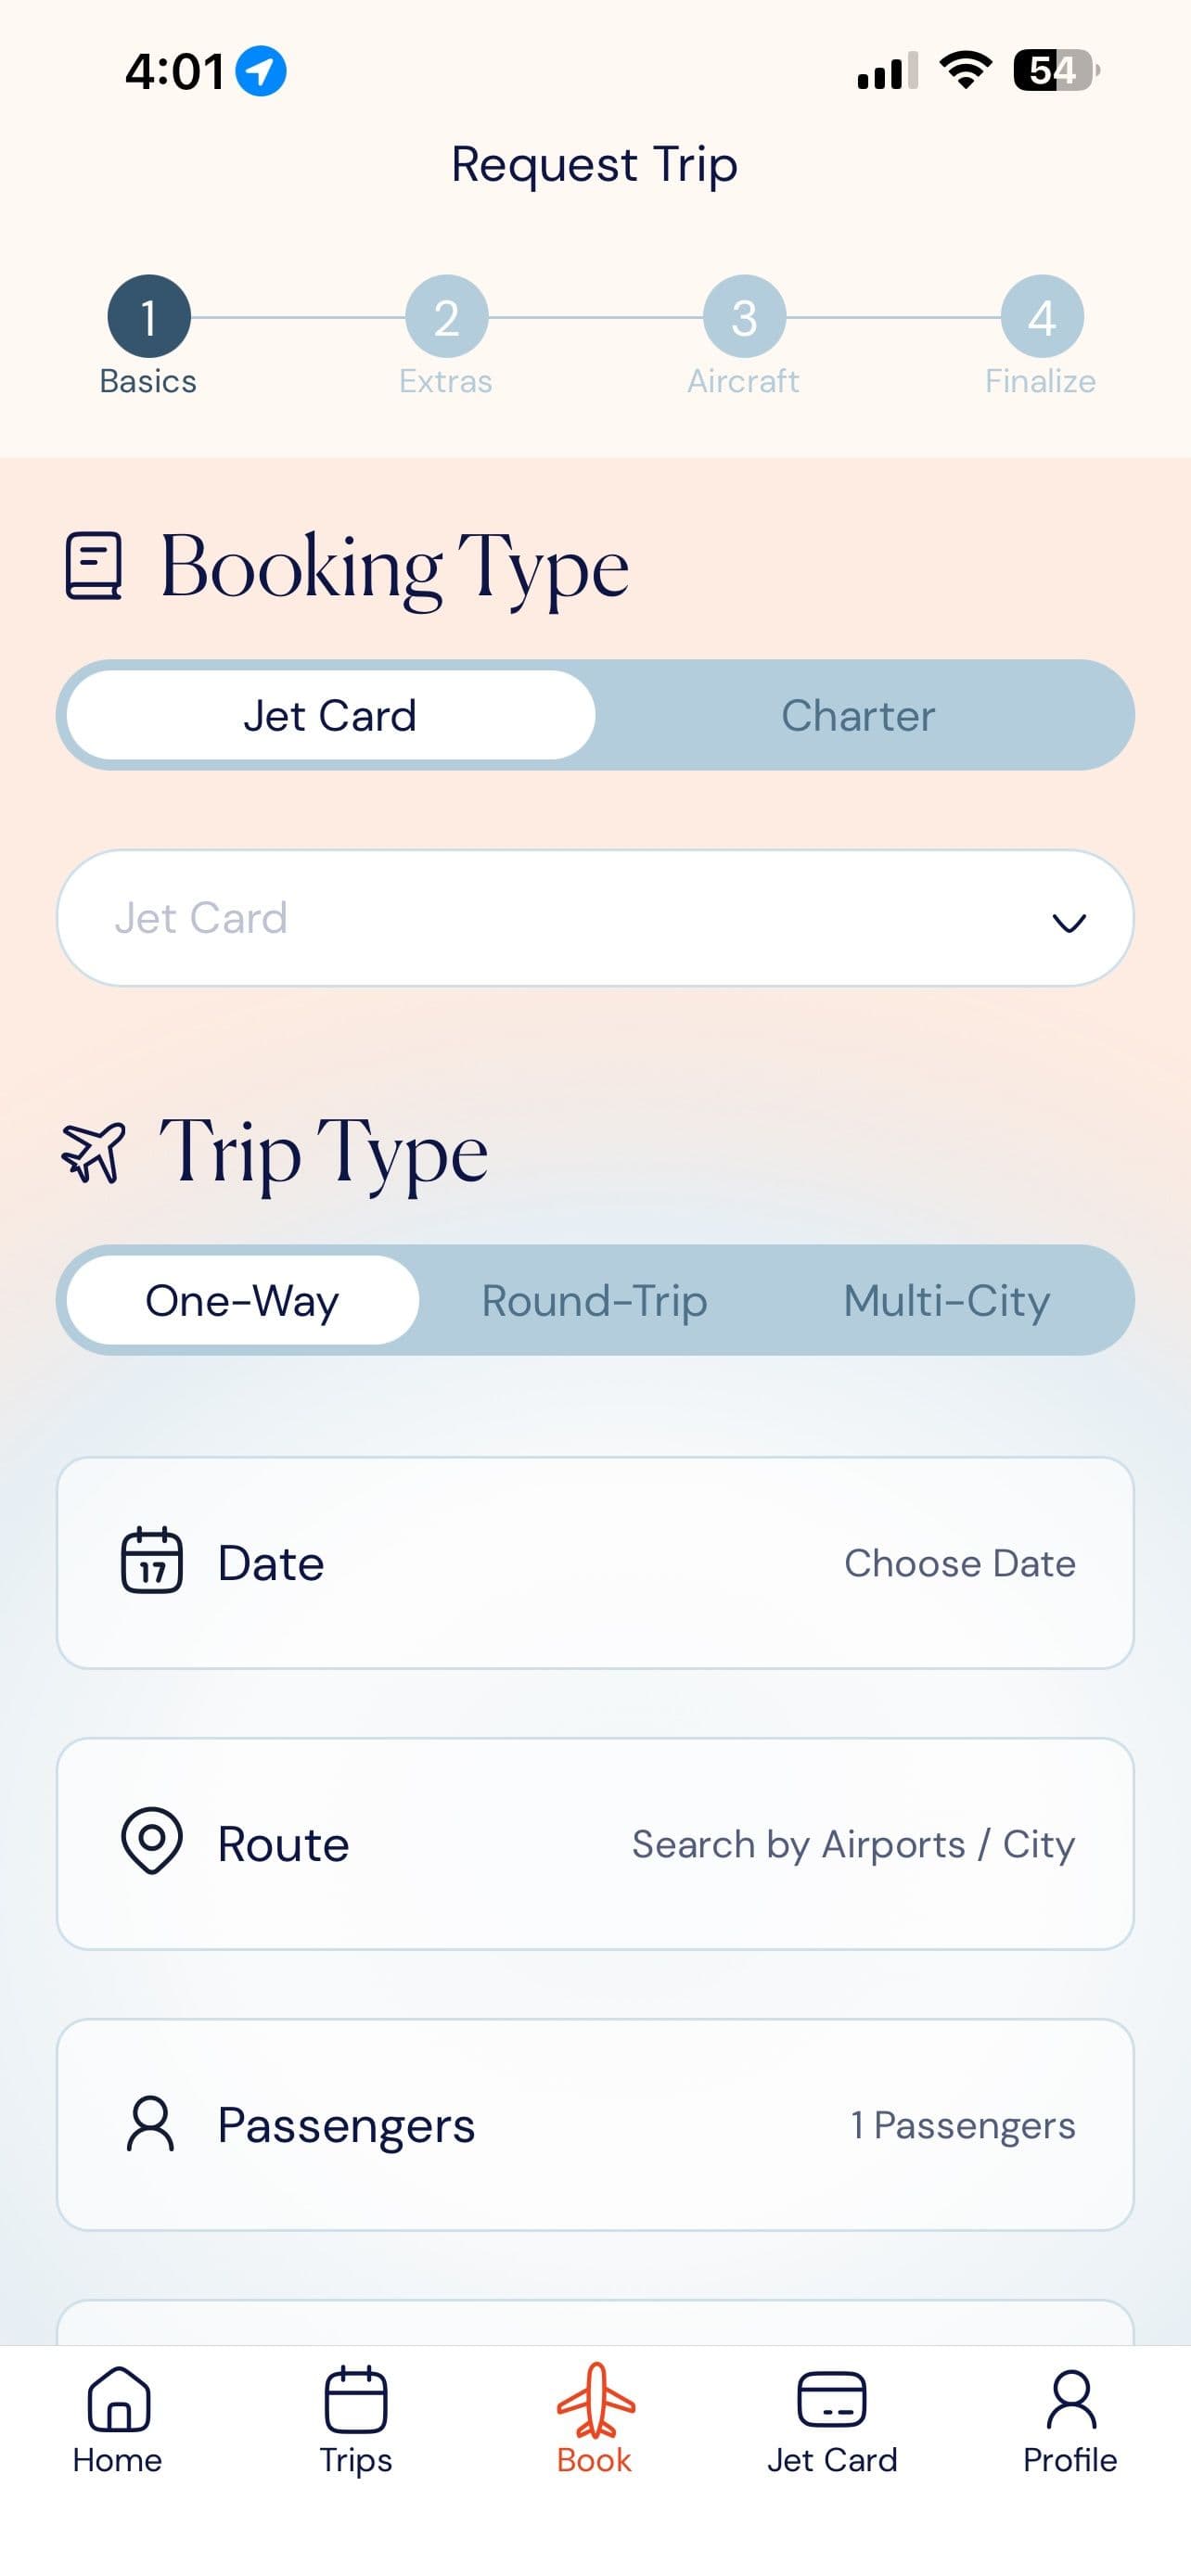
Booking Type
Booking with a Jet Card.
Begin by selecting Jet Card as your booking type, then choose the Card you'd like to use.
- Confirm Jet Card is selected.
- Select the Card you'd like to use to book.
- Trip Type, Date, Route, Passengers and Time appear below.
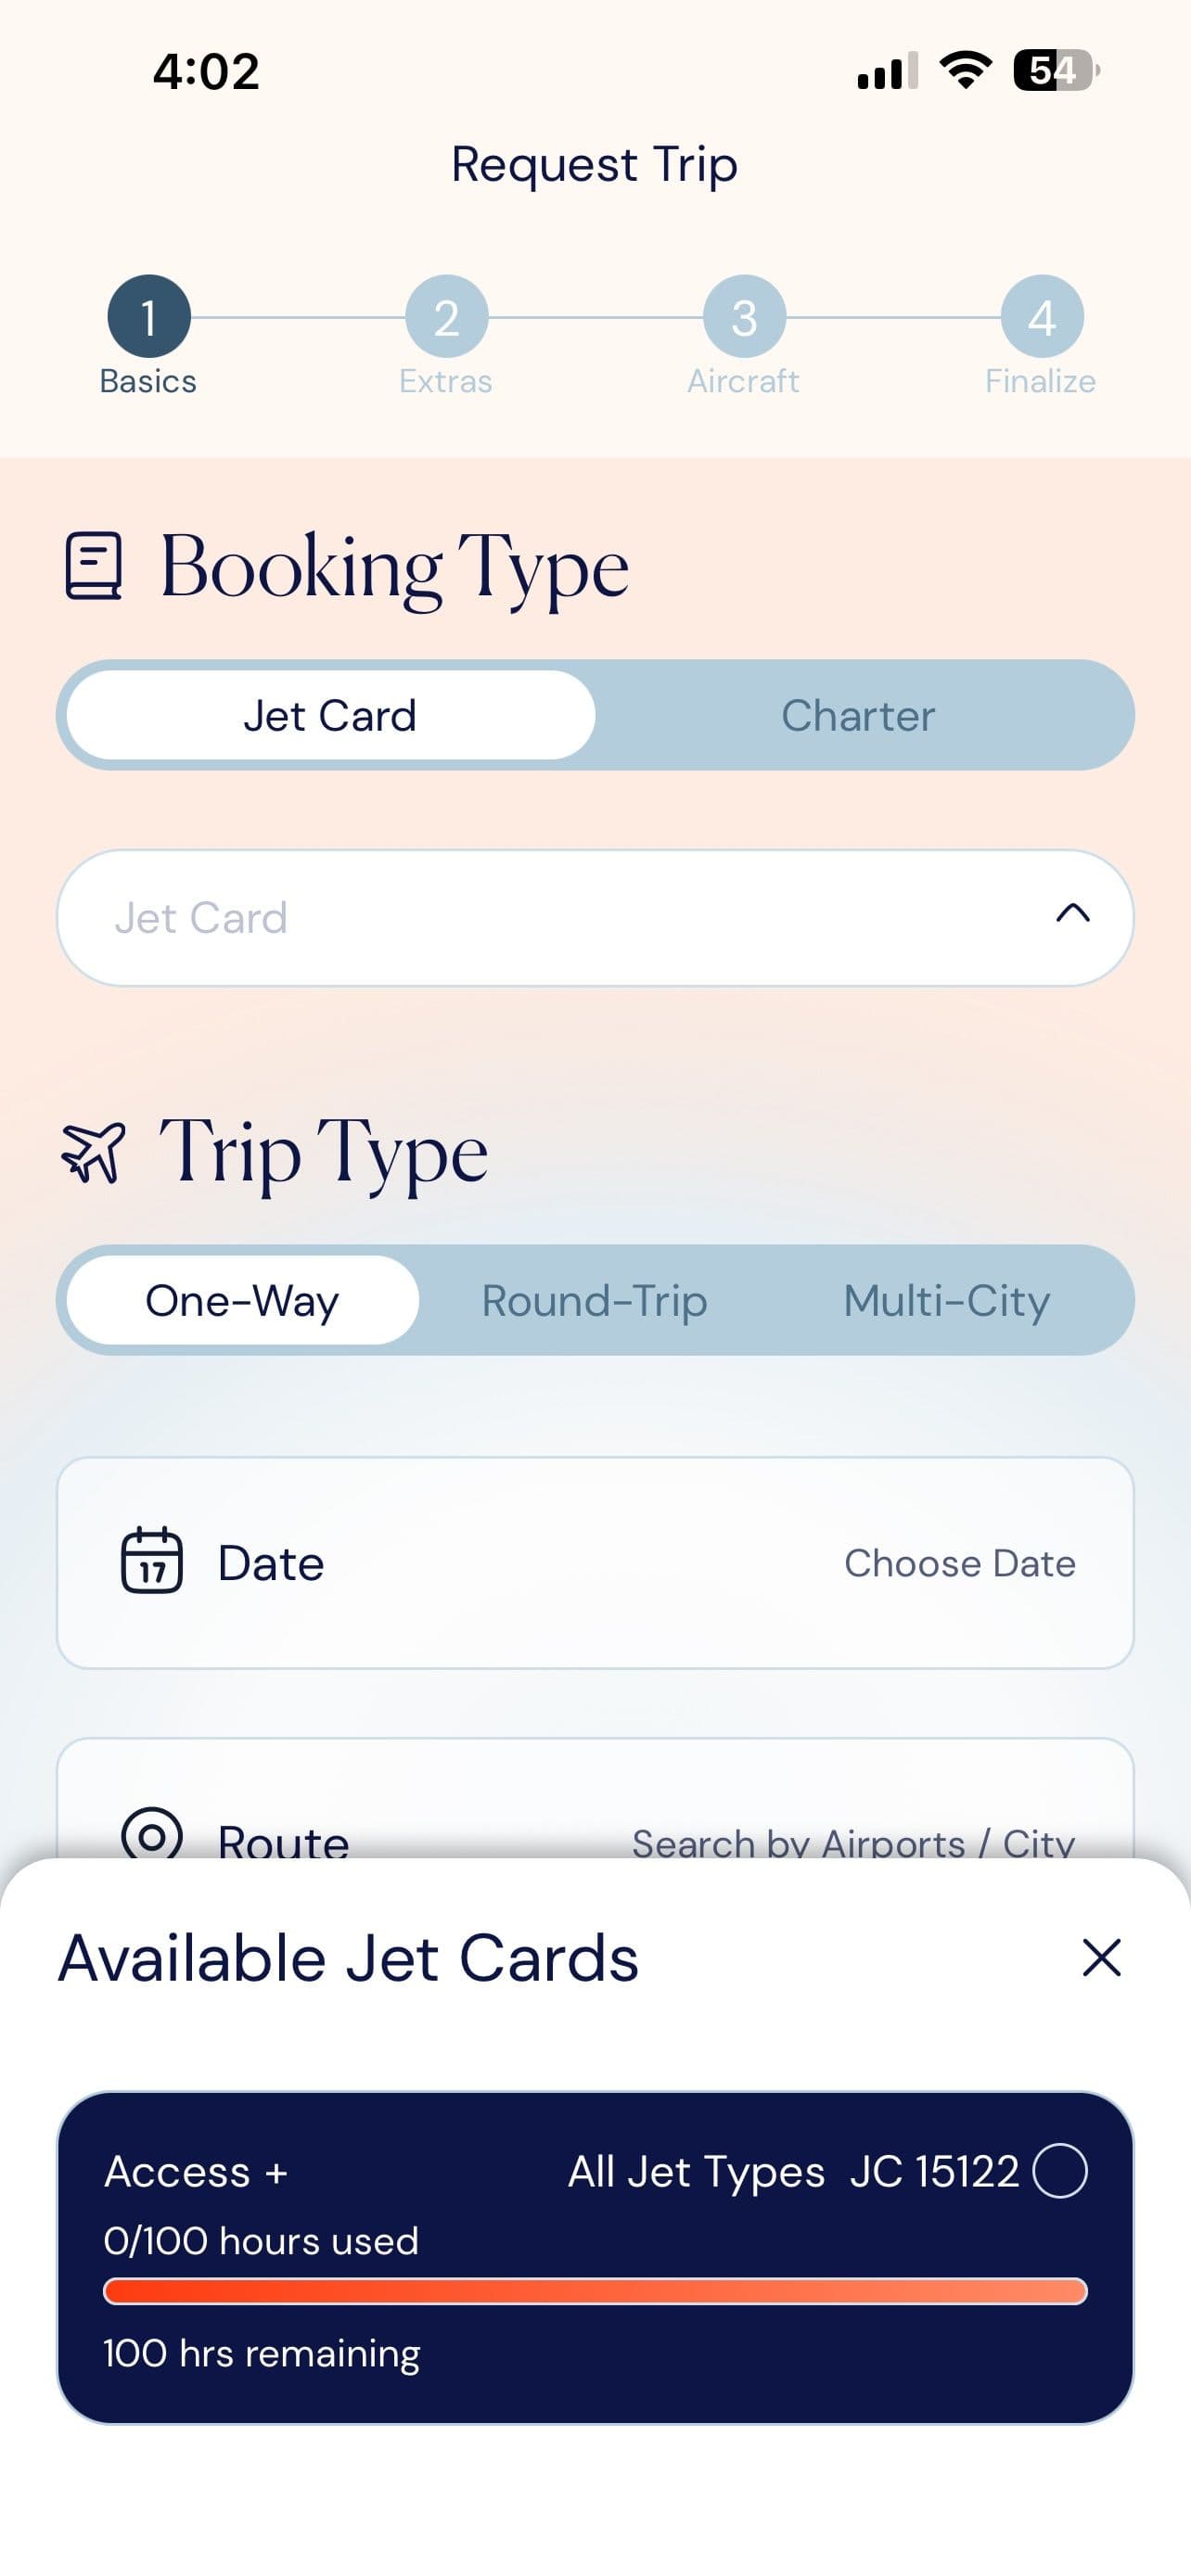
Available Jet Cards
Select your card.
All of your available Jet Cards appear in a list. Each Card displays your remaining hours and Card details to help you choose.
- Tap a card to select it.
- You can switch Cards anytime before confirming your trip.
Jet Card Trip Booking · Steps 4 – 7
Choose your travel date, route, and preferences.
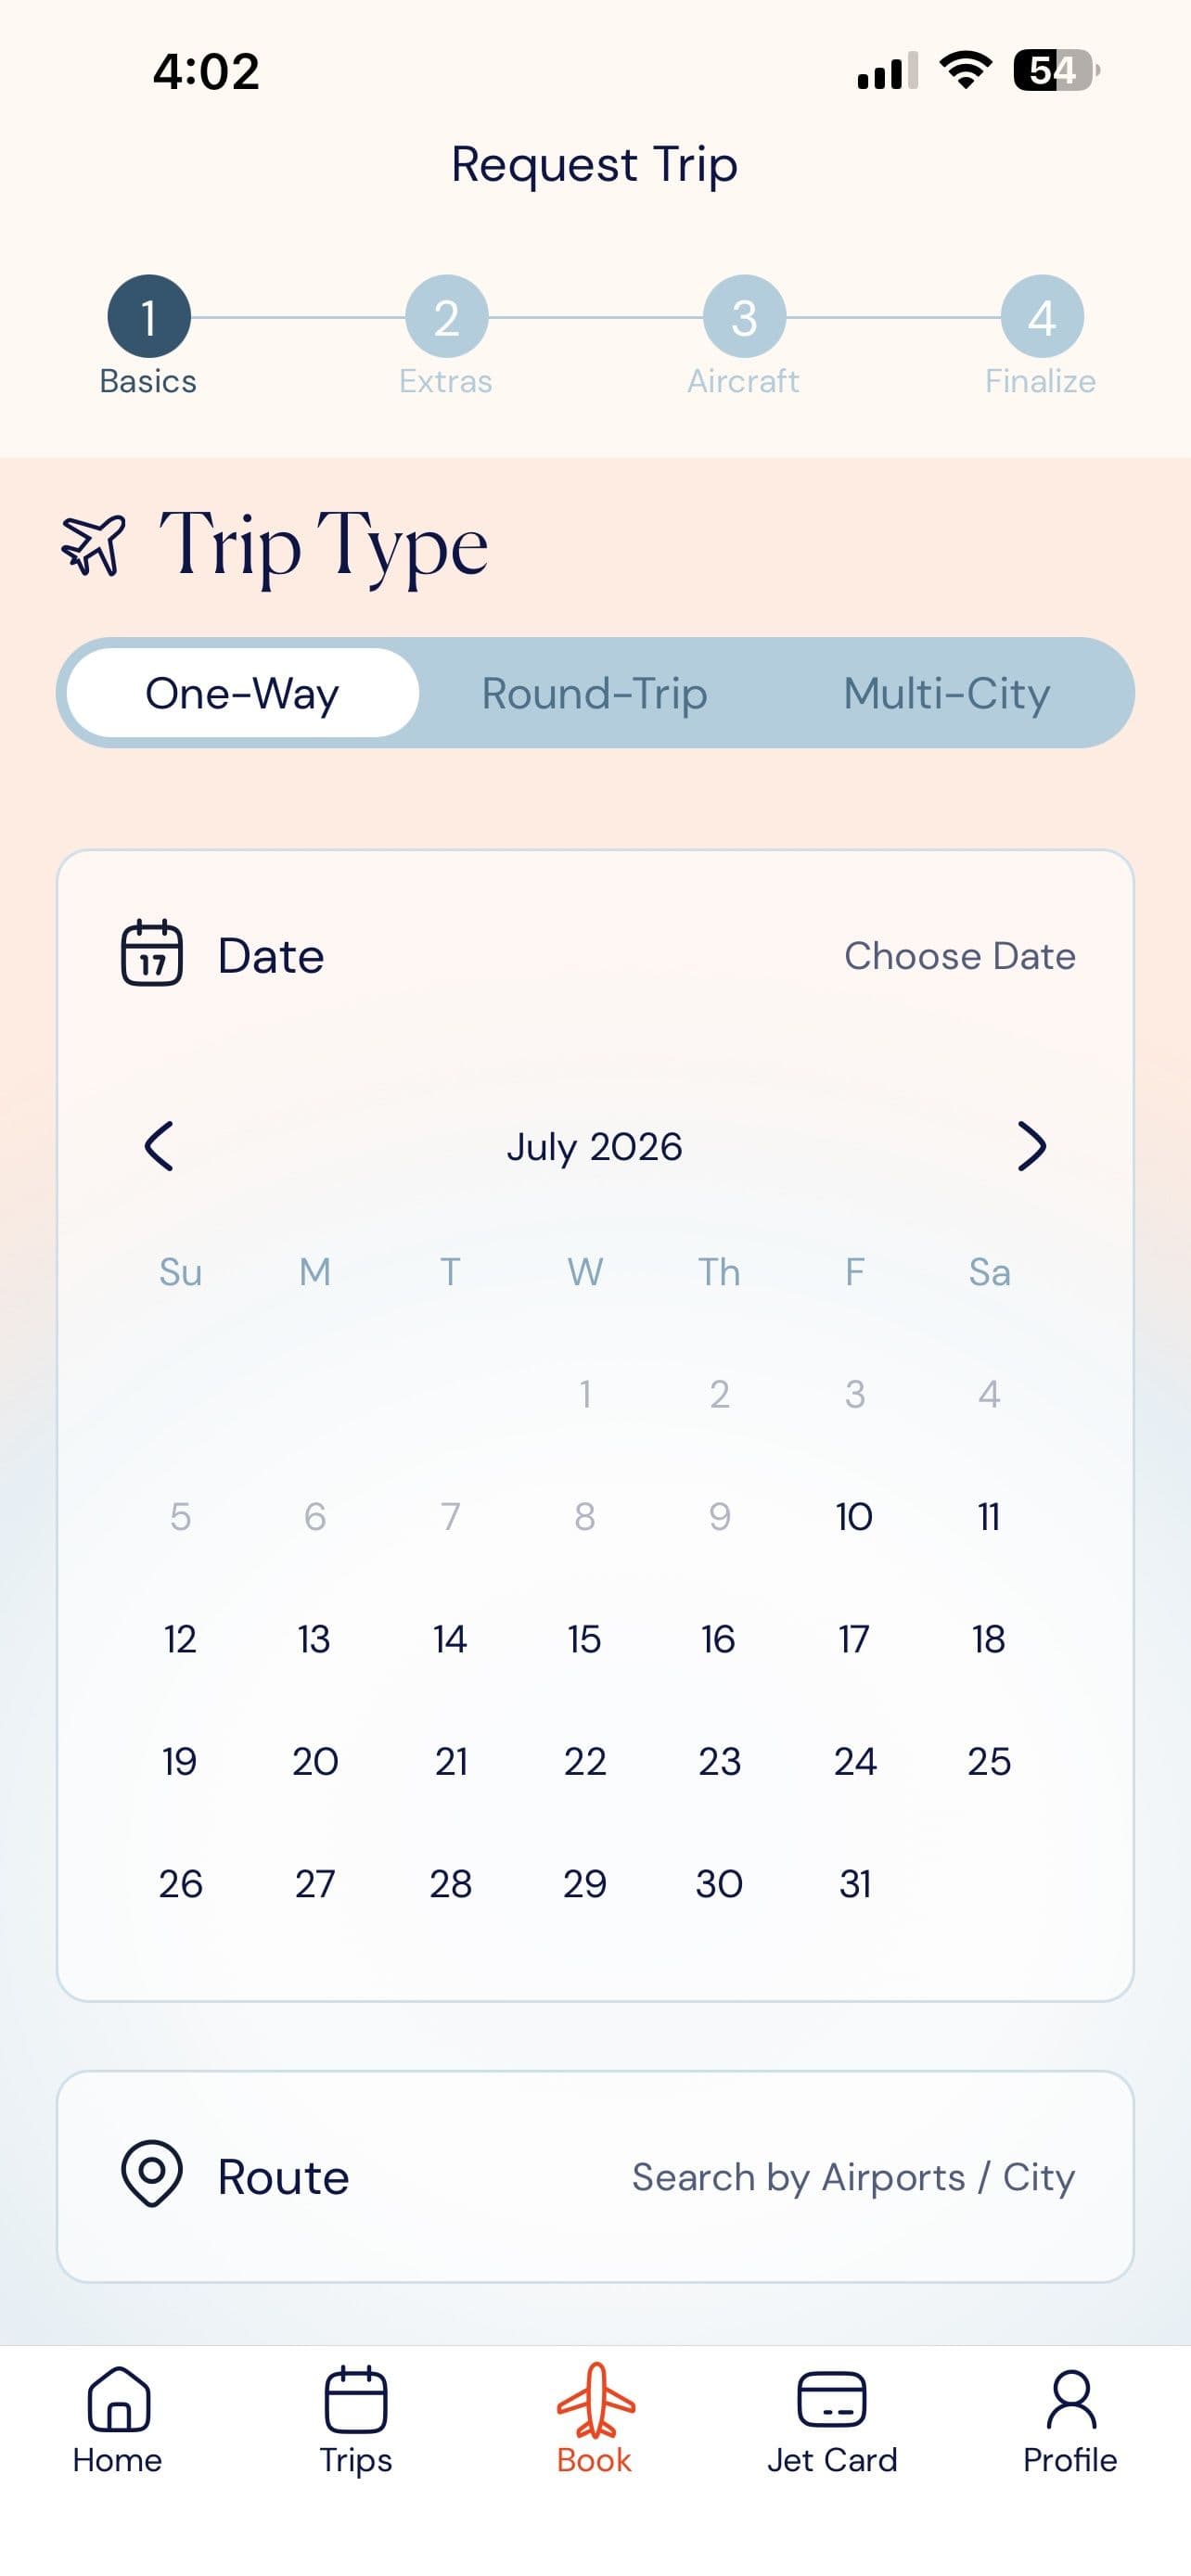
Basics: Travel Date
Choose your travel date.
Select your departure date to open the calendar.
- Choose your departure date.
- Round-trip bookings require both departure and return dates.
- If your departure is within 24 hours of your Jet Card's required booking notice, the trip must be completed with the assistance of your Private Aviation Expert rather than through the app.
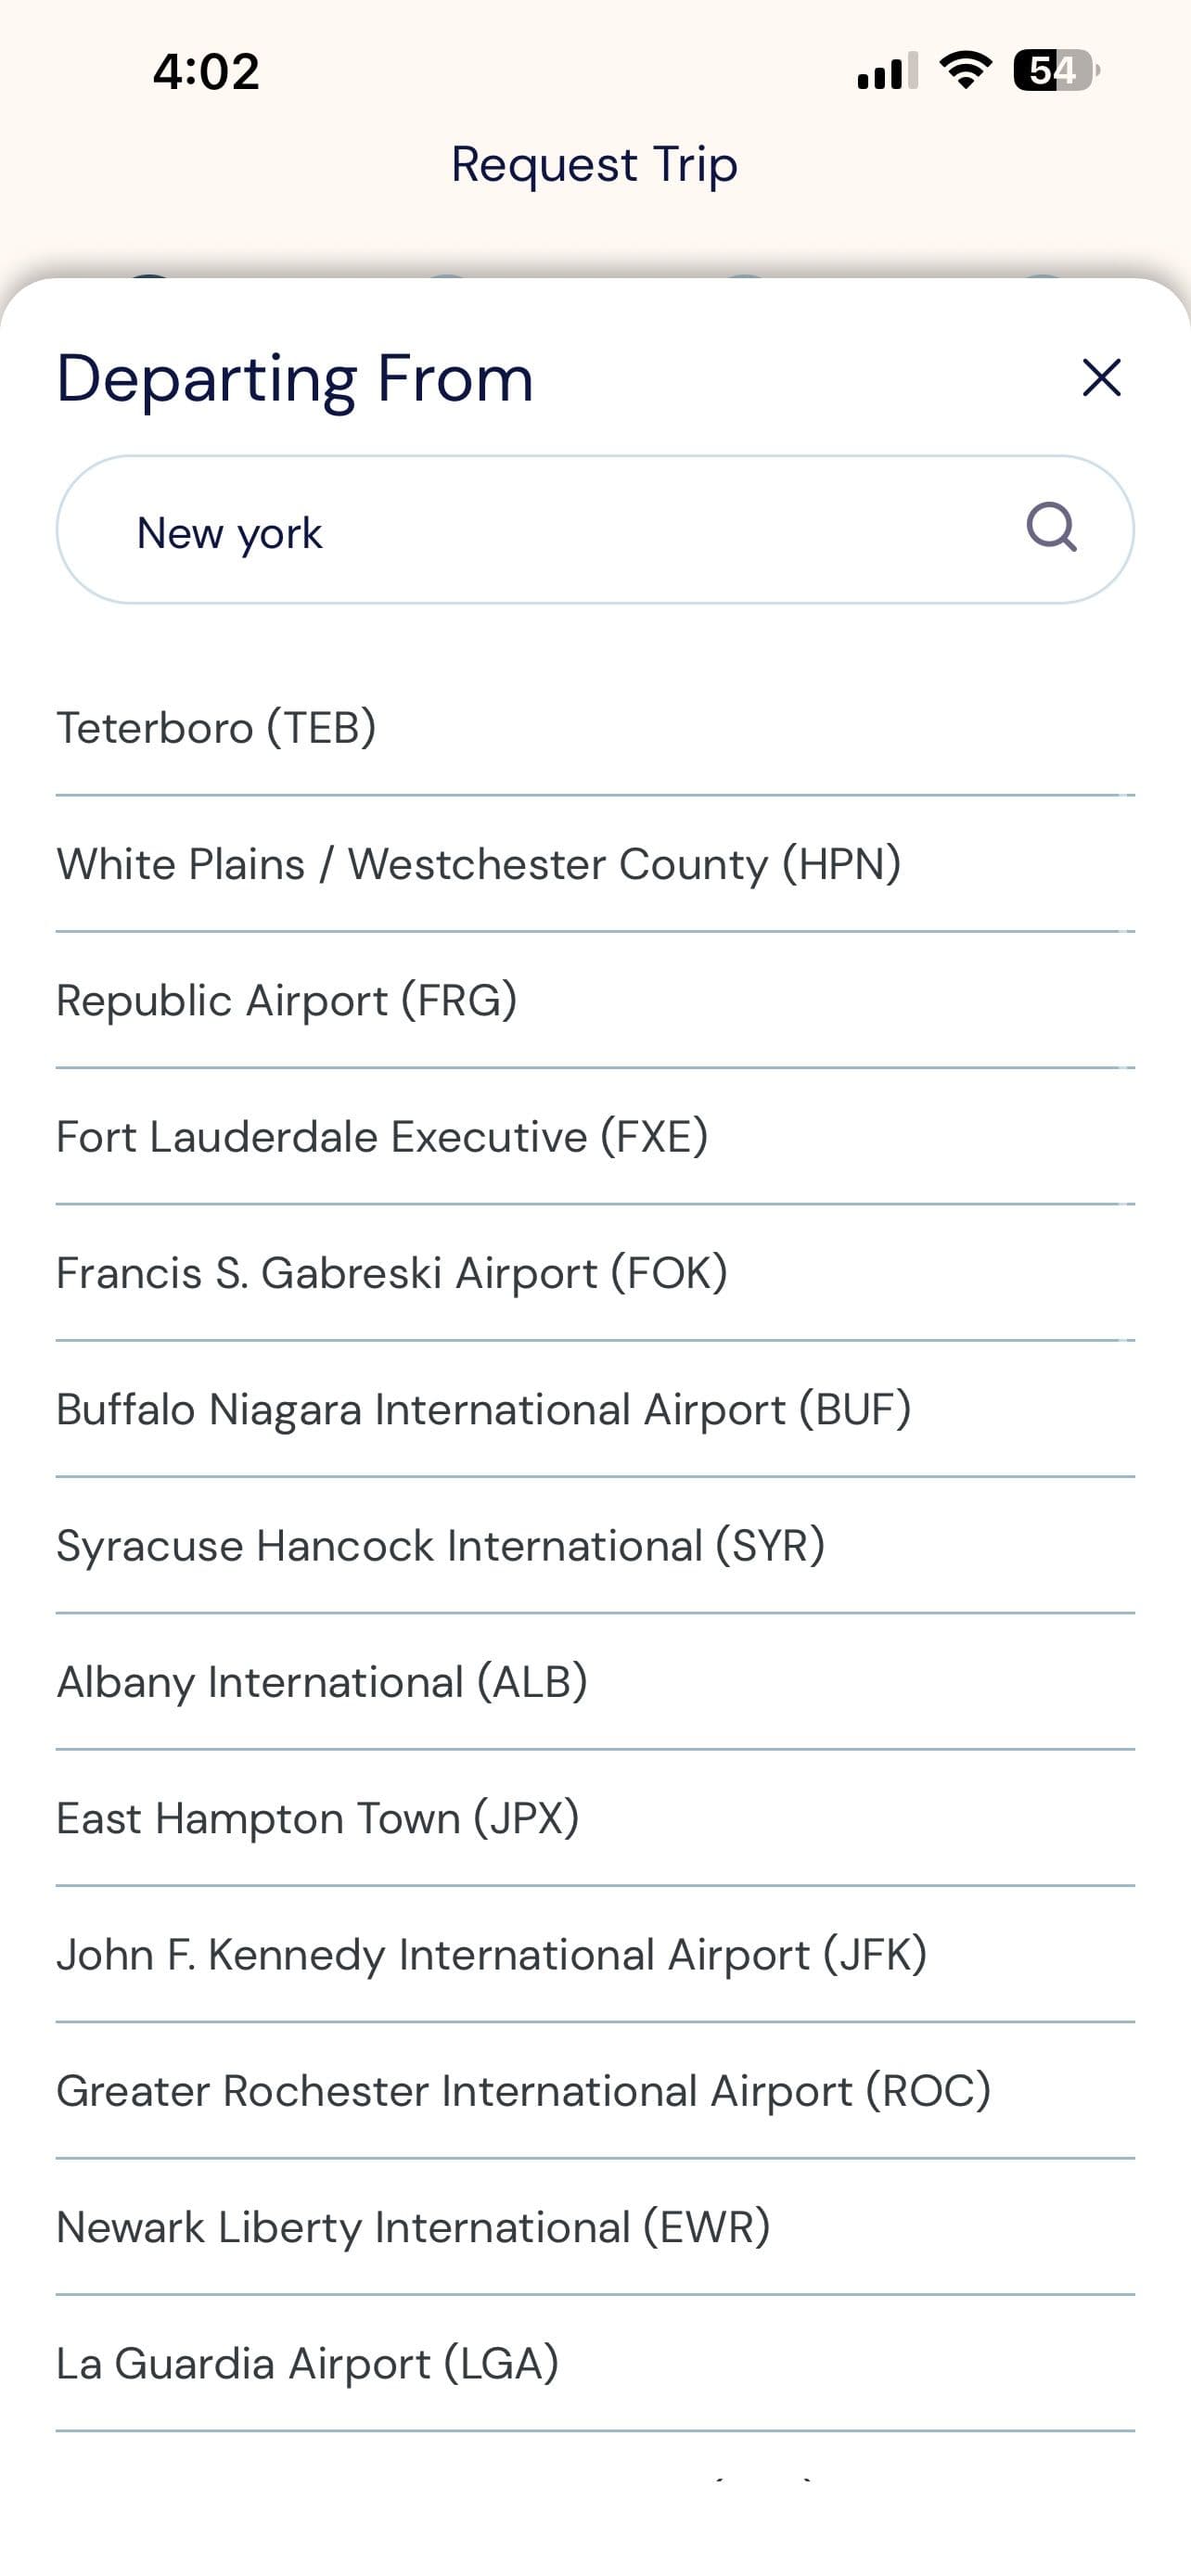
Basics: Route
Select your airports.
Search by city, airport name, or airport code to quickly find your departure and arrival airports.
- Search by city, airport, or code.
- Recently used airports appear first.
- Your departure FBO will be confirmed once your trip is scheduled.
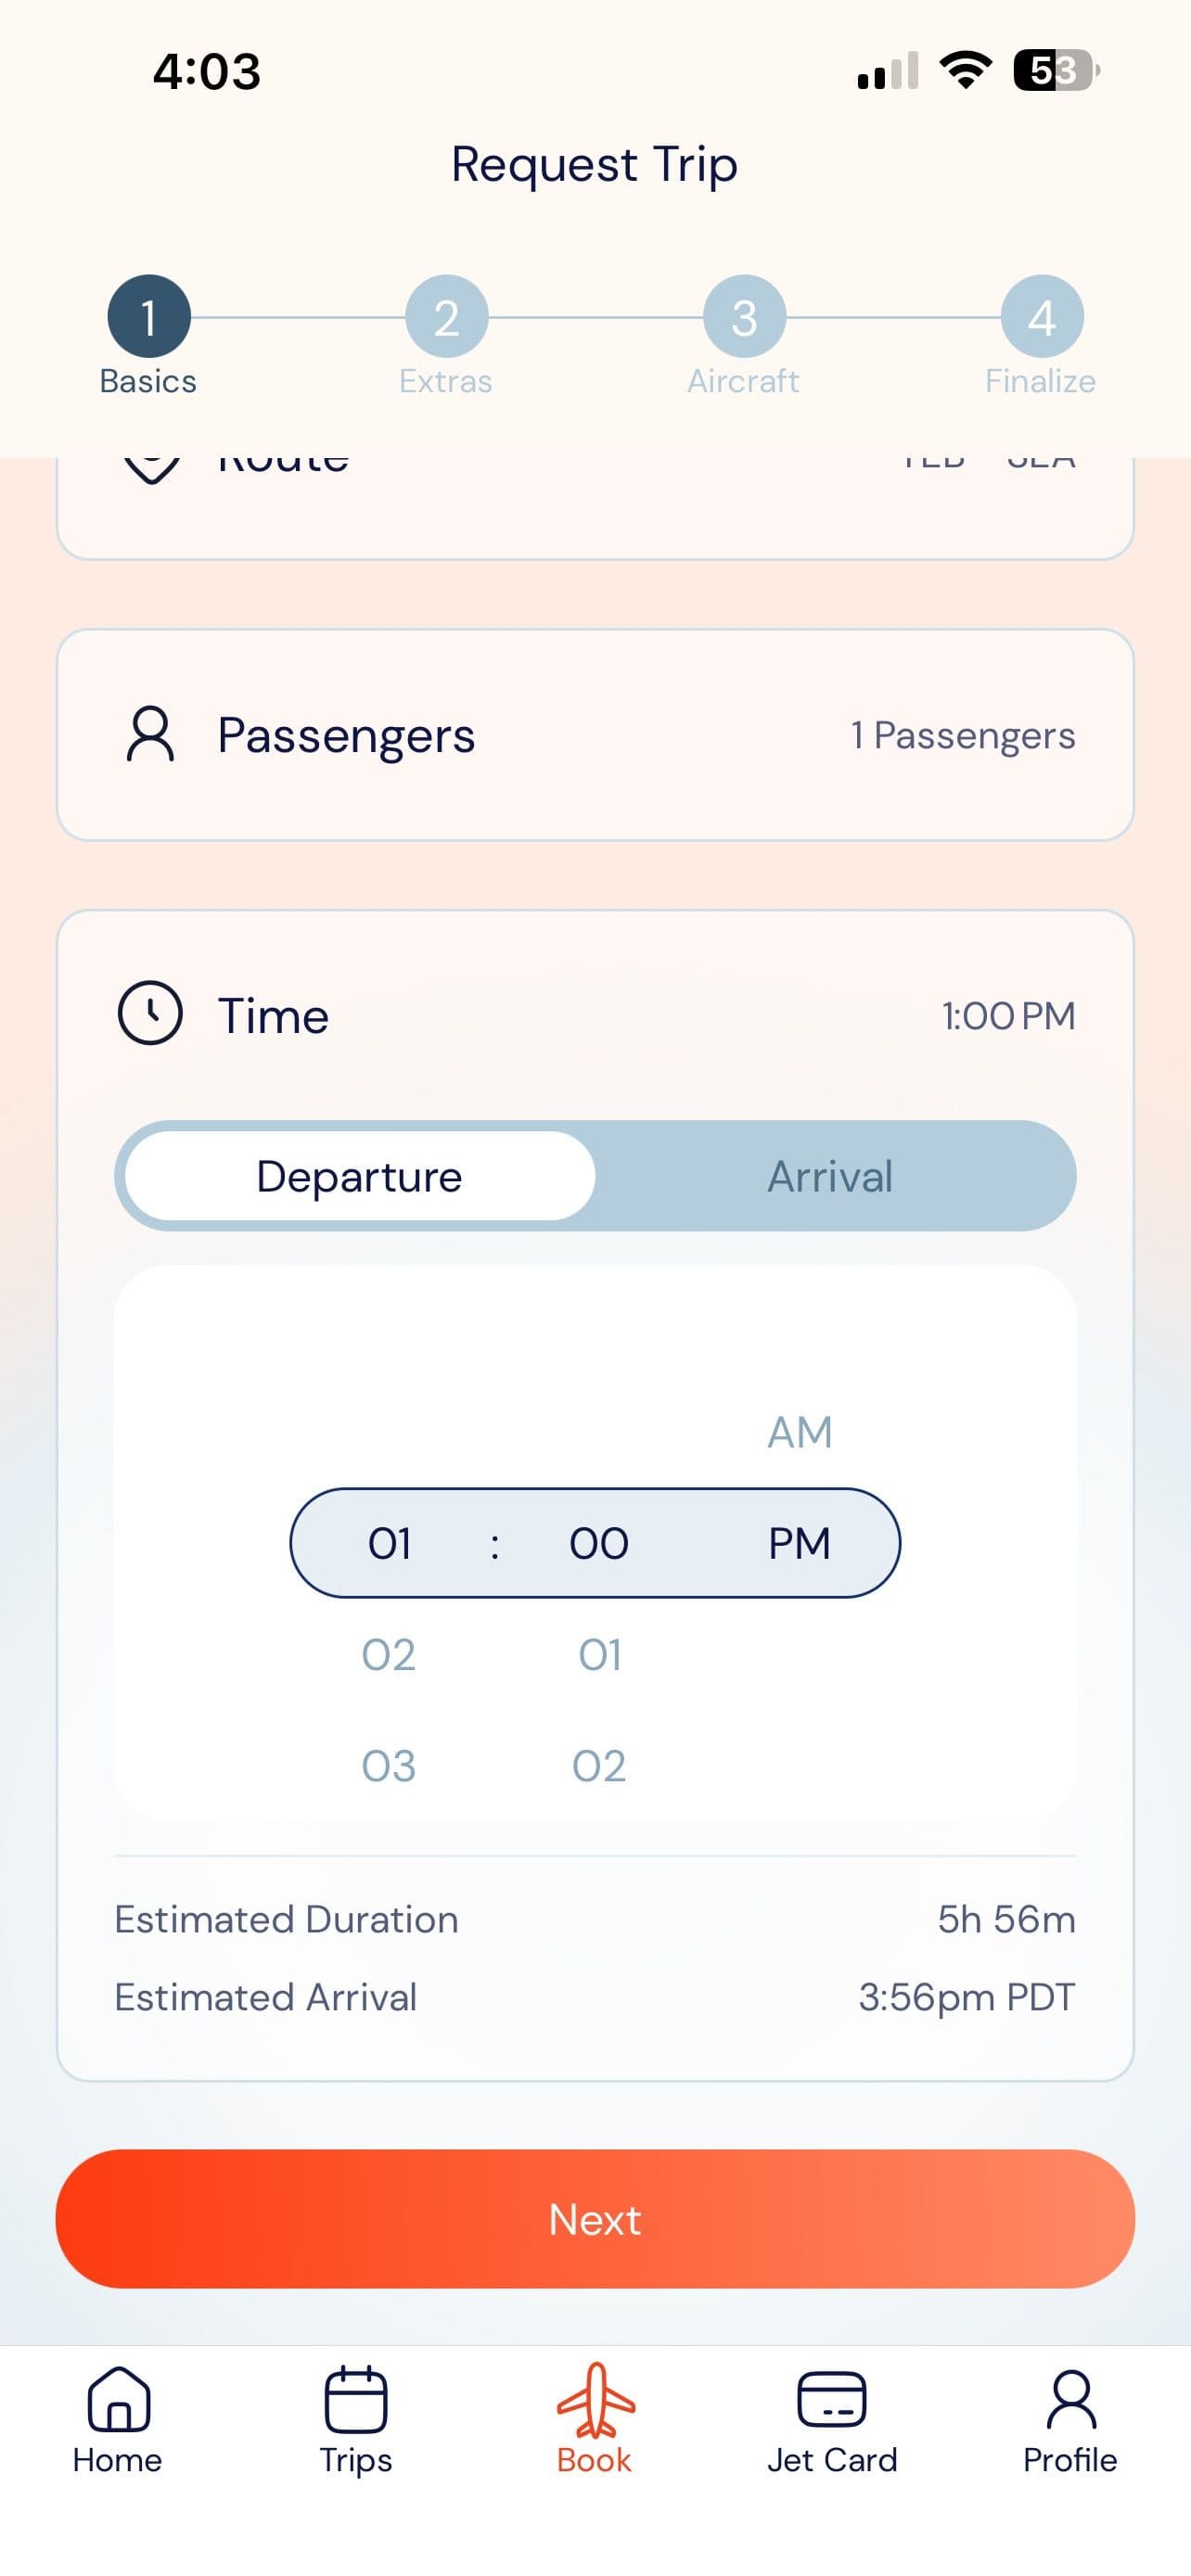
Basics: Trip Details
Review your trip details.
Confirm your travel date, route, passenger count, and preferred departure or arrival time before continuing.
- Choose either a departure or arrival time to continue.
- If an estimated time isn't available, continue your booking and your Private Aviation Expert will finalize the details with you.
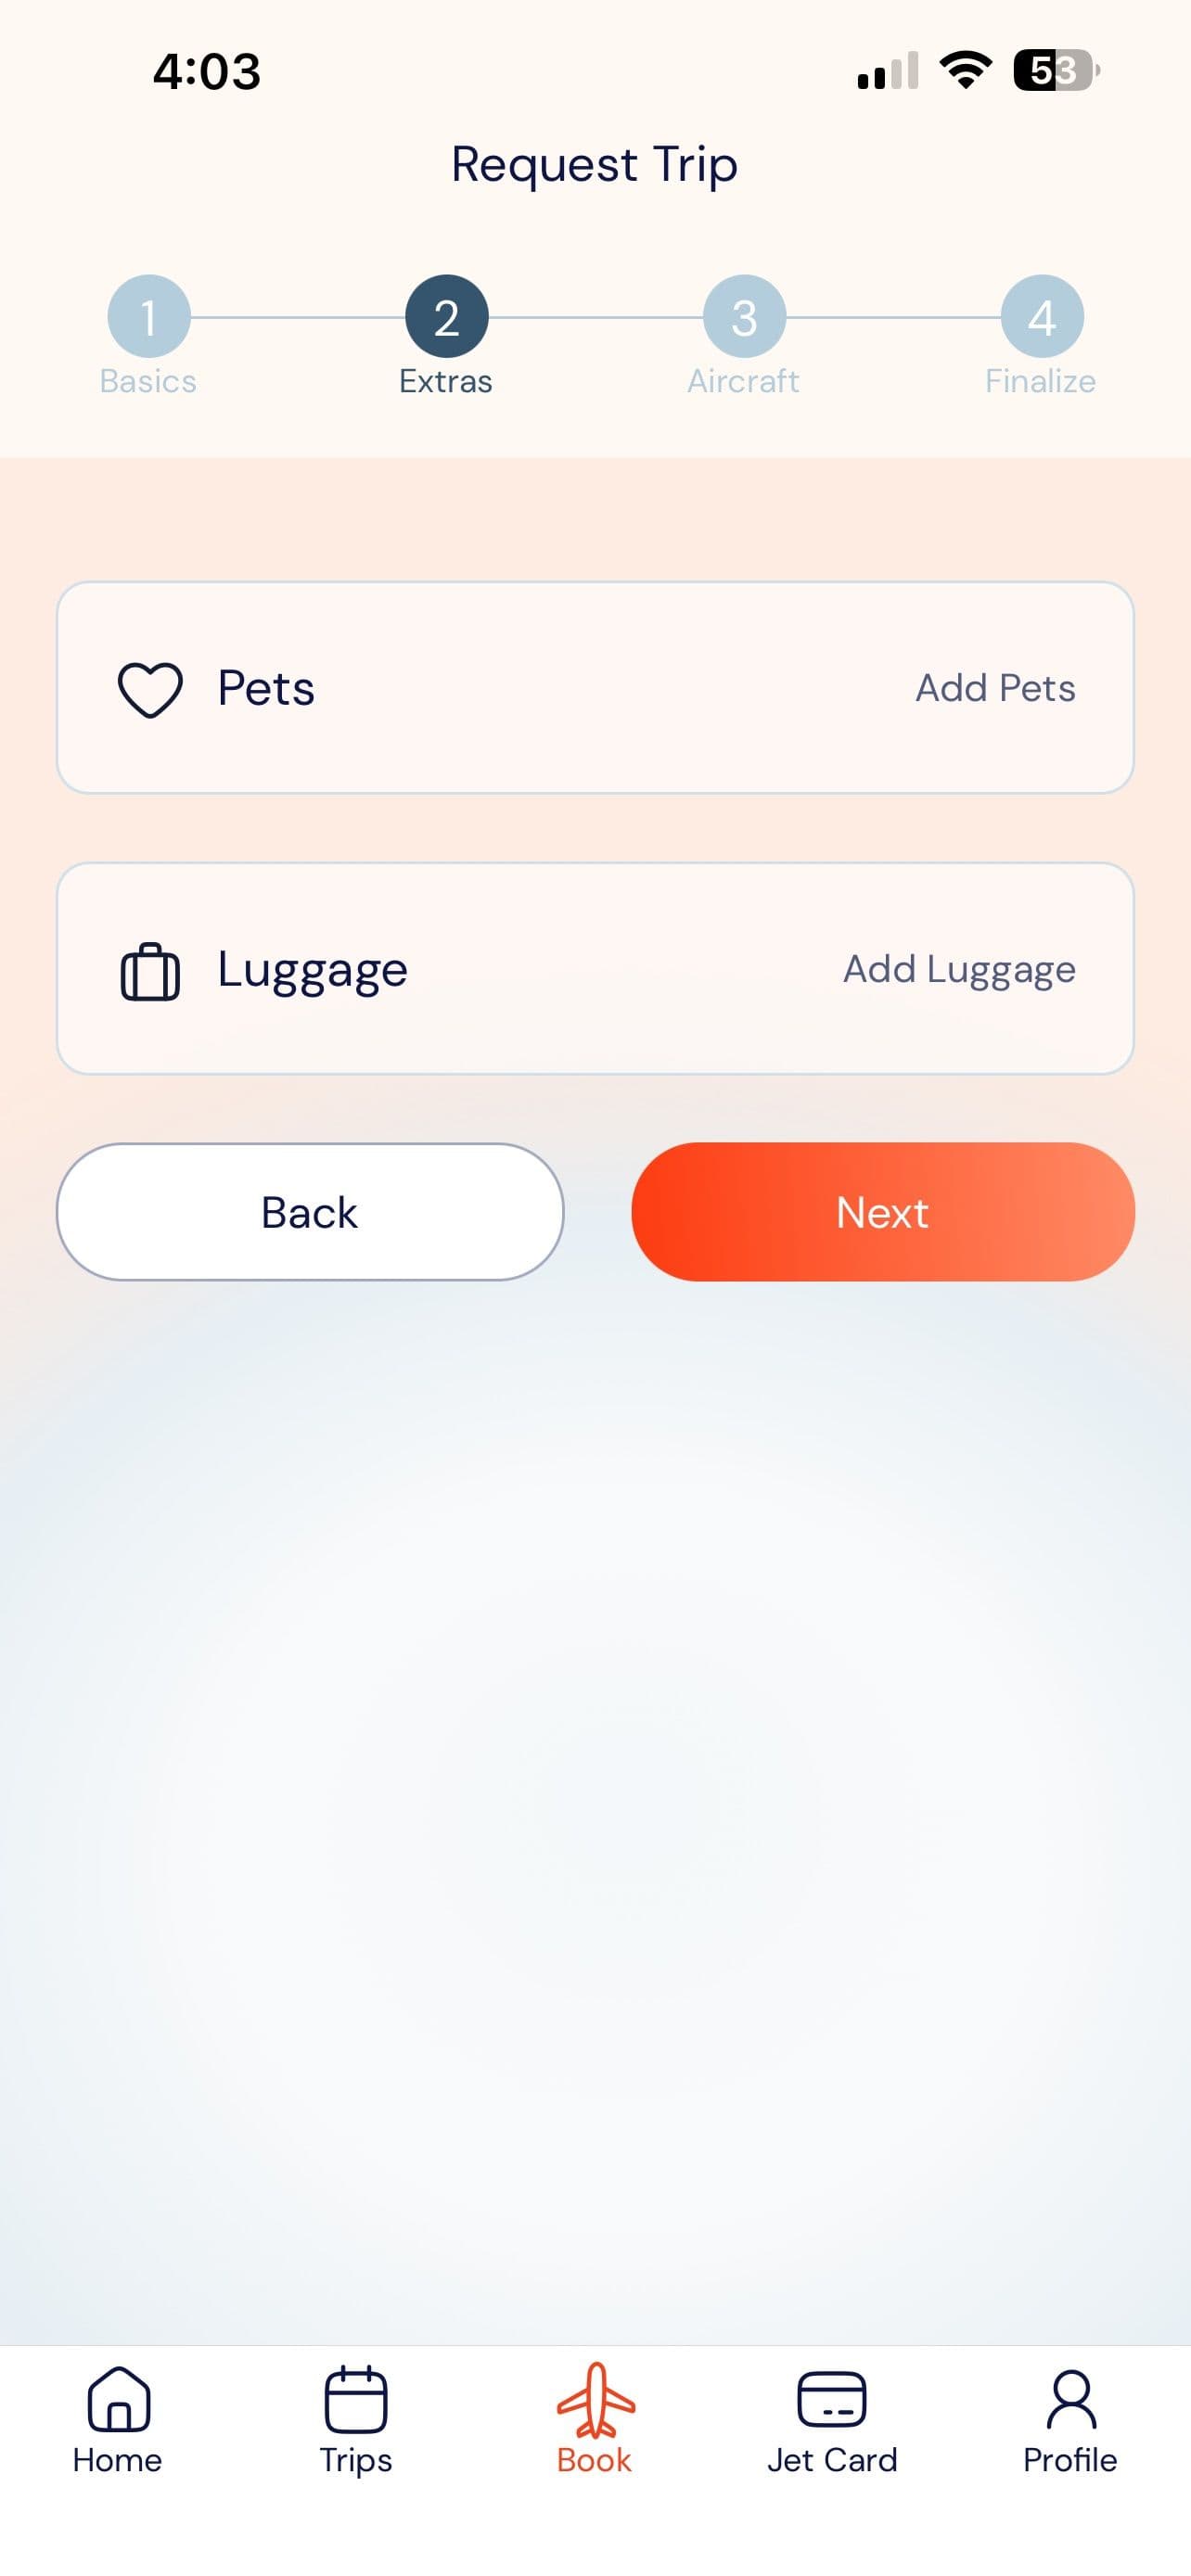
Extras: Pets and Luggage
Add any pets and luggage.
Let us know if you'll be traveling with pets or oversized luggage so we can prepare accordingly.
- Add any pets traveling with you.
- Let us know if you'll have standard or oversized luggage.
- Both fields are optional and can be updated later.
Tip: Not sure about pets or luggage yet? Leave these fields blank. Your team will confirm the details before your flight.
JET CARD TRIP BOOKING · STEPS 8 – 11
Choose your aircraft and confirm your trip request.
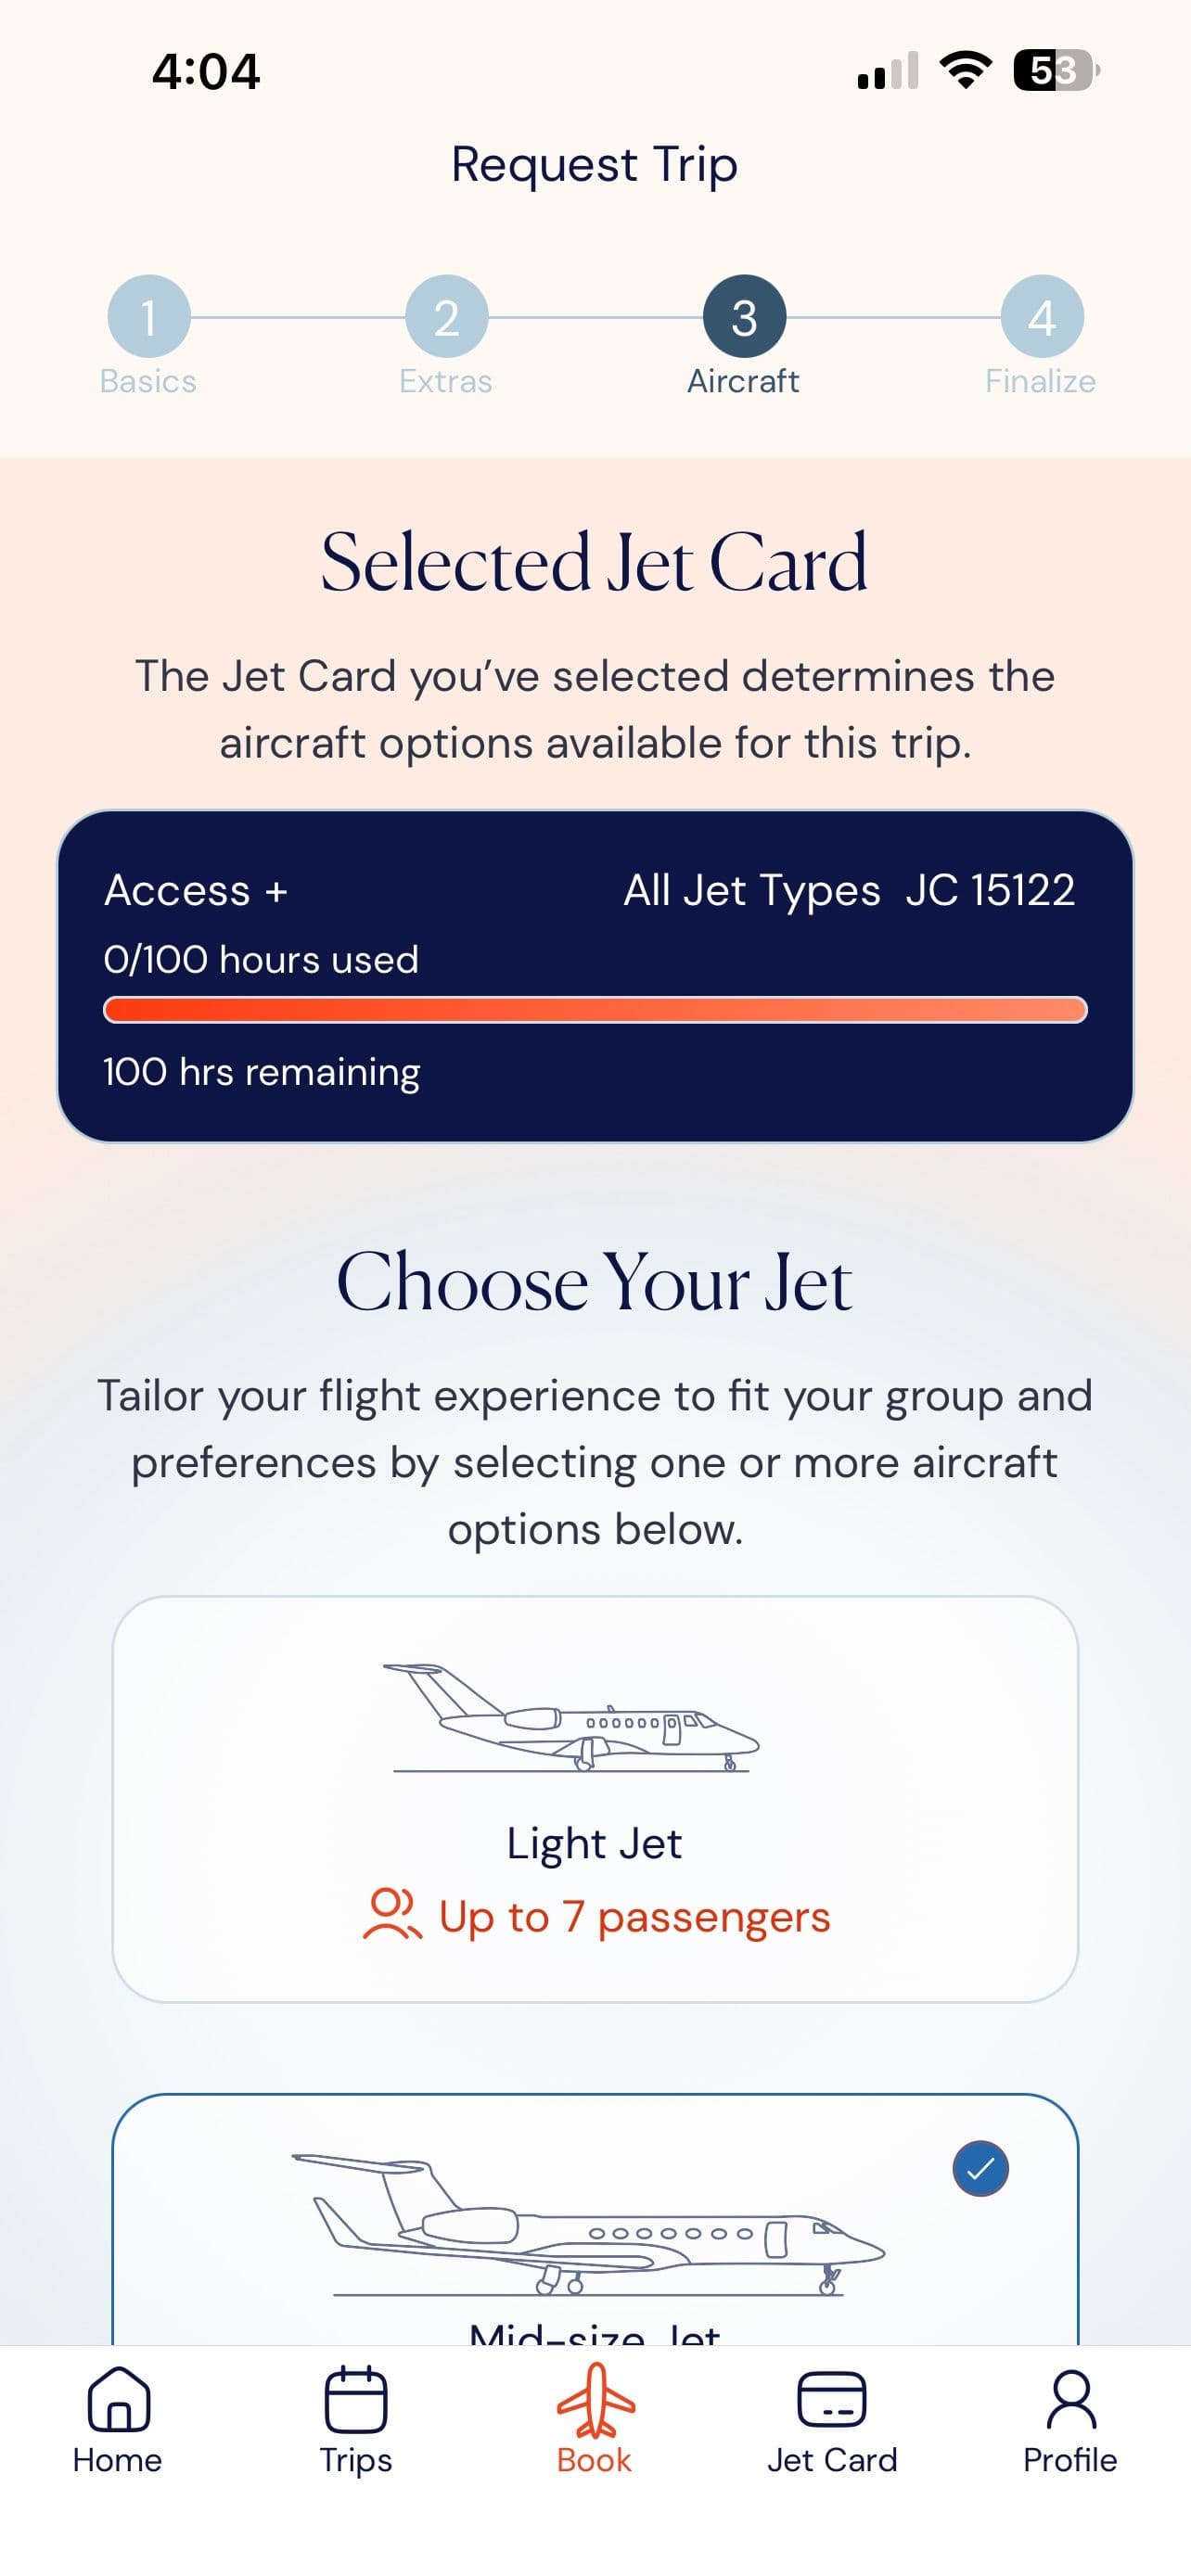
Aircraft
Choose your aircraft.
Your Jet Card determines the aircraft available for this trip.
- Light – Up to 7 passengers
- Mid-size – Up to 8 passengers
- Super-Mid – Up to 9 passengers
- Heavy – Up to 16 passengers
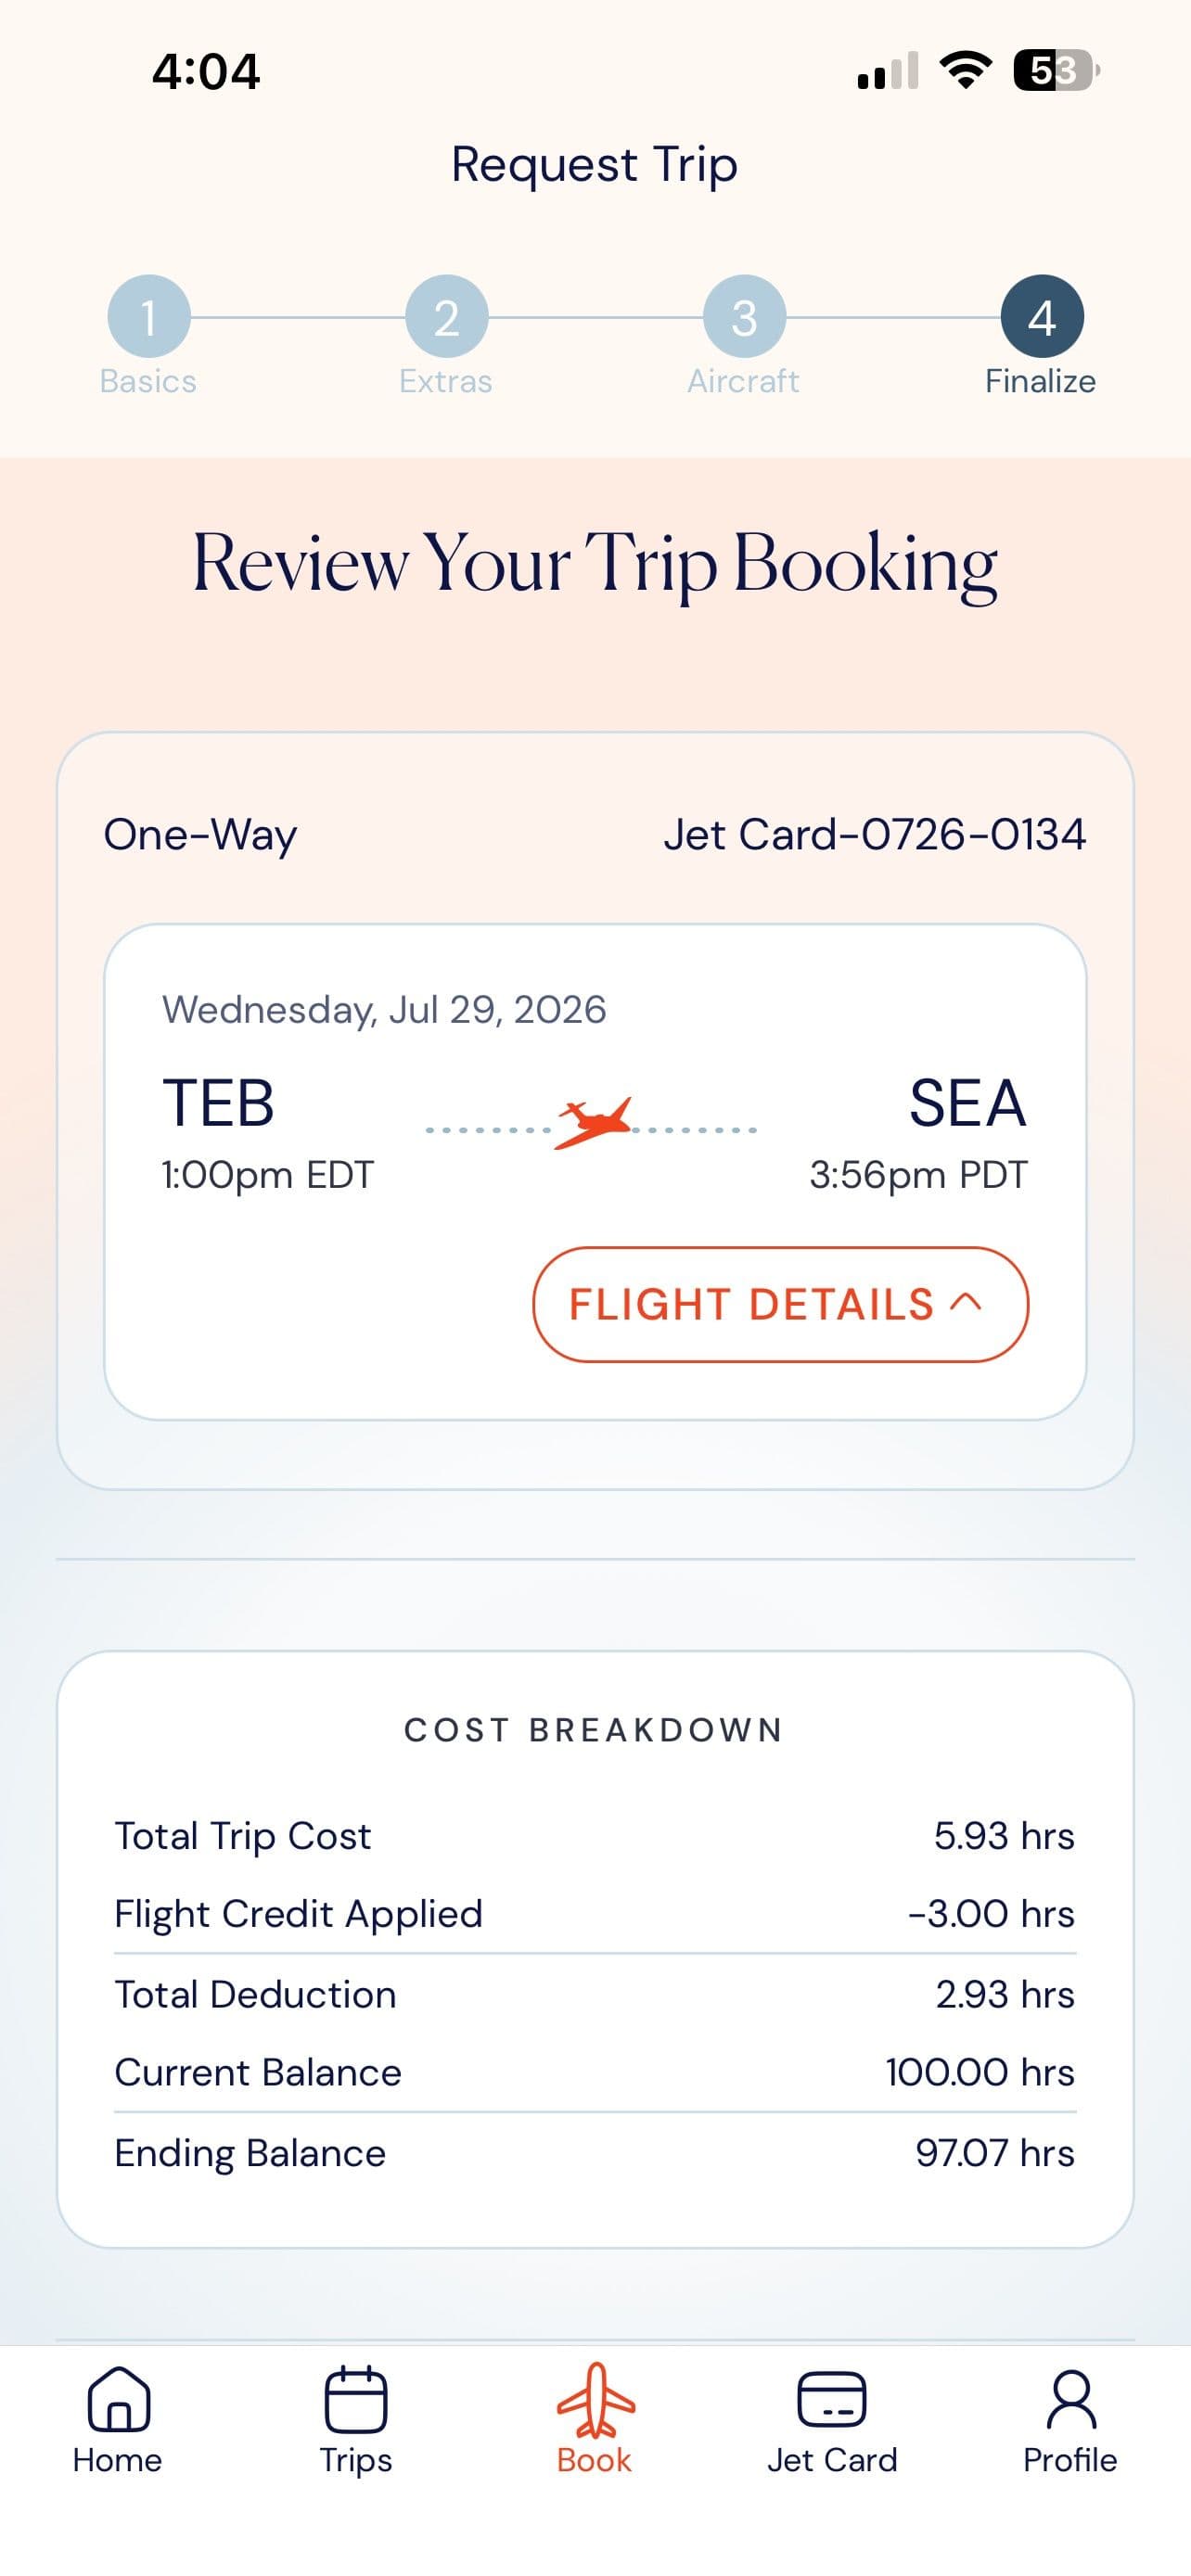
Finalize
Review your booking.
See the estimated hours deducted for your trip, your current balance, and your remaining hours.
- Tap Flight Details to expand routing.
- Scroll to confirm payment method.
- Confirm your remaining balance before continuing.
Finalize
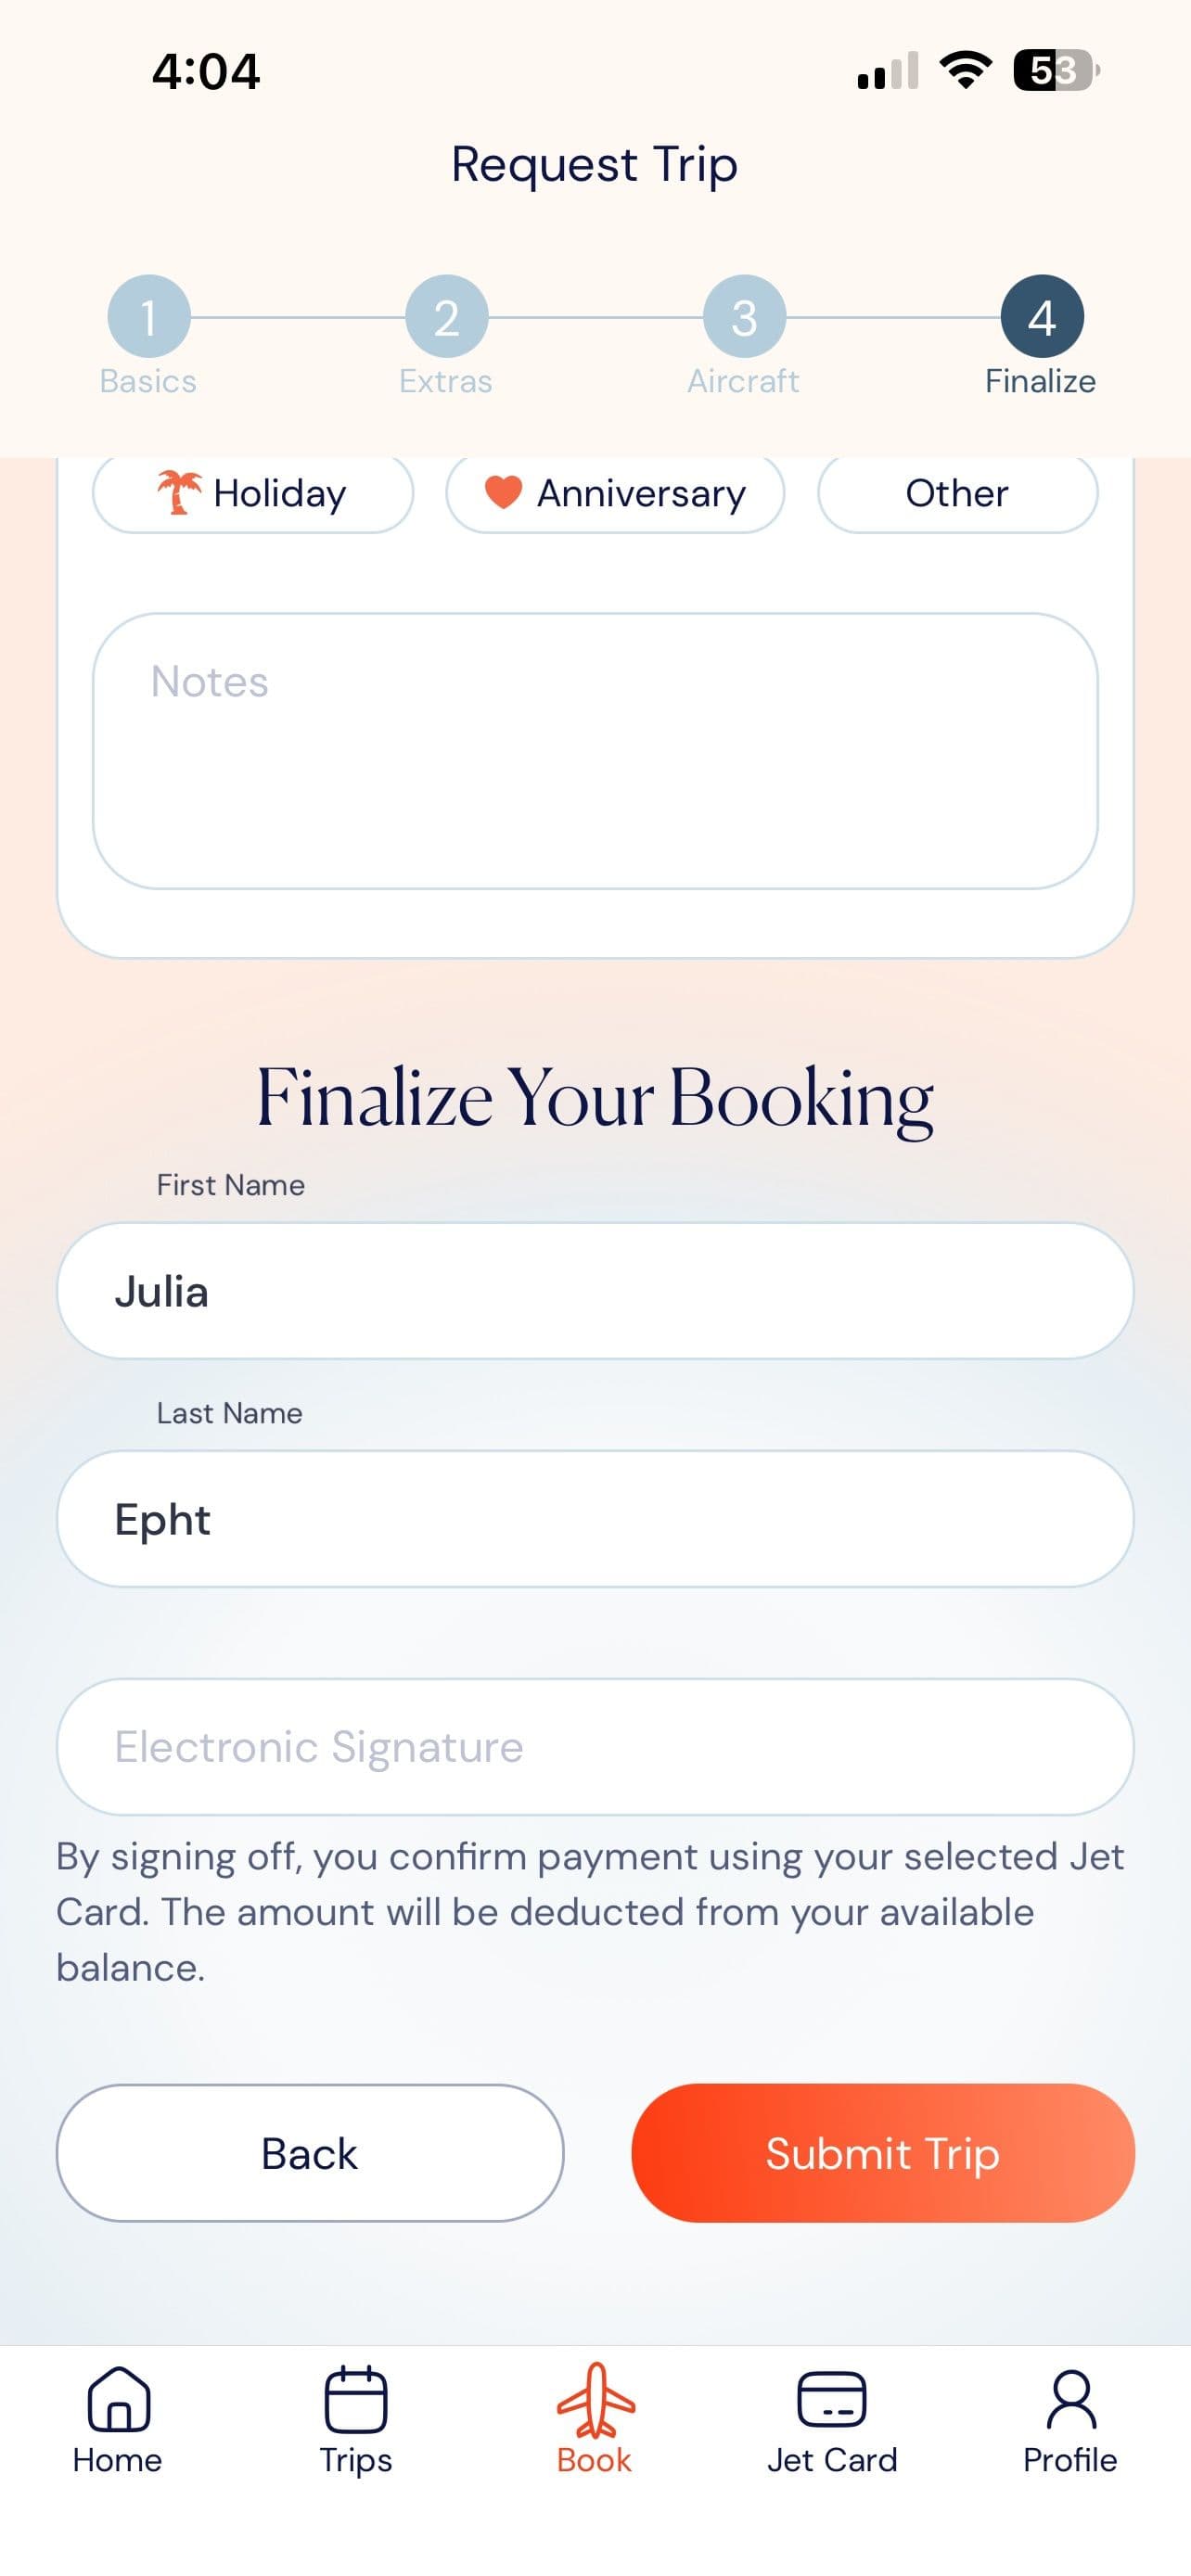
Submit your trip request.
Review your information, sign electronically, and submit your trip request. Signing authorizes the deduction from your Jet Card balance.
- Confirm your name as it appears on your account.
- Add your electronic signature.
- Note any catering or ground transportation requests.
Confirmation
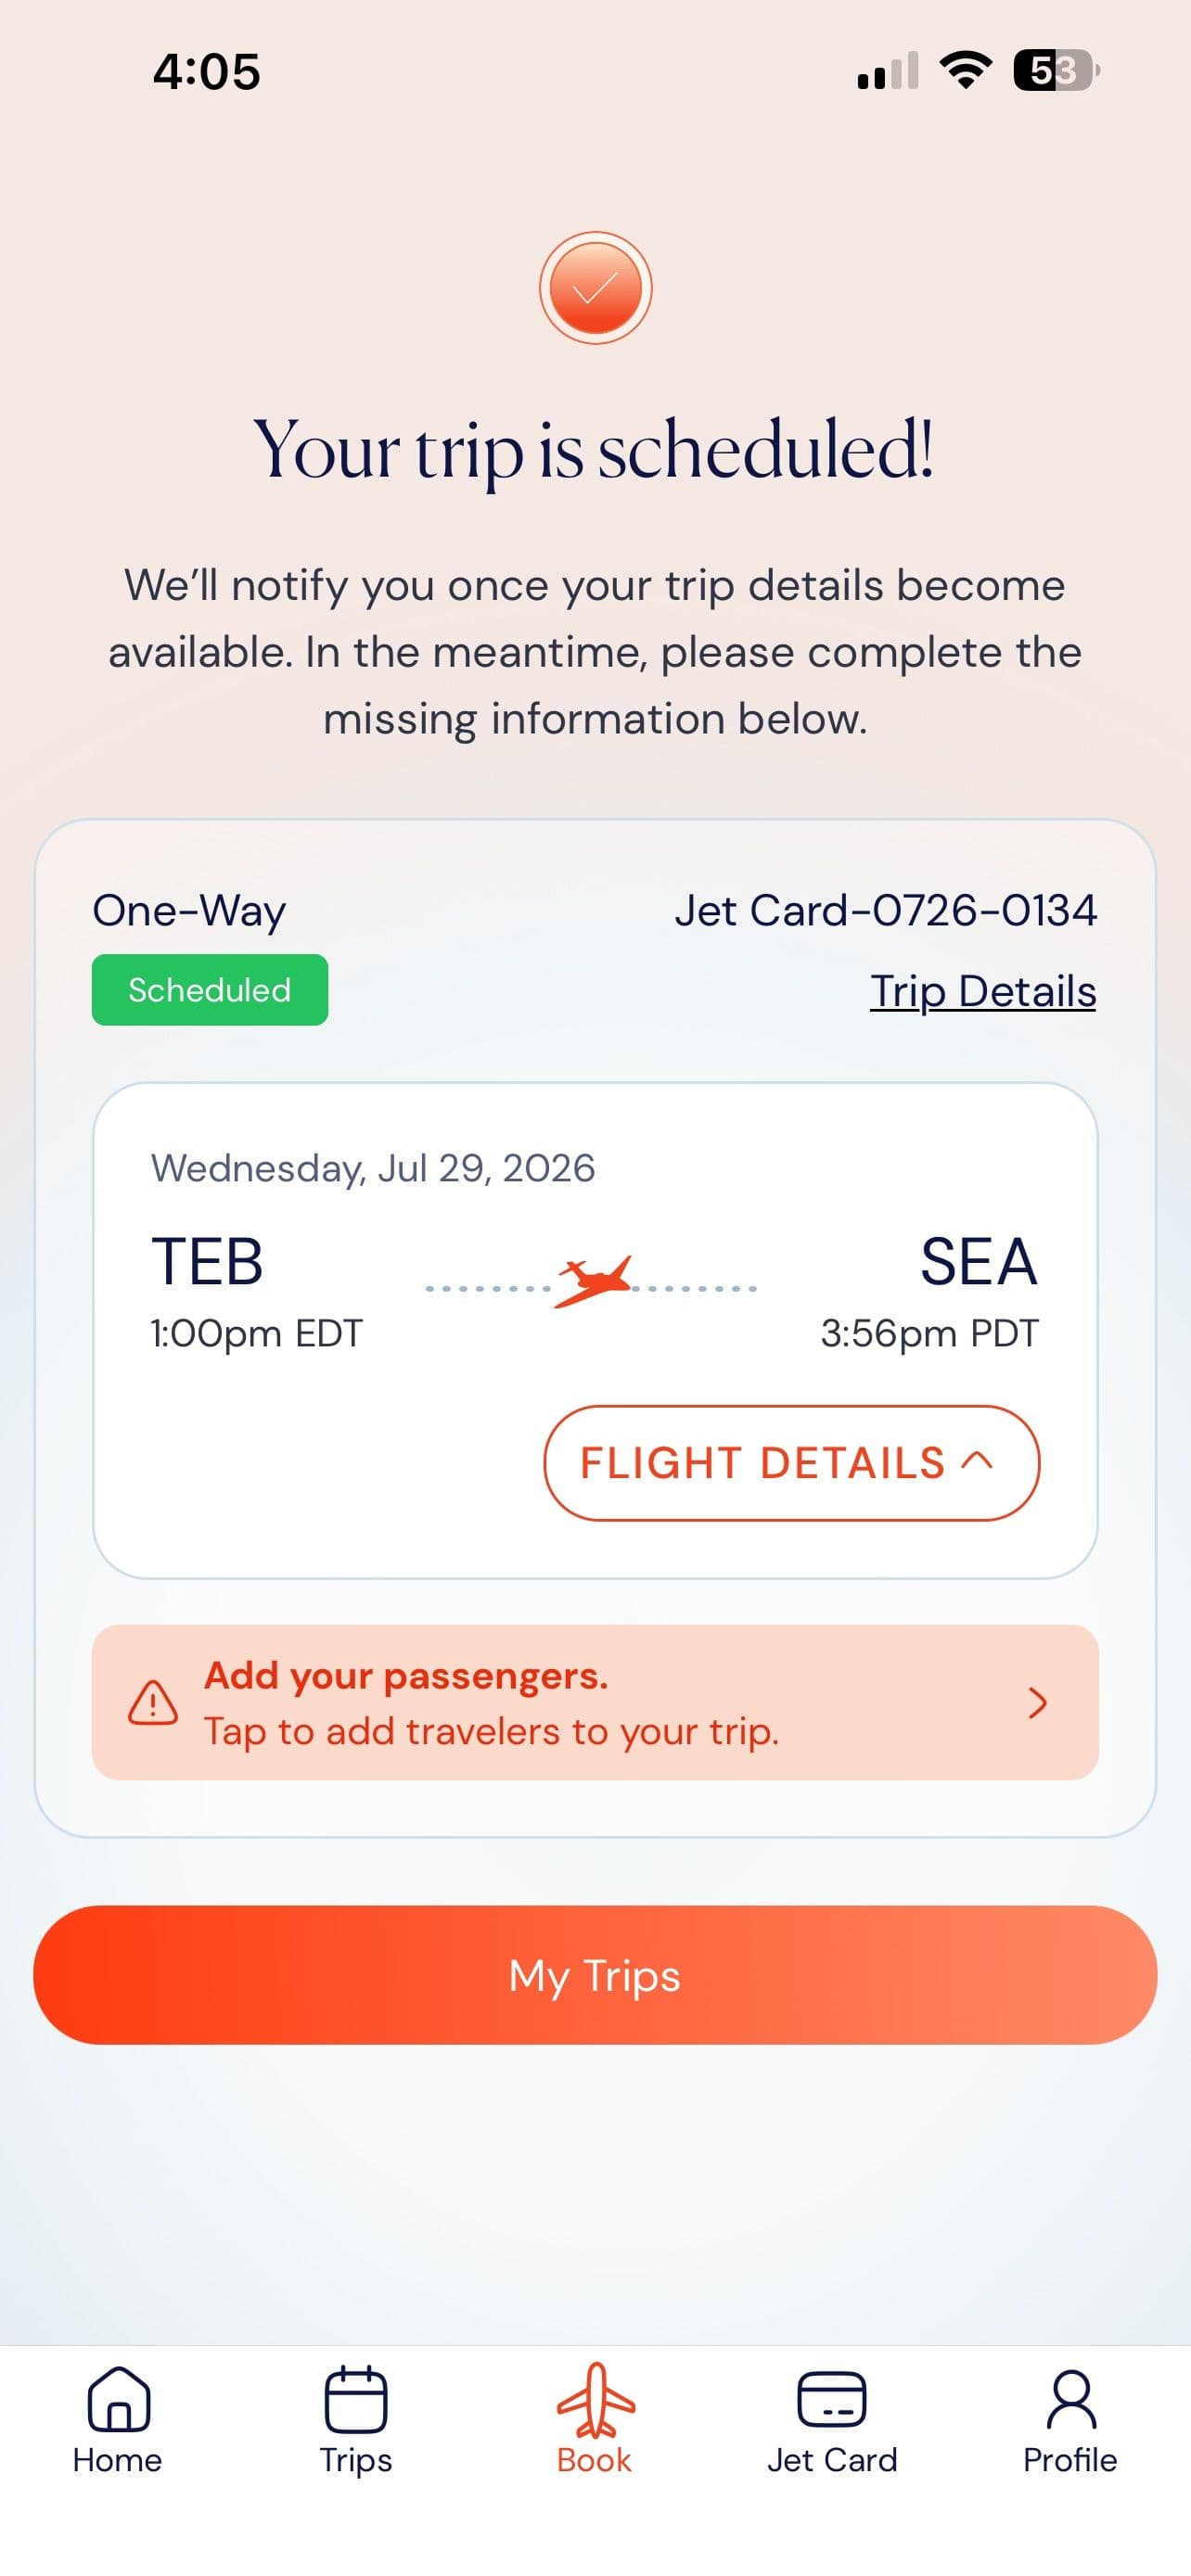
Your trip is scheduled.
Once your request is confirmed, you'll see your trip in My Trips and receive a confirmation email.
- View your itinerary in My Trips.
- Open Trip Details to review your booking and payment method.
- Add passenger information when you're ready.
Note: Your remaining Jet Card balance is based on the estimated flight time. Once your trip is complete, your balance will be adjusted to reflect the actual flight time, and you'll receive a summary by email.
Request an On-Demand Charter Flight
Request an on-demand charter and pay by credit card. Whether you're flying without a Jet Card or selecting an aircraft beyond your Jet Card's available options, the app guides you through four quick steps: Policies, Authorization, Payment, and Review before your charter trip request is sent to our team.
Flight Booking • Steps 1 – 4
Build your trip just like a Jet Card request. Share your travel plans and we'll source your live charter options.
Aircraft
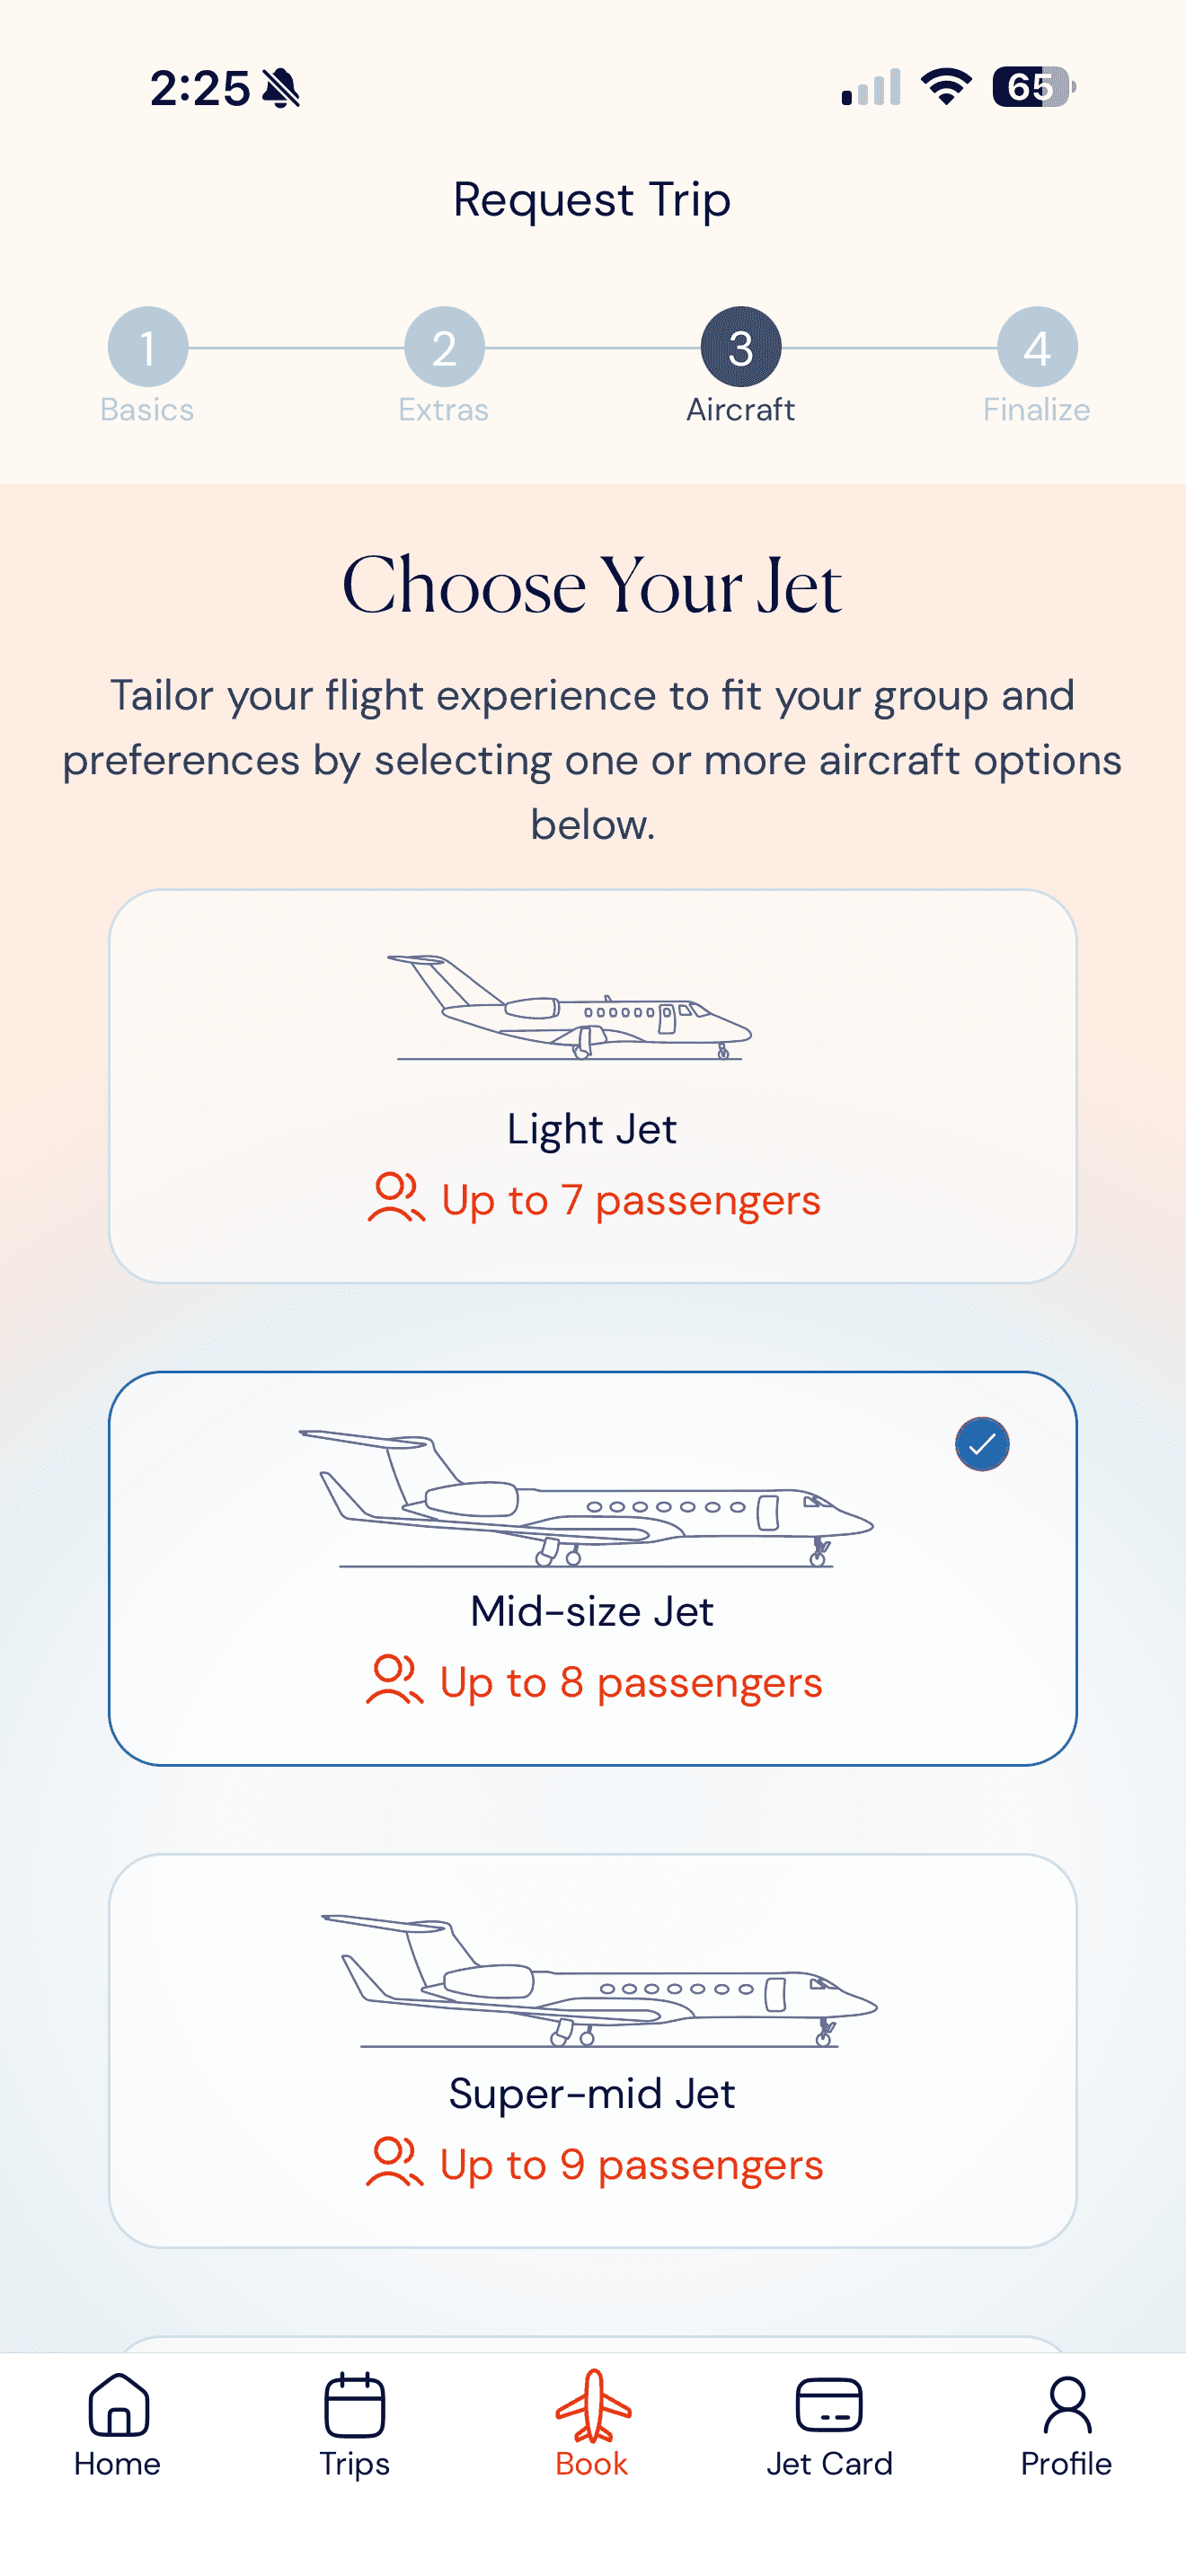
Select your preferred aircraft.
Charter bookings start the same way as a Jet Card flight. Complete Basics and Extras steps shown in the Jet Card Booking section, then switch to Charter to get live pricing from our trusted operator network.
- At Aircraft, select Charter instead of a Jet Card.
- Choose one or more aircraft categories (select multiple for the most flexibility).
- Tap Next to continue.
Finalize
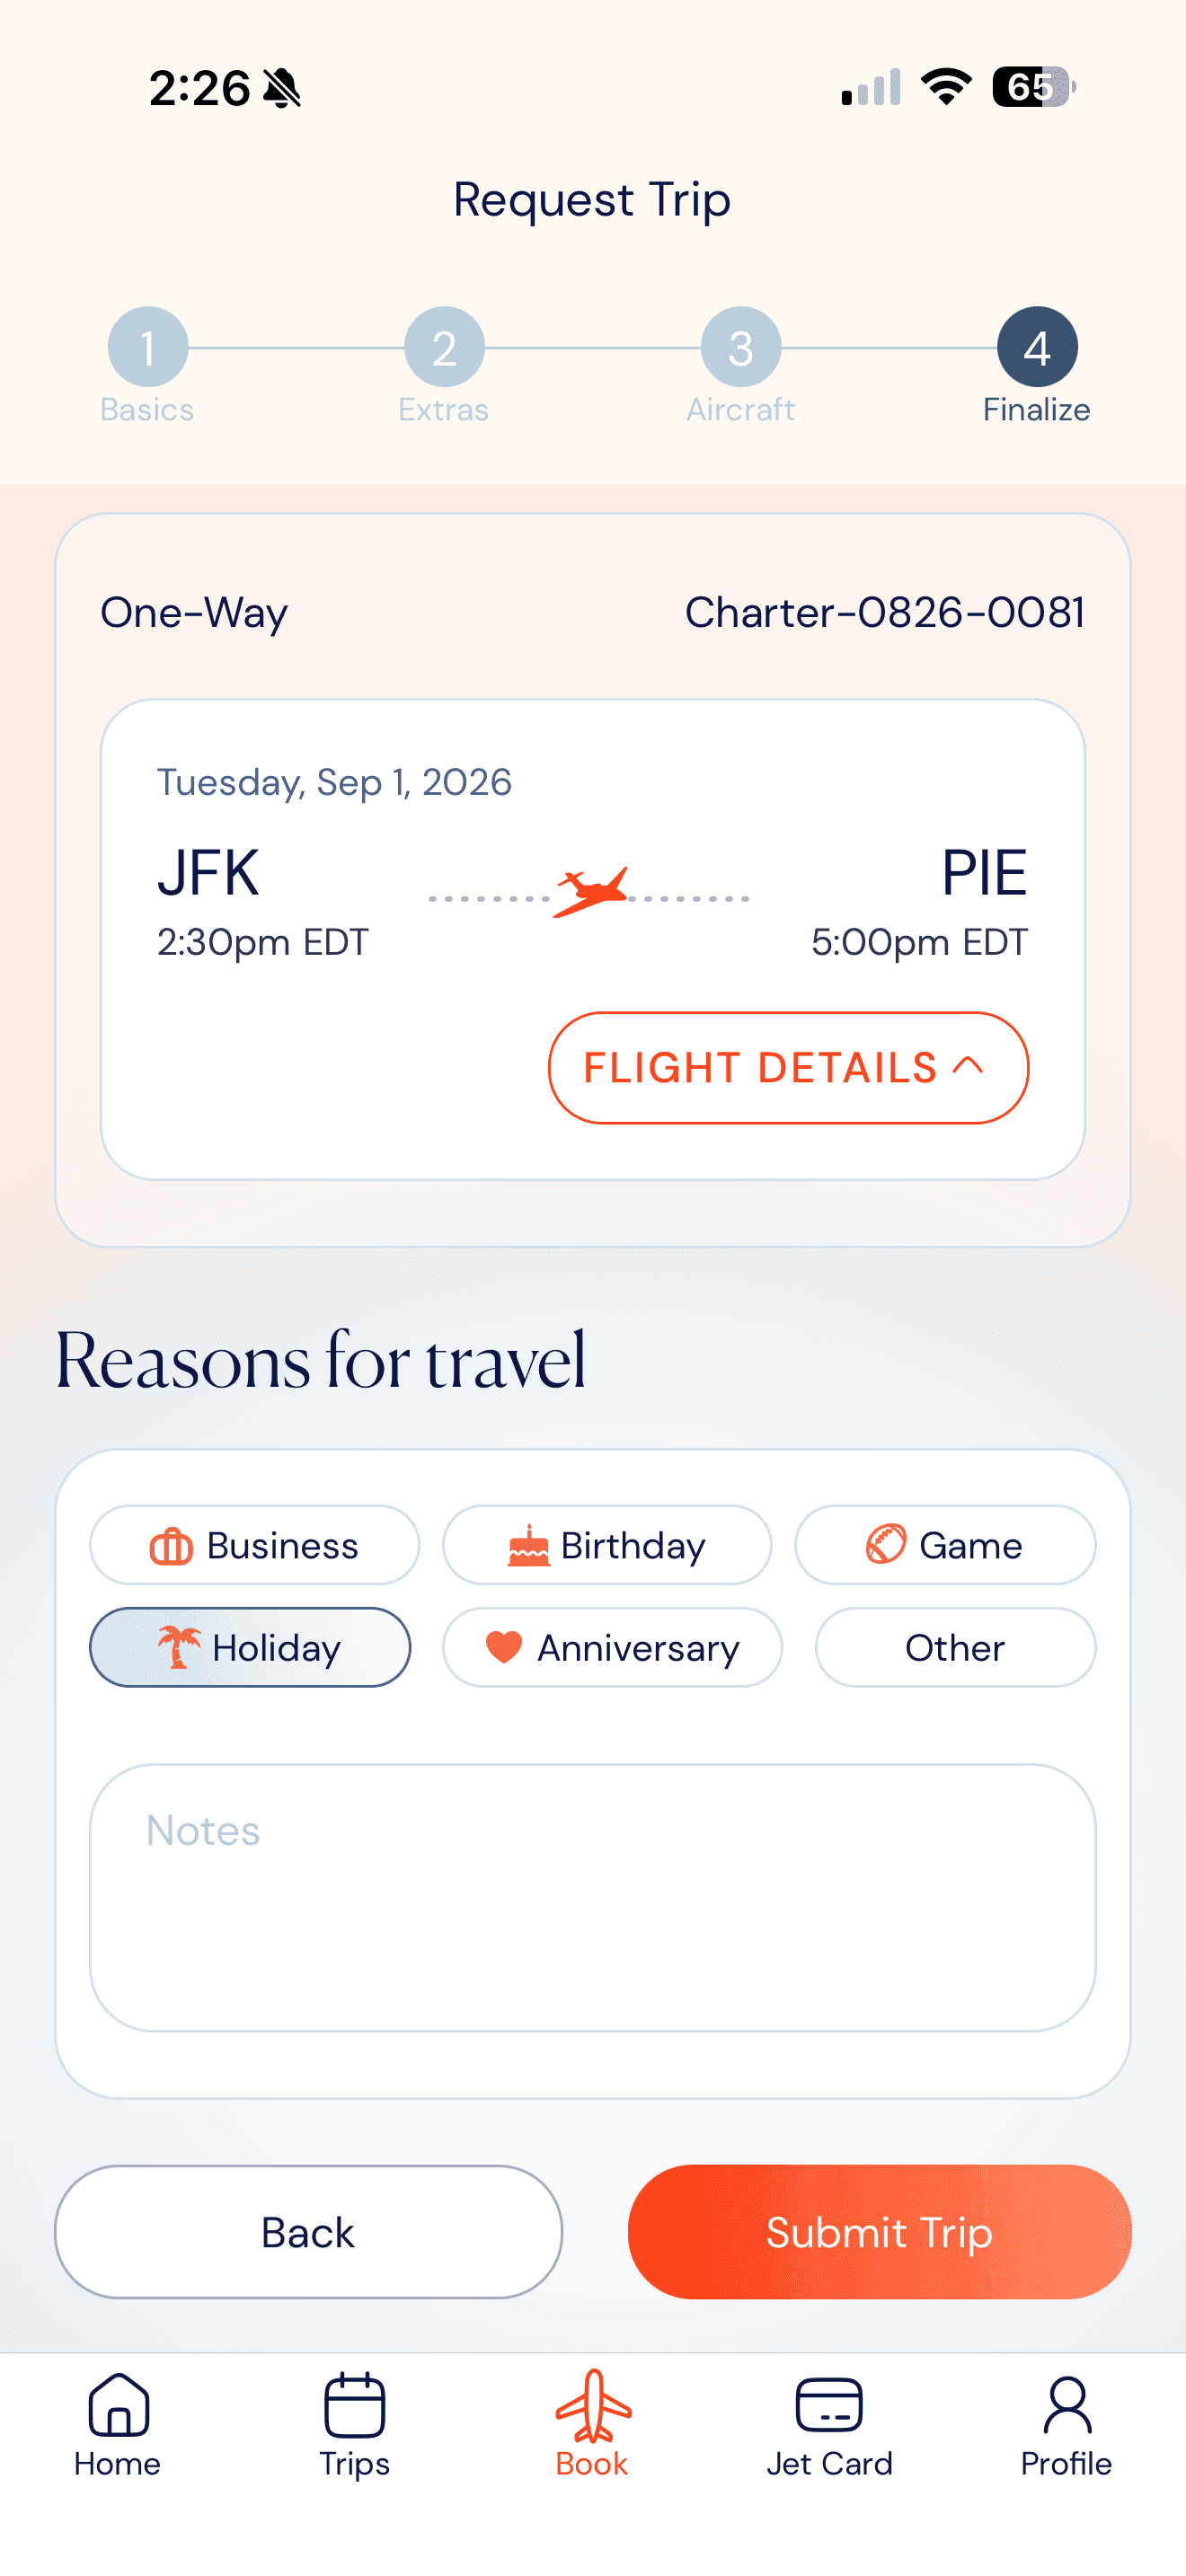
Review your request.
Confirm trip details below before submitting your request. Add a reason for travel and any notes that will help our team personalize your flight.
- Confirm your itinerary.
- Select a reason for travel.
- Add any special requests or notes.
- Tap Submit Trip.
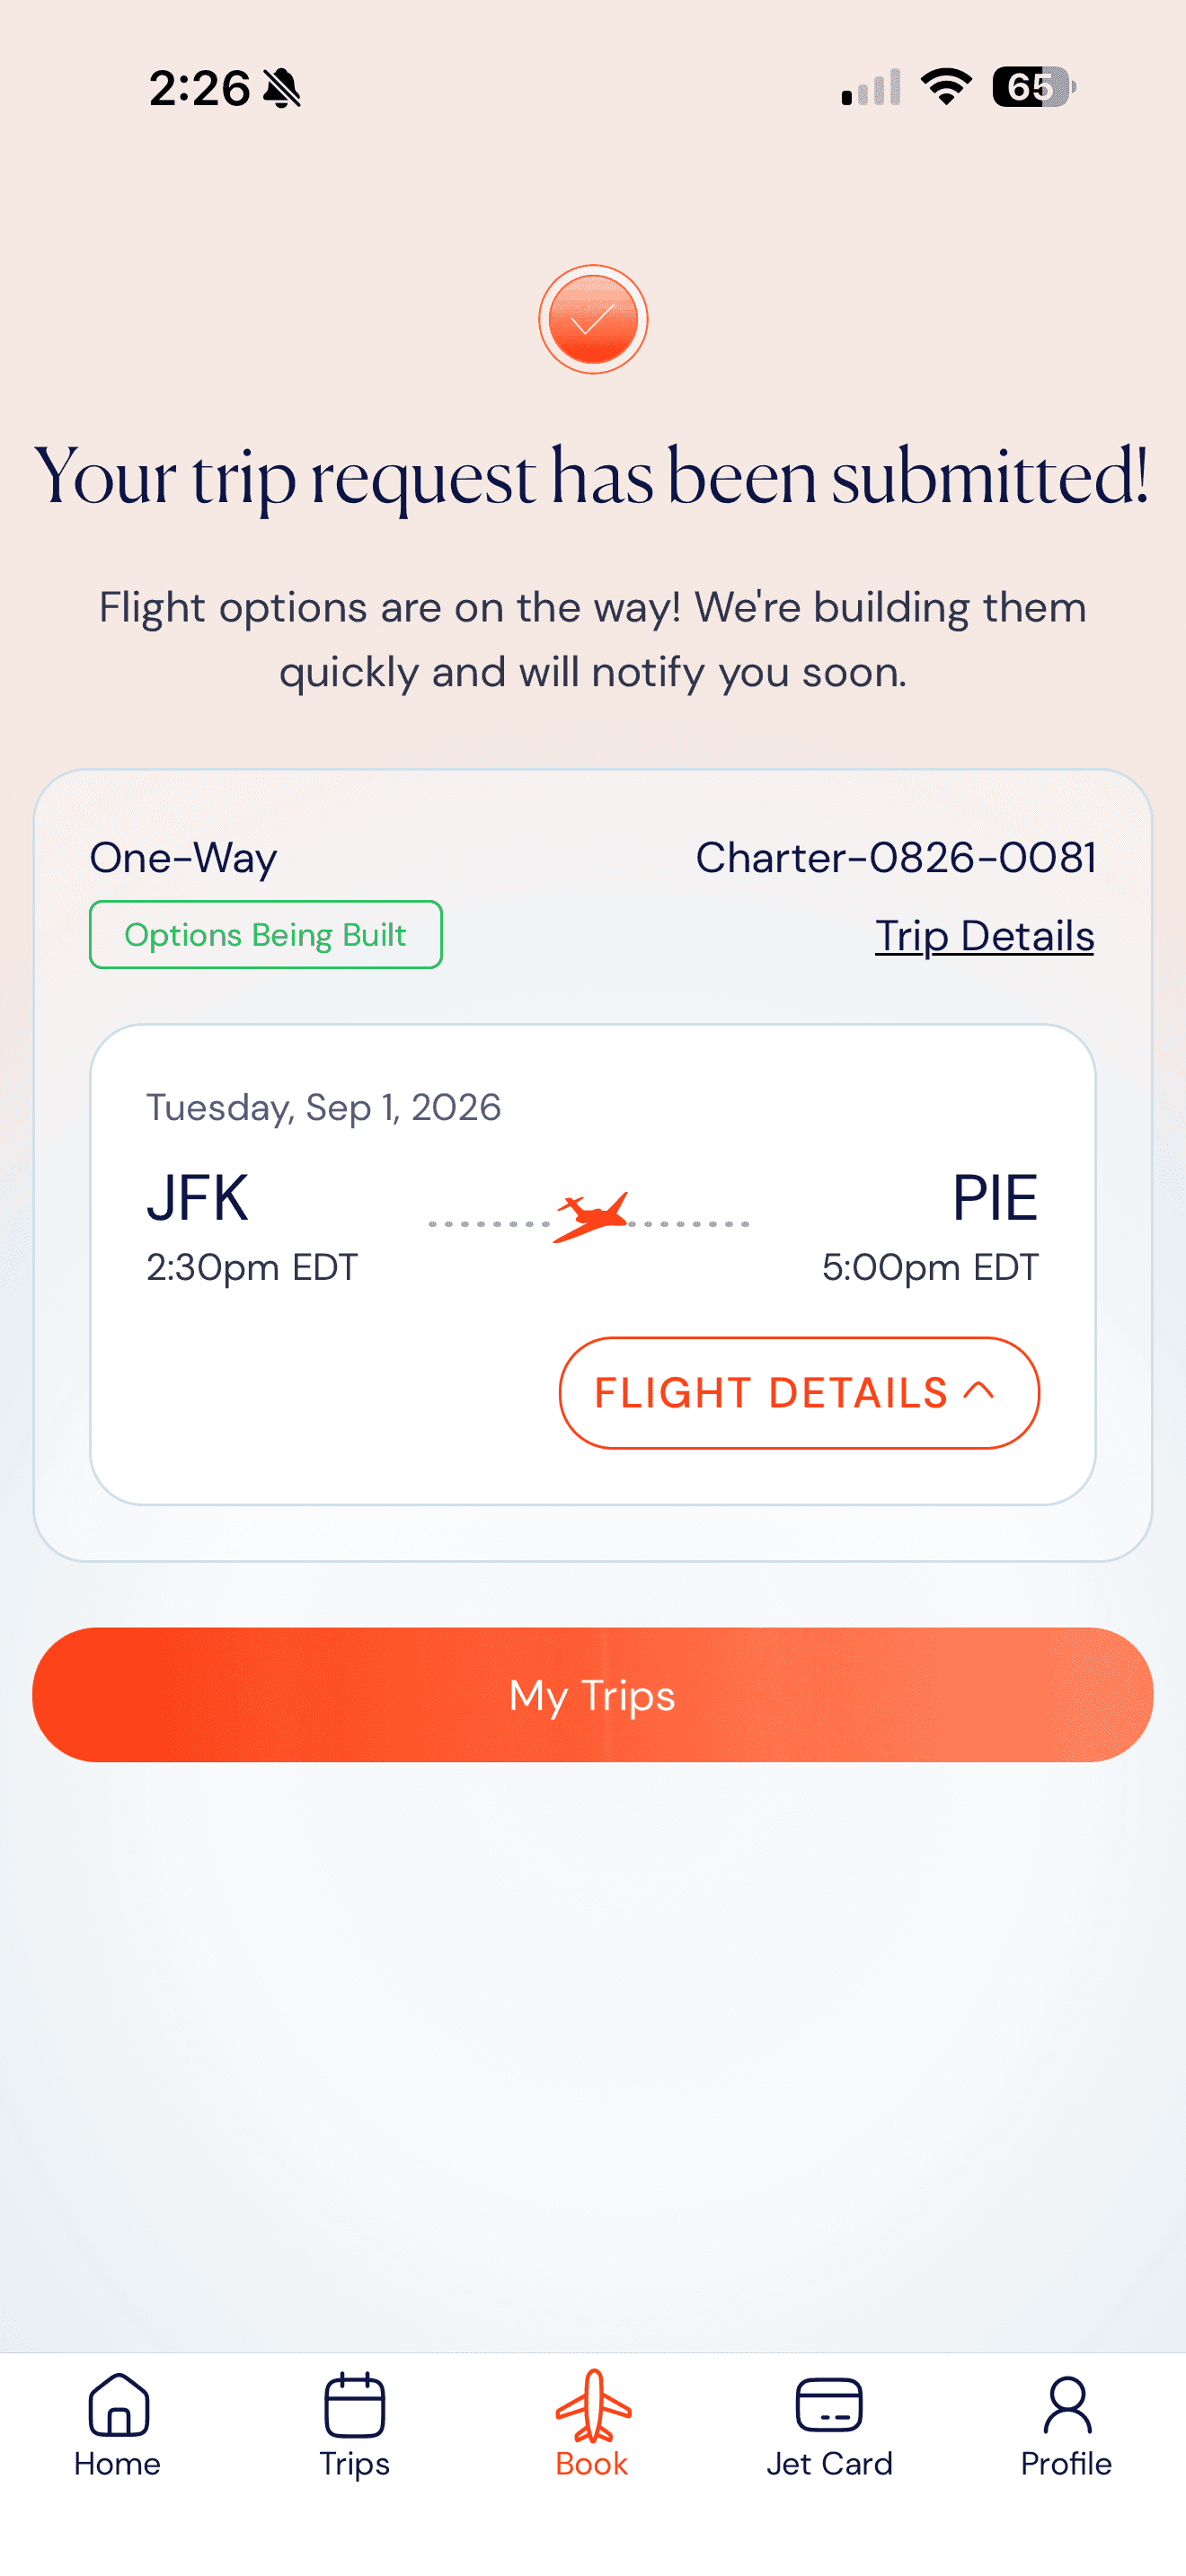
Trip submitted
We're sourcing your flight options.
Your request has been received. Our team is sourcing aircraft that match your itinerary and will notify you as soon as your options are ready.
- While we're sourcing options, you'll see 'Options Being Built' on your trip — sit tight, we move fast.
- You'll be notified by push notification and email when flight options are available.
- Tap My Trips to track status.
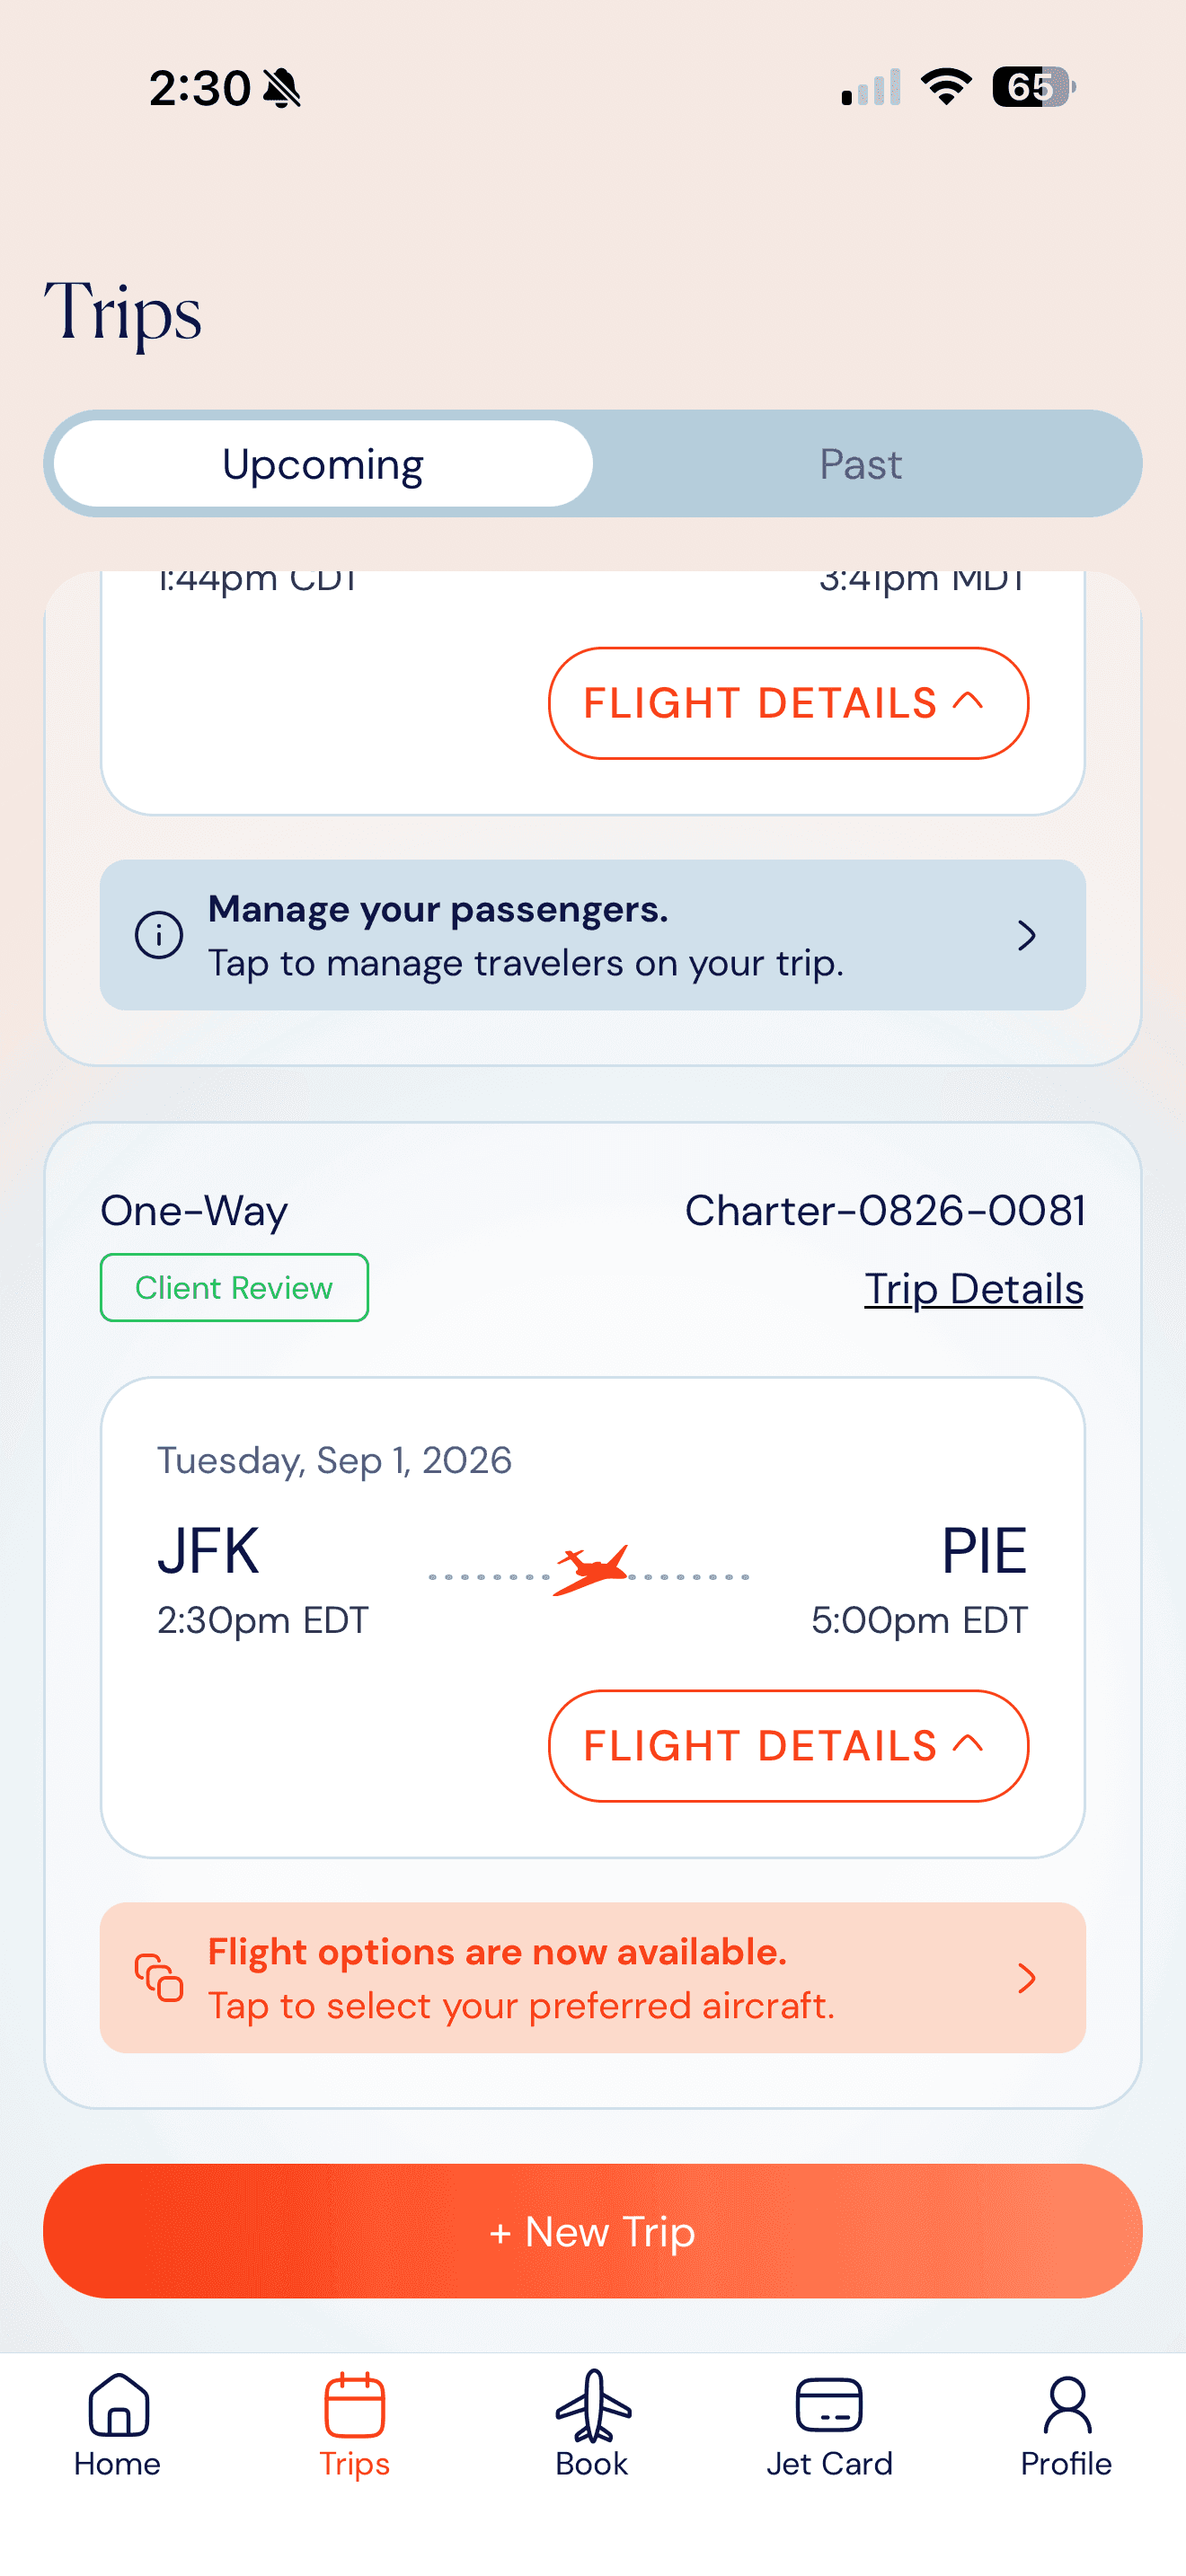
Client Review
Flight options ready.
Your charter options are ready to review. You'll receive a notification, and your trip will be updated to Client Review. Compare your flight options and select the aircraft that best fits your travel needs.
- Open the notification or My Trips then tap Choose Your Trip.
- Review your flight options and select your preferred aircraft.
- Your Private Aviation Expert will take care of the rest.
About the operators: Your safety is our highest priority. Every flight option meets Jets.com's Assured Safety Standards, and we prioritize ARGUS and Wyvern-rated operators whenever possible.
Charter Flight Booking · Steps 5 – 8
Confirm your trip, costs, and payment.
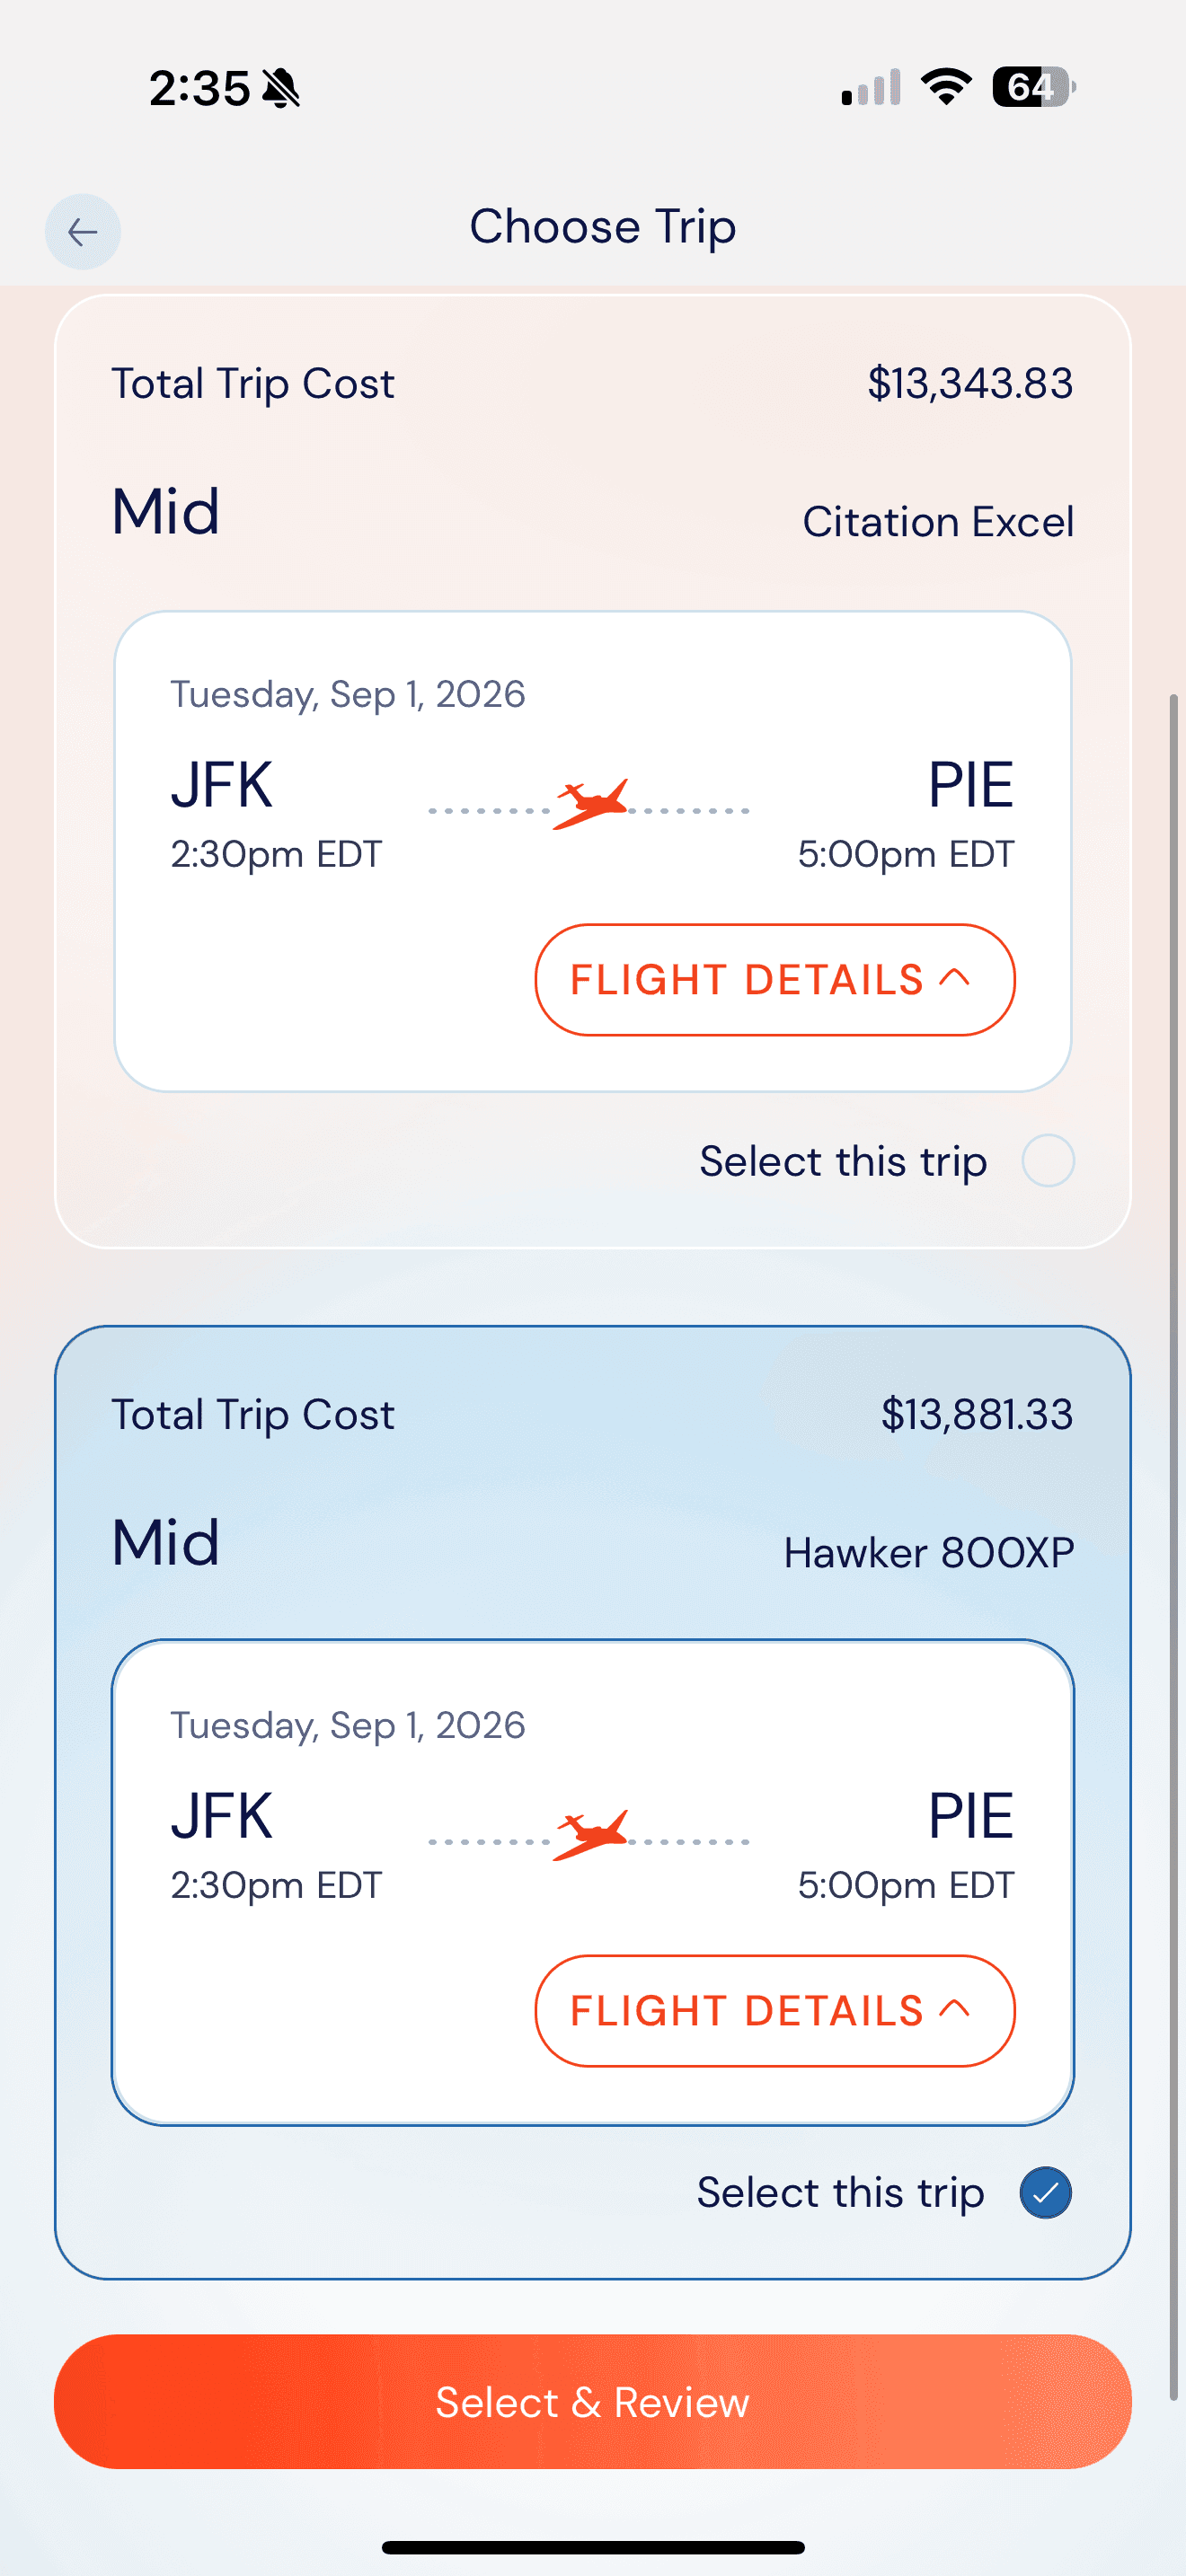
choose your trip
Review your flight options.
Compare aircraft, pricing, and itinerary details before selecting the option that best fits your travel plans.
- Tap Flight Details to expand.
- Tap Select this trip to highlight it.
- Tap Select & Review to continue.
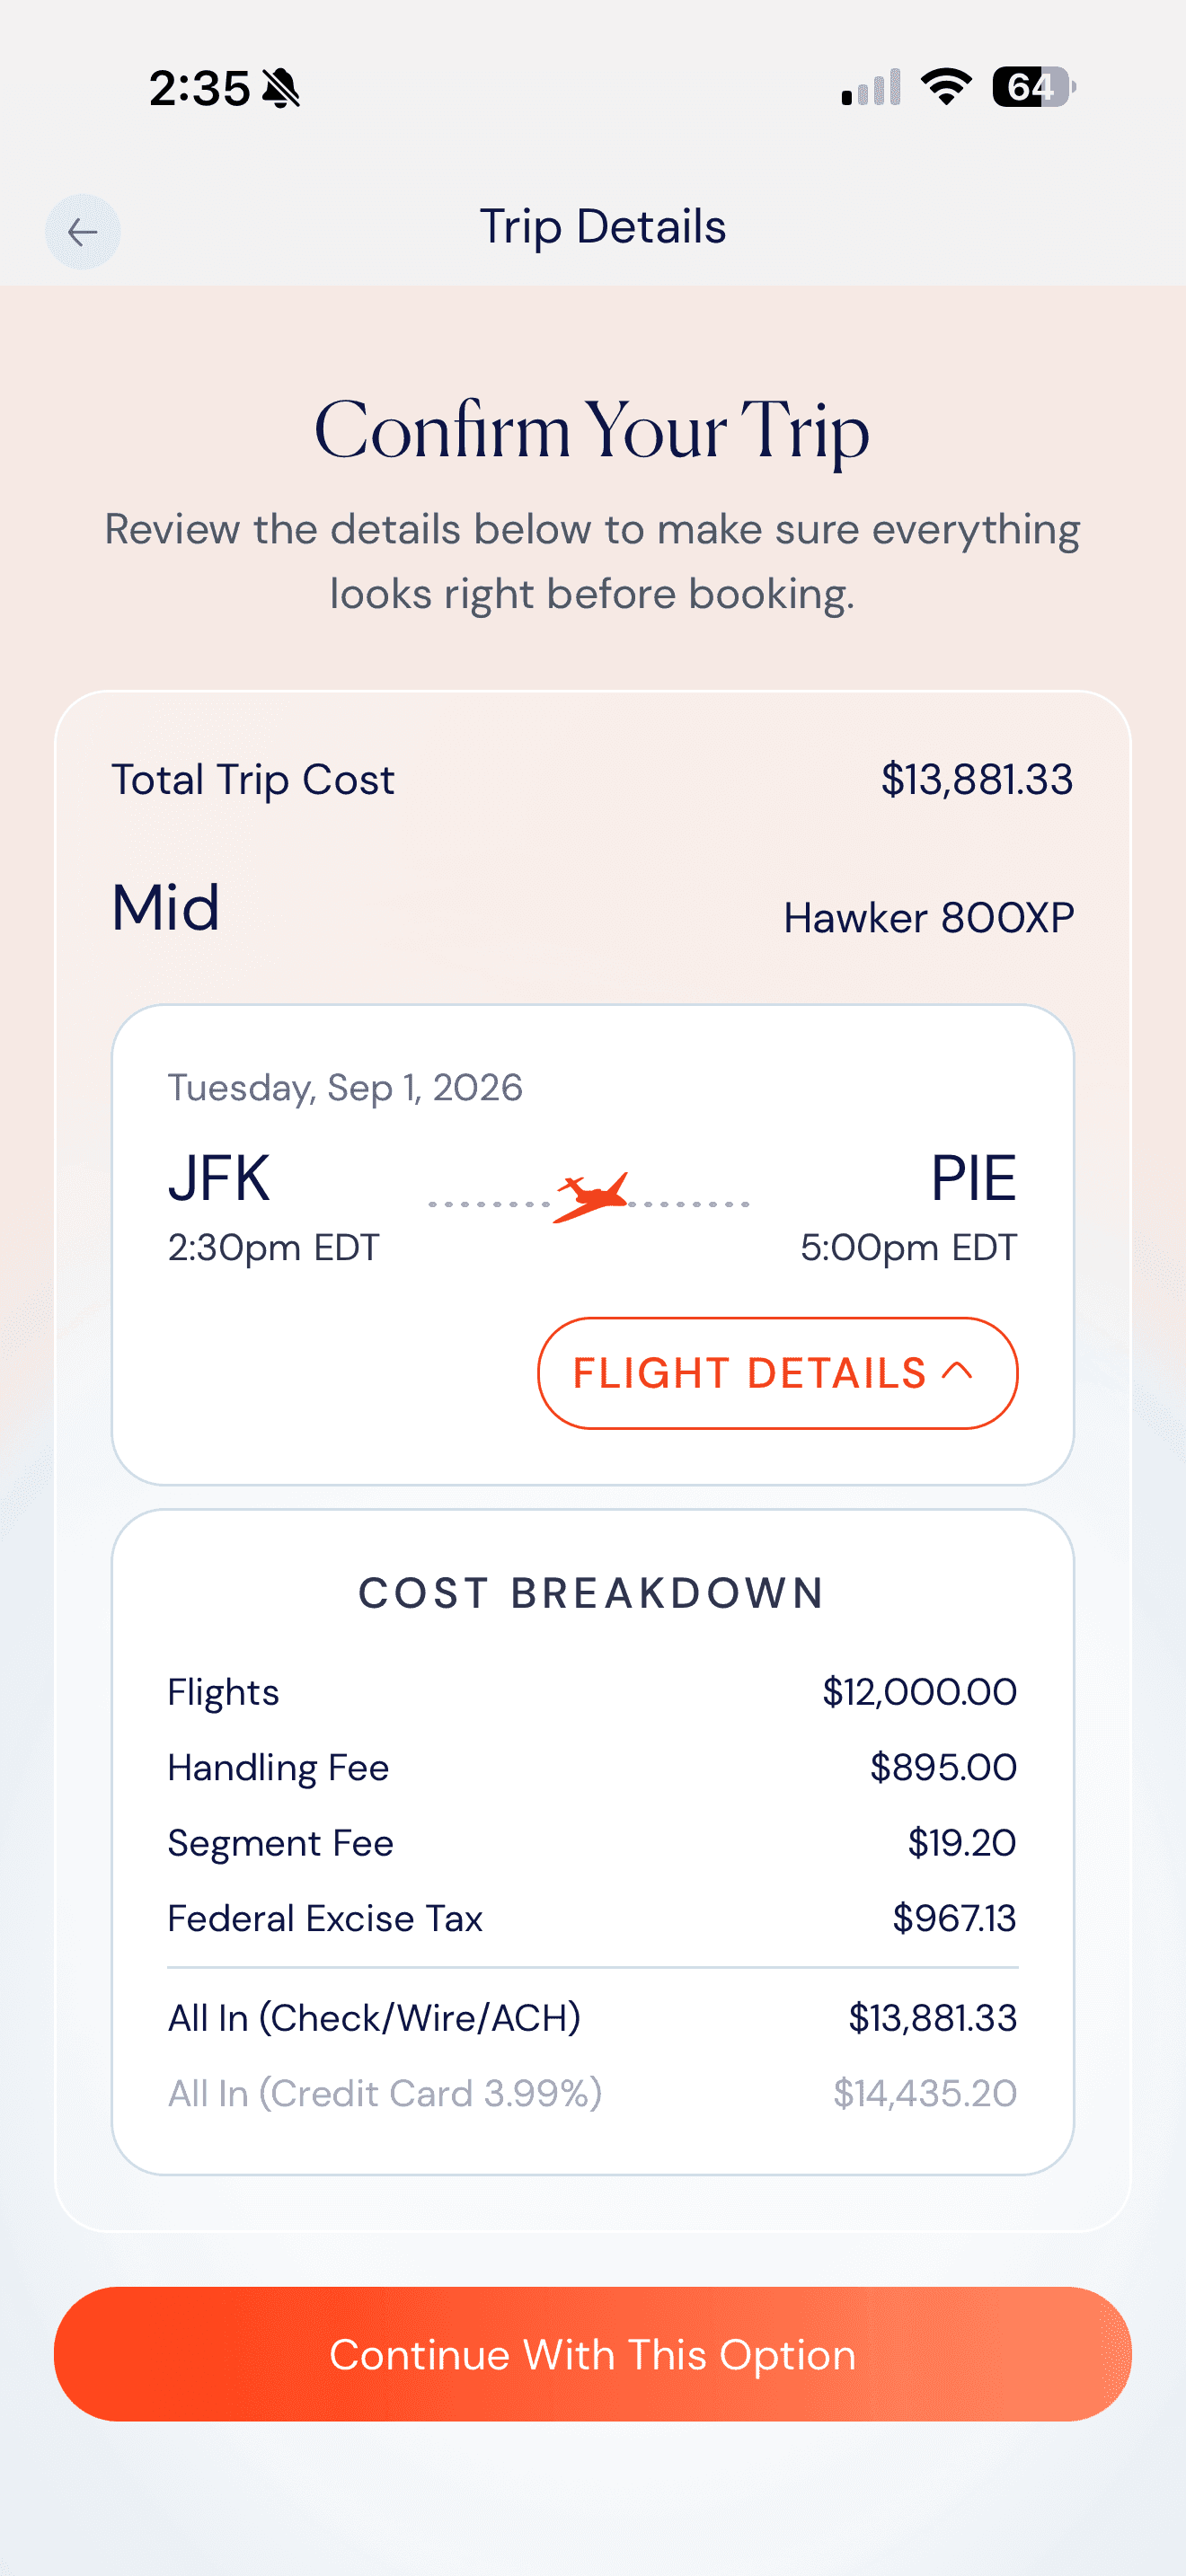
confirm your trip
Review the cost breakdown.
See a clear breakdown of your trip cost before confirming your booking. Compare payment options and choose the one that works best for you.
- All In (Check/Wire/ACH) – the total cost.
- All In (Credit Card 3.99%) – the total cost with credit card fee.
- Tap Continue With This Option.
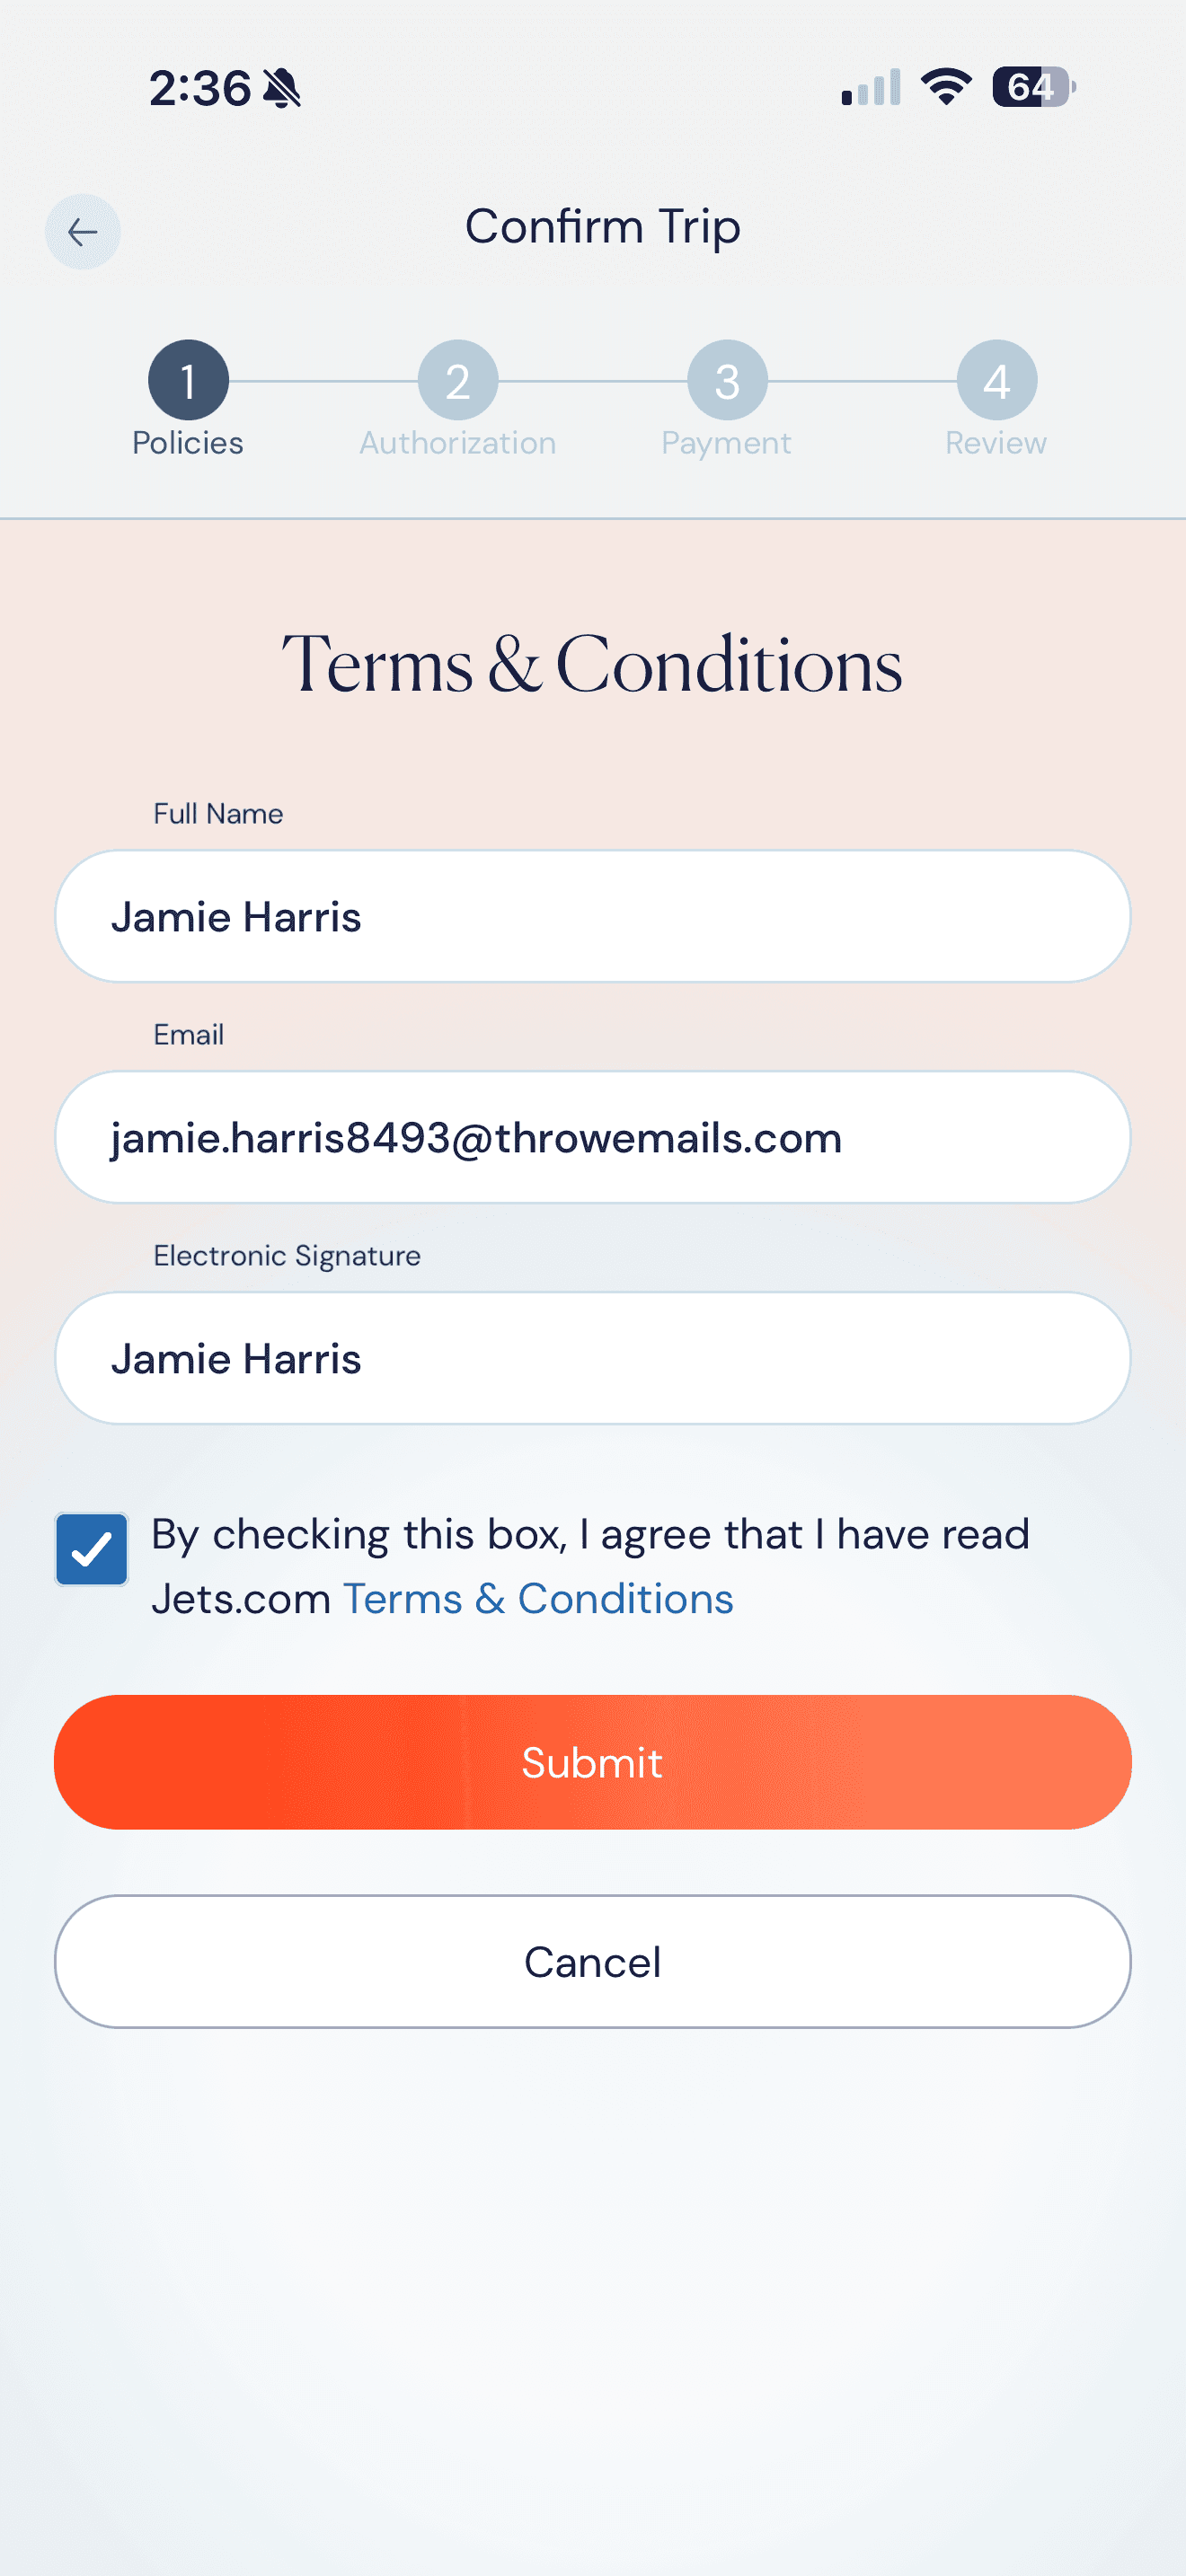
Review Policies
Sign the Terms & Conditions.
Review the agreement, provide your electronic signature, and accept the Terms & Conditions to continue.
- Signature is timestamped and saved.
- Tap Terms & Conditions to read.
- The Submit button remains disabled until all fields are complete.
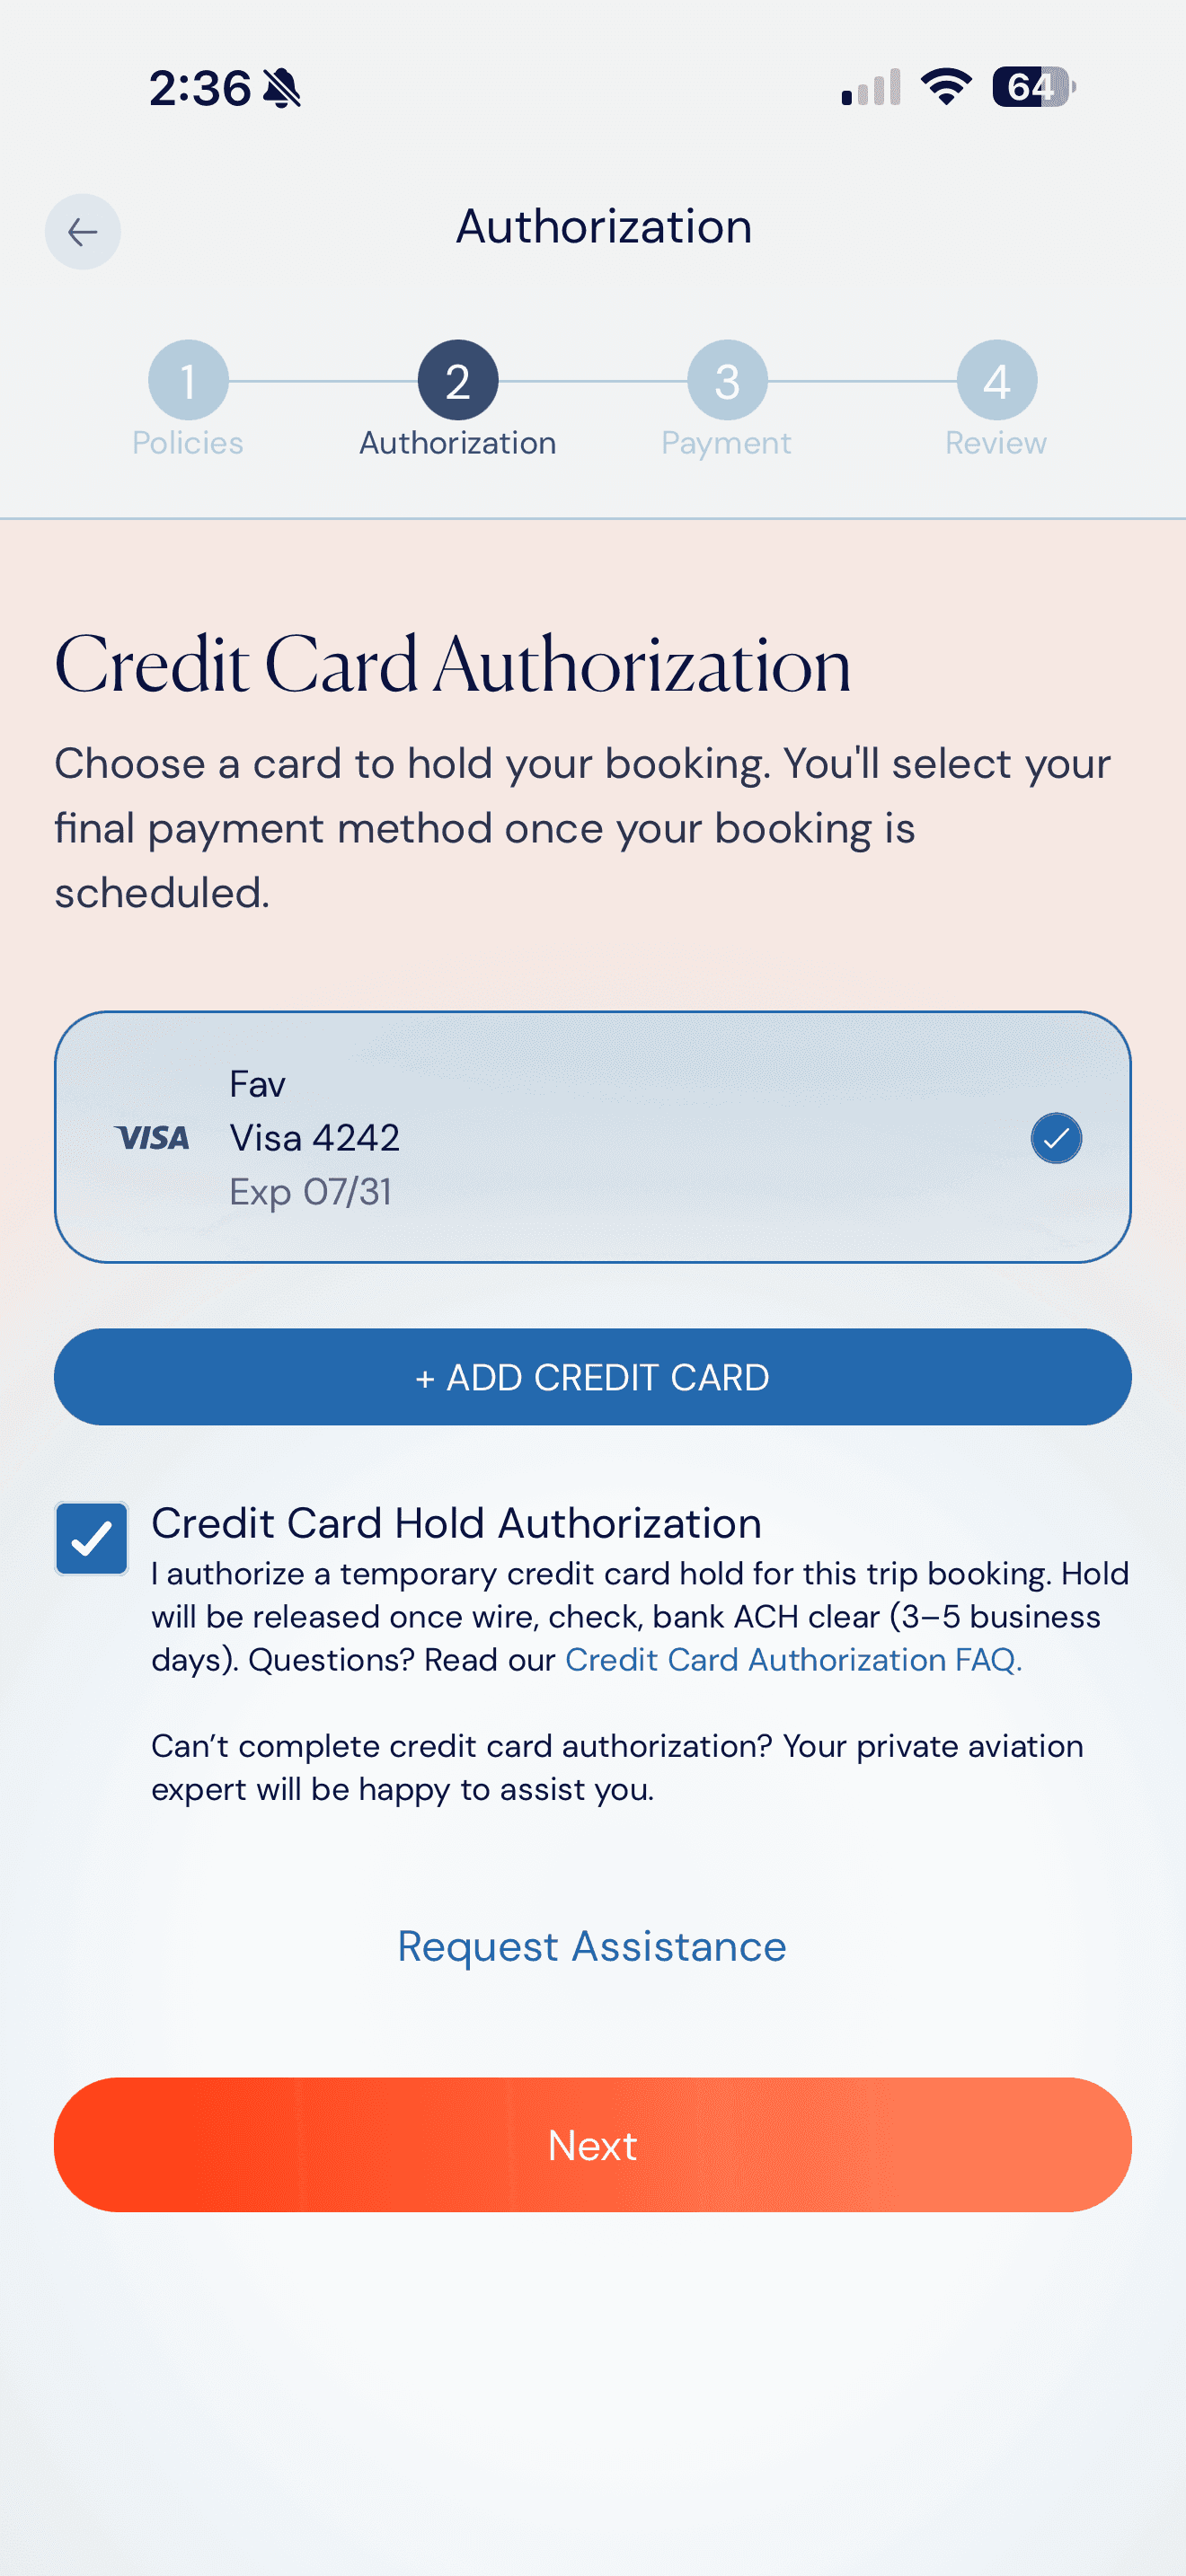
Credit Card Authorization
Authorize your payment.
Select a credit card to place a temporary authorization hold while we finalize your booking. Your card won't be charged until payment is processed according to your selected payment method.
- Tap an existing card or + Add Credit Card.
- Check the authorization box to confirm.
- If you're paying by wire/check/ACH, the temporary credit card hold will be released once your payment clears.
About the authorization hold: The hold is released once your wire, check, or ACH payment clears (typically 3–5 business days). If you pay by credit card, the hold becomes the final charge and a 3.99% processing fee applies.
CHARTER FLIGHT BOOKING · STEPS 9 - 11
Your trip is scheduled — complete payment to finalize the booking.
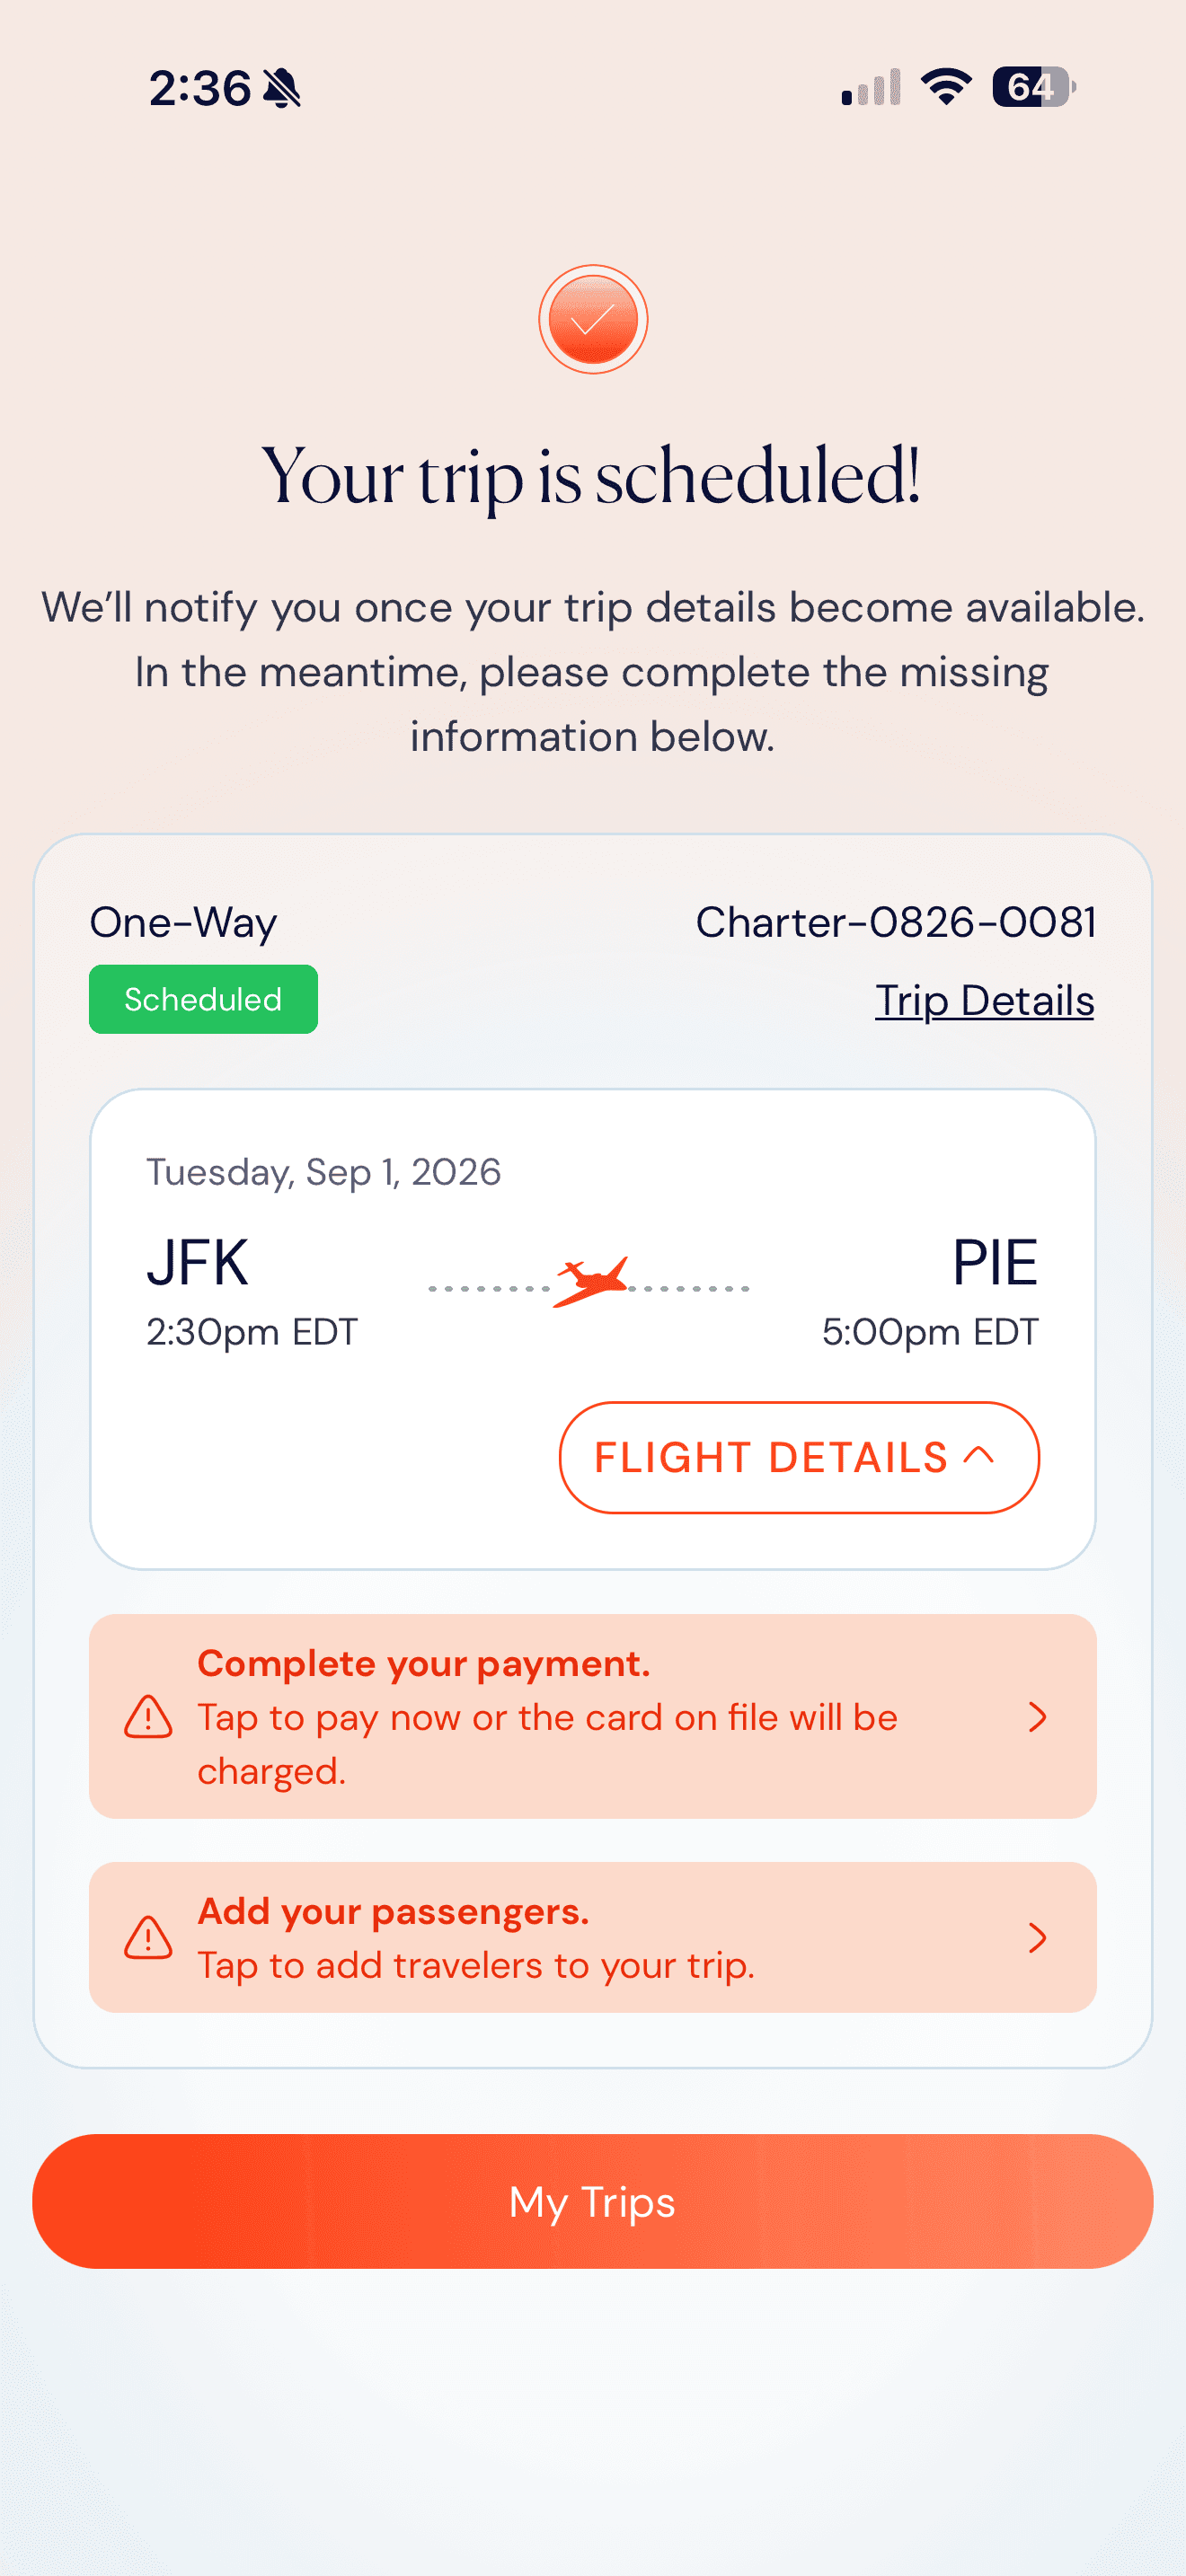
trip scheduled
Complete your payment.
Your trip card now prompts you to complete payment and verify your passengers.
- Your trip status is now Scheduled.
- Tap Complete your payment to continue.
- Tap Verify your passengers to add travelers.
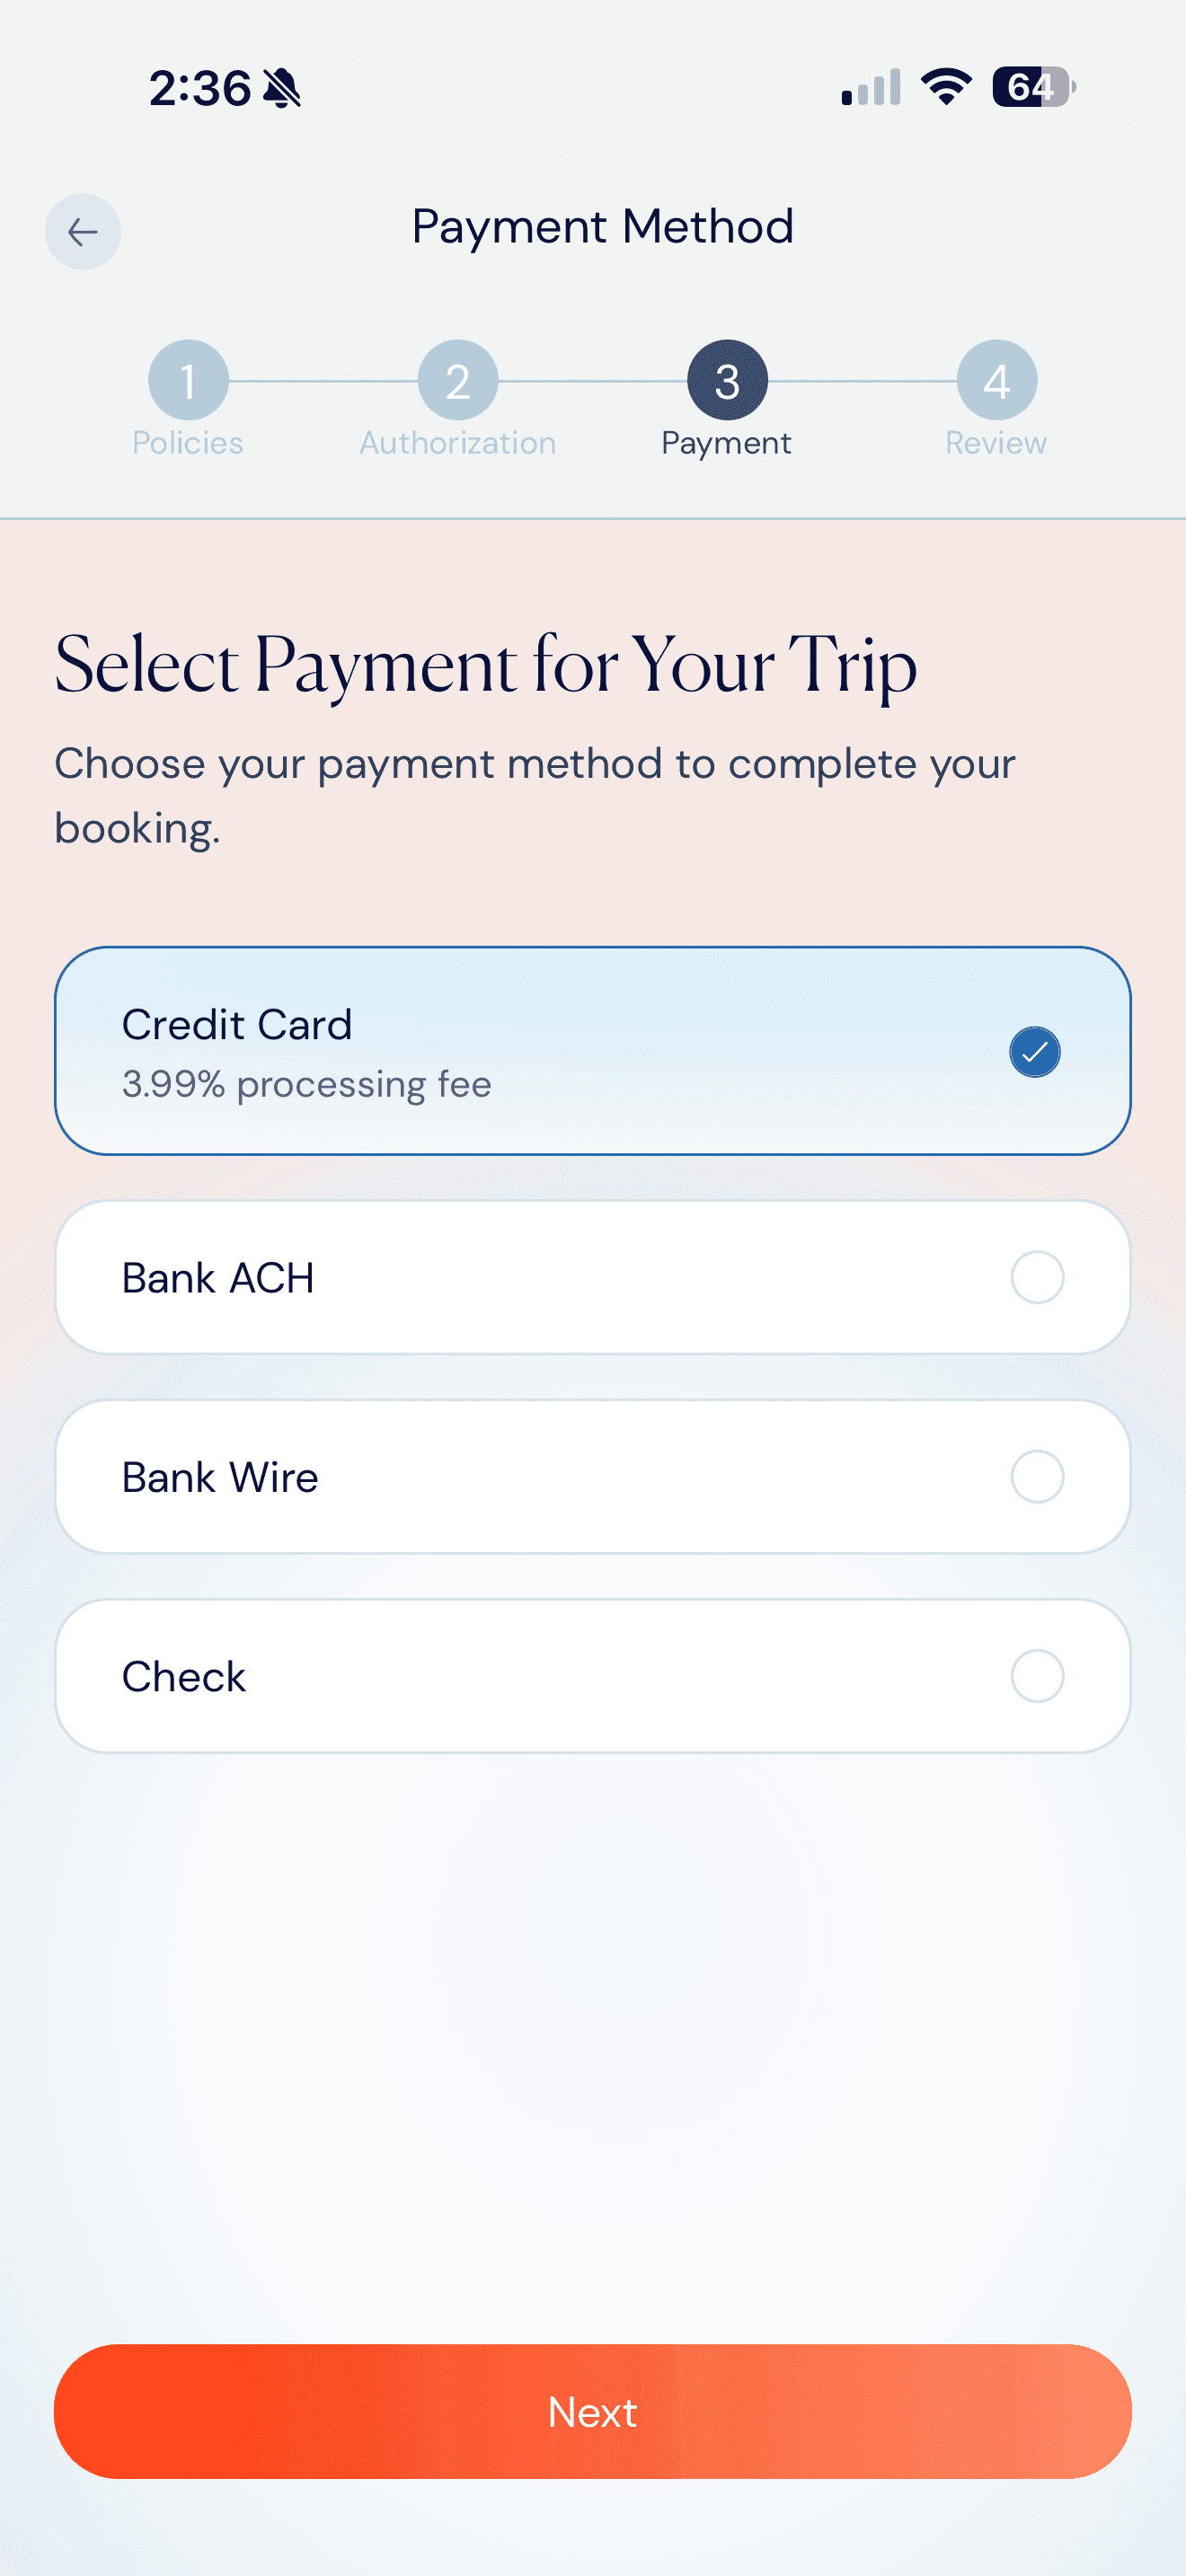
Payment Method
Choose how to pay.
Pick Credit Card (with the 3.99% processing fee), Bank ACH, Bank Wire, or Check. Credit Card is fastest to clear; the others have no fee.
- Credit Card – 3.99% processing fee.
- Bank ACH, Bank Wire, Check – no fee.
- Tap Next to confirm details.
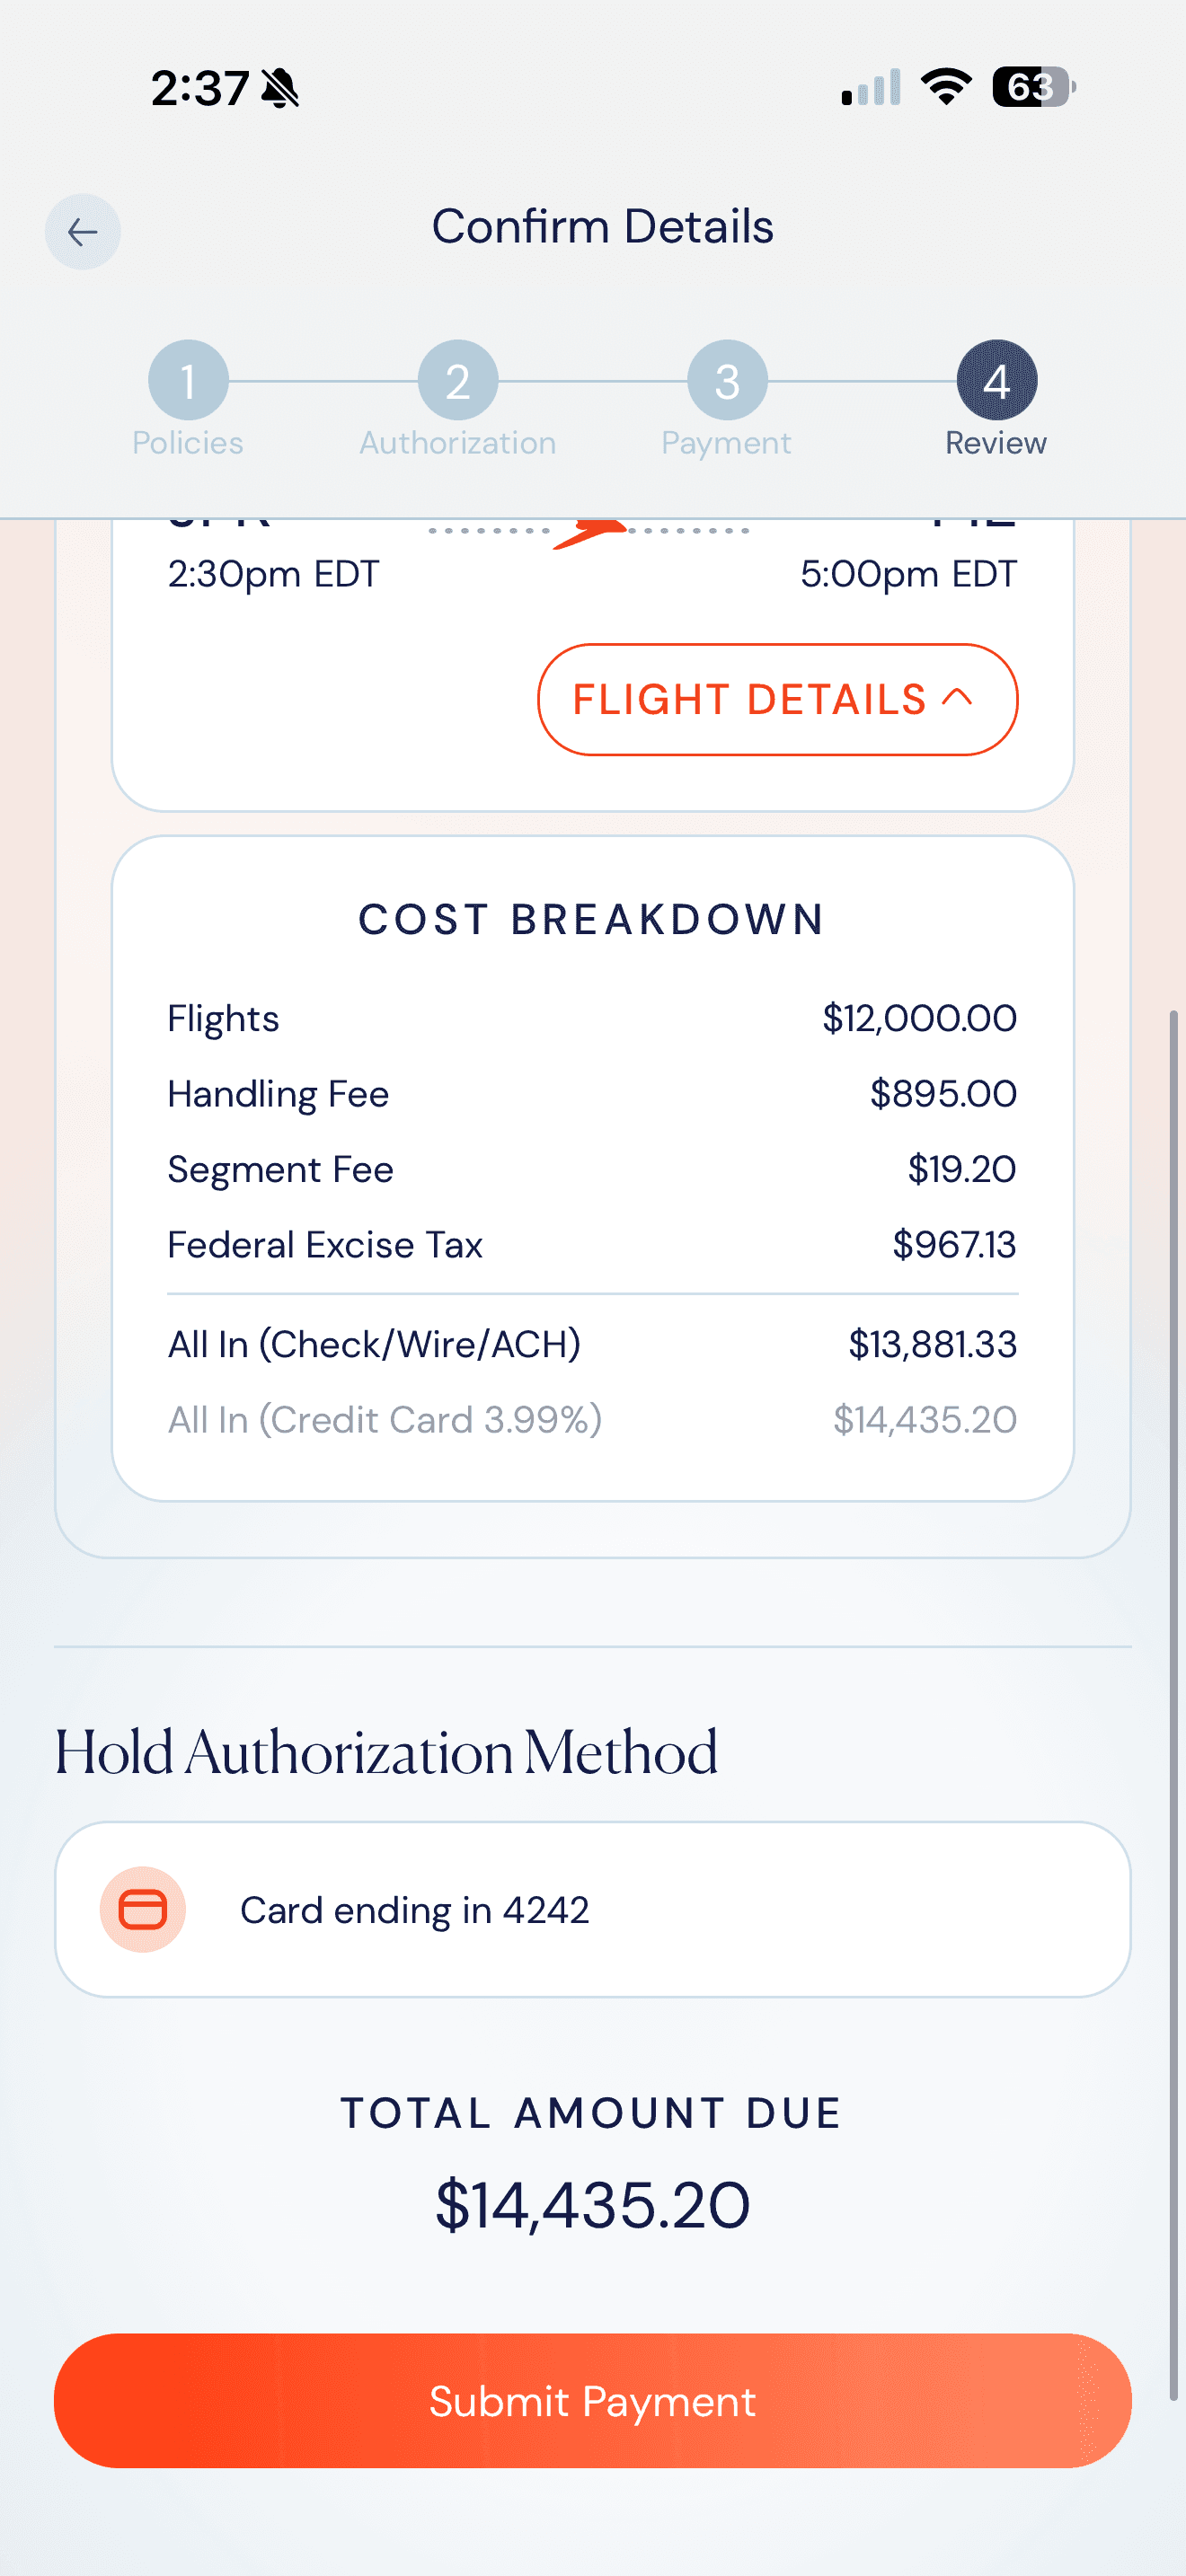
Confirm Details
Submit payment.
A final cost breakdown shows the Total Amount Due for your selected method. Tap Submit Payment to finalize.
- The total updates based on your selected payment method.
- Credit Card and ACH payments can be completed in the app. Bank Wire and Check payments are completed offline.
- After submitting payment, you'll see a confirmation screen.
Next: After you submit payment, you'll see a confirmation screen and your trip status will update based on your payment method.
Charter Flight Booking · Steps 12–13
Payment confirmed — your trip is officially on the books.

payment confirmed
Your payment was successful.
A confirmation screen with a checkmark confirms your payment. Tap Next to return to your Trips list.
- Payment is processed using your selected payment method.
- If applicable, any authorization hold is released within 3 – 5 business days.
- A receipt is emailed within a few minutes.
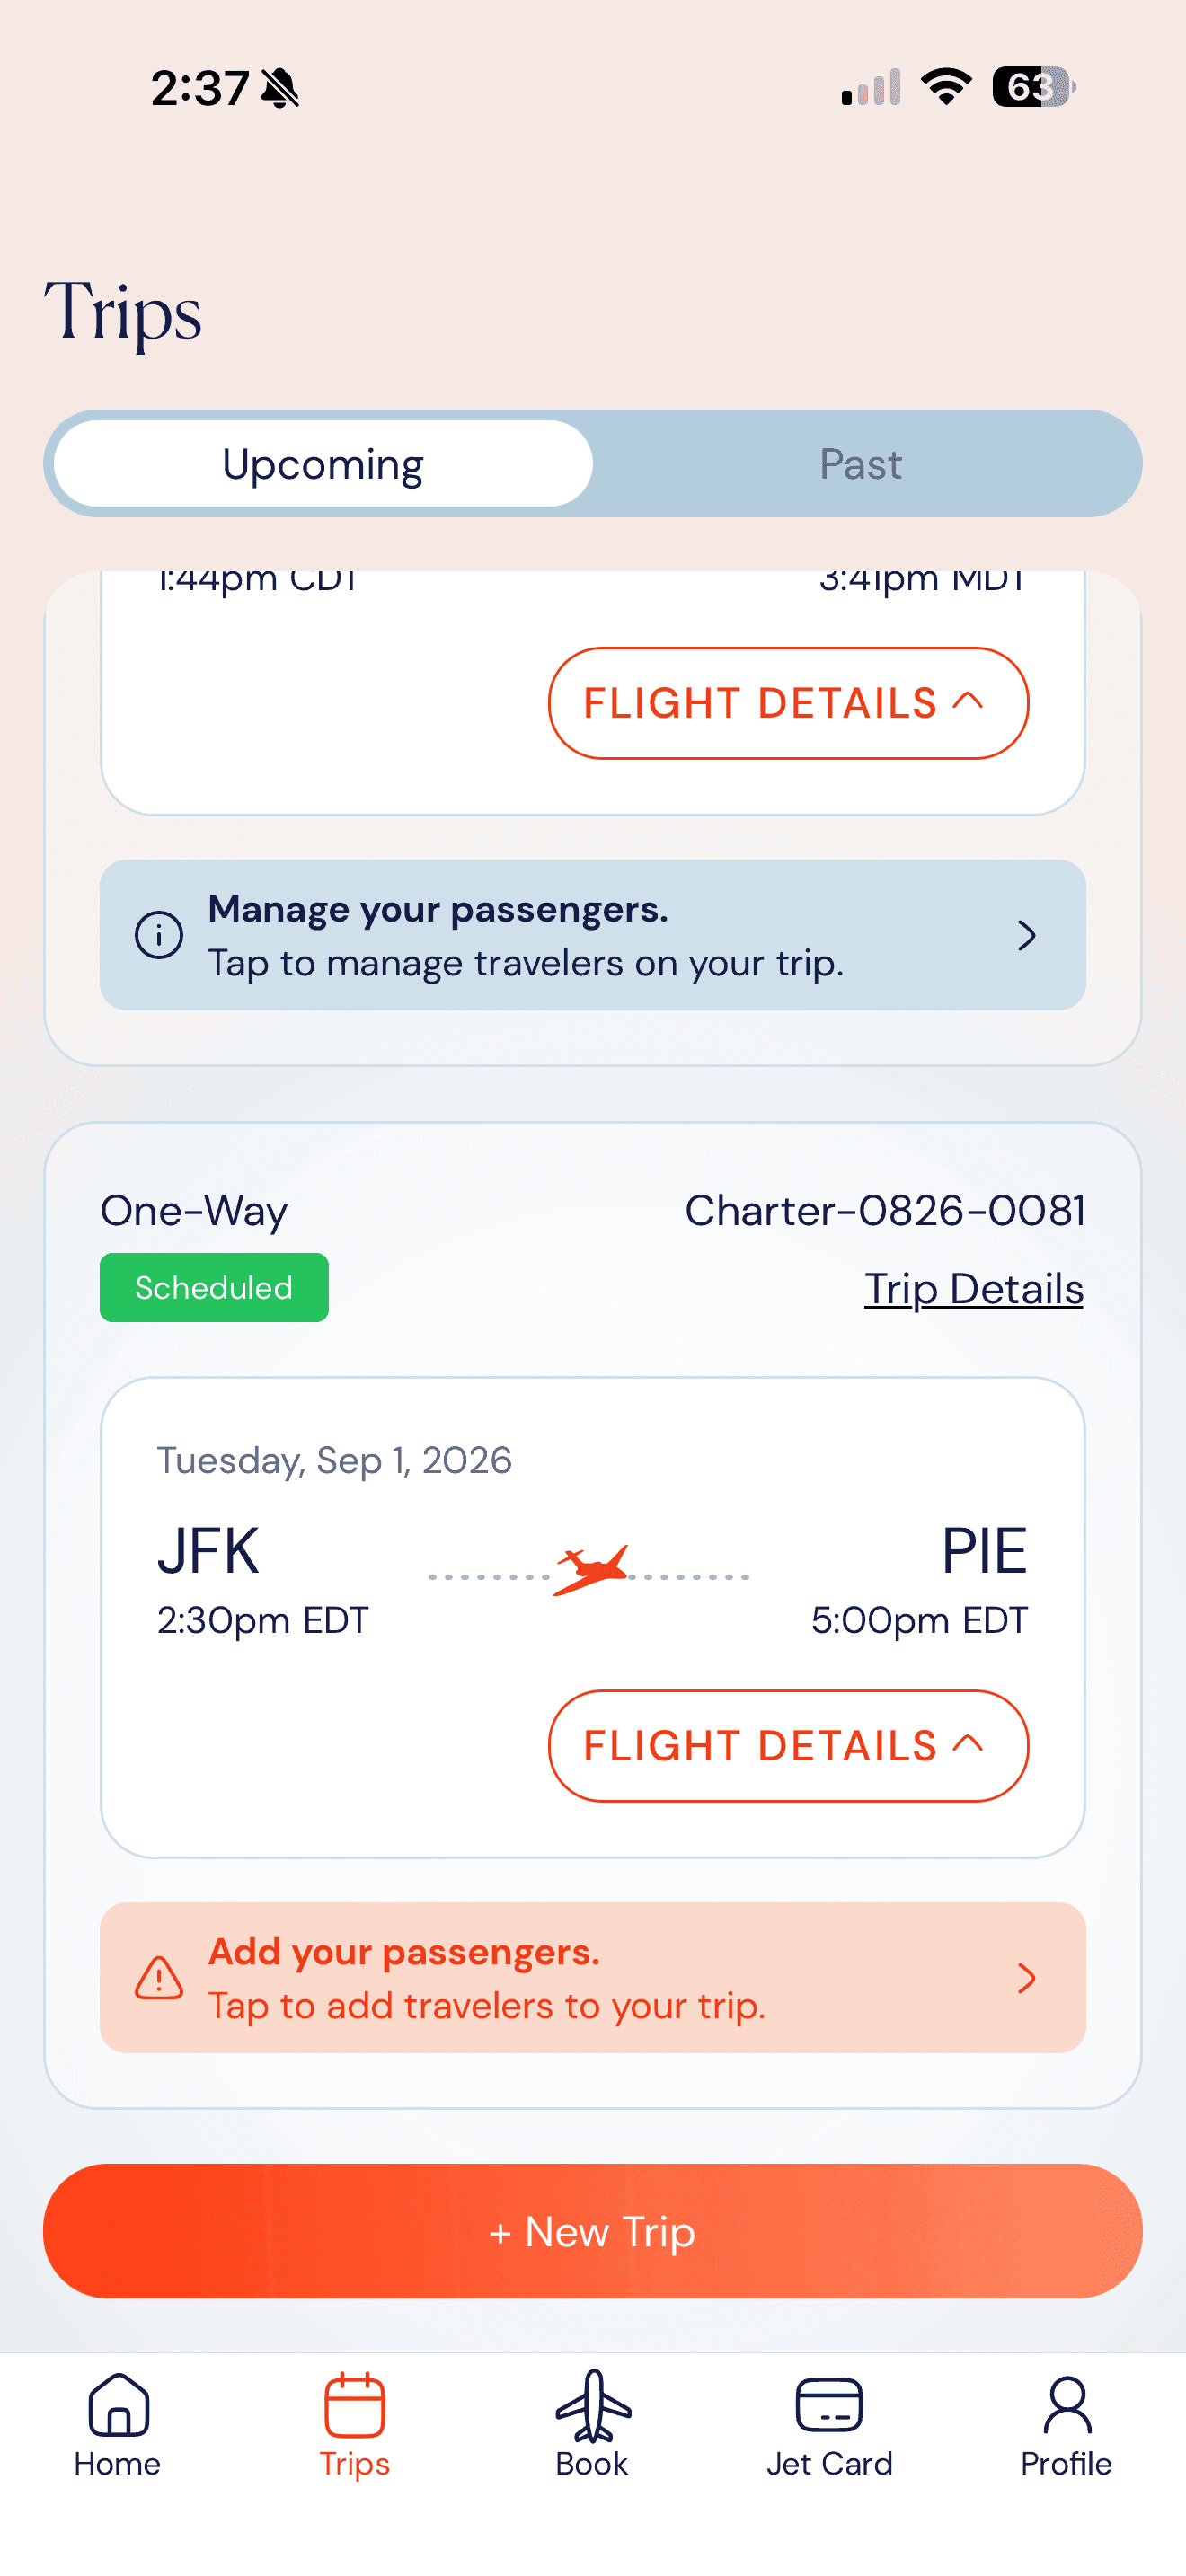
Payment Method
Your trip is on the books.
The Trips list now shows your booking without the complete payment prompt. The trip card surfaces a Verify your passengers prompt — required before takeoff.
- Tap Trip Details for payment details.
- Tap Flight Details to expand routing & FBO info.
- Tap Verify your passengers to complete your passenger manifest.
What's next: Add your passengers from the trip card or continue to Passenger Verification. Passenger verification is required before departure.
charter payment methods
payment methods at a glance
What to Expect | Credit Card | Bank ACH | Bank Wire | Check |
|---|---|---|---|---|
Processing fee | +3.99% added to total | None | None | None |
Funds Clearing Time | Instant on submit | 3-5 business days | Same business day if before cut-off | 7-10 business days mail + clearance |
Credit Card Hold | Authorization converts to payment | Released on clearance | Released on clearance | Released on clearance |
In-App Confirmation | Immediate confirmation screen | Instructions screen | Instructions screen | Instructions screen |
Email Follow-Up | - | - | Wire instructions | Mailing address & payee |
Best For | Last-minute trips | No-fee domestic payments | Same-Day Funding | Pre-Planned Trips |
No matter which payment method you choose, the booking process is the same through Submit Payment. What changes is how your payment is processed afterward. Credit Card payments are confirmed immediately, while ACH, Wire, and Check require funds to clear before payment is finalized.
Manage Passengers
Every confirmed trip requires a complete passenger manifest before takeoff. Simply add your passengers, designate a lead passenger, and upload identification directly in the app. Once you've flown with us, your passenger details are saved securely in the app, so booking future trips takes just moments.
Managing Passengers · Steps 1 – 4
Add passengers, complete their profiles, and assign a lead.
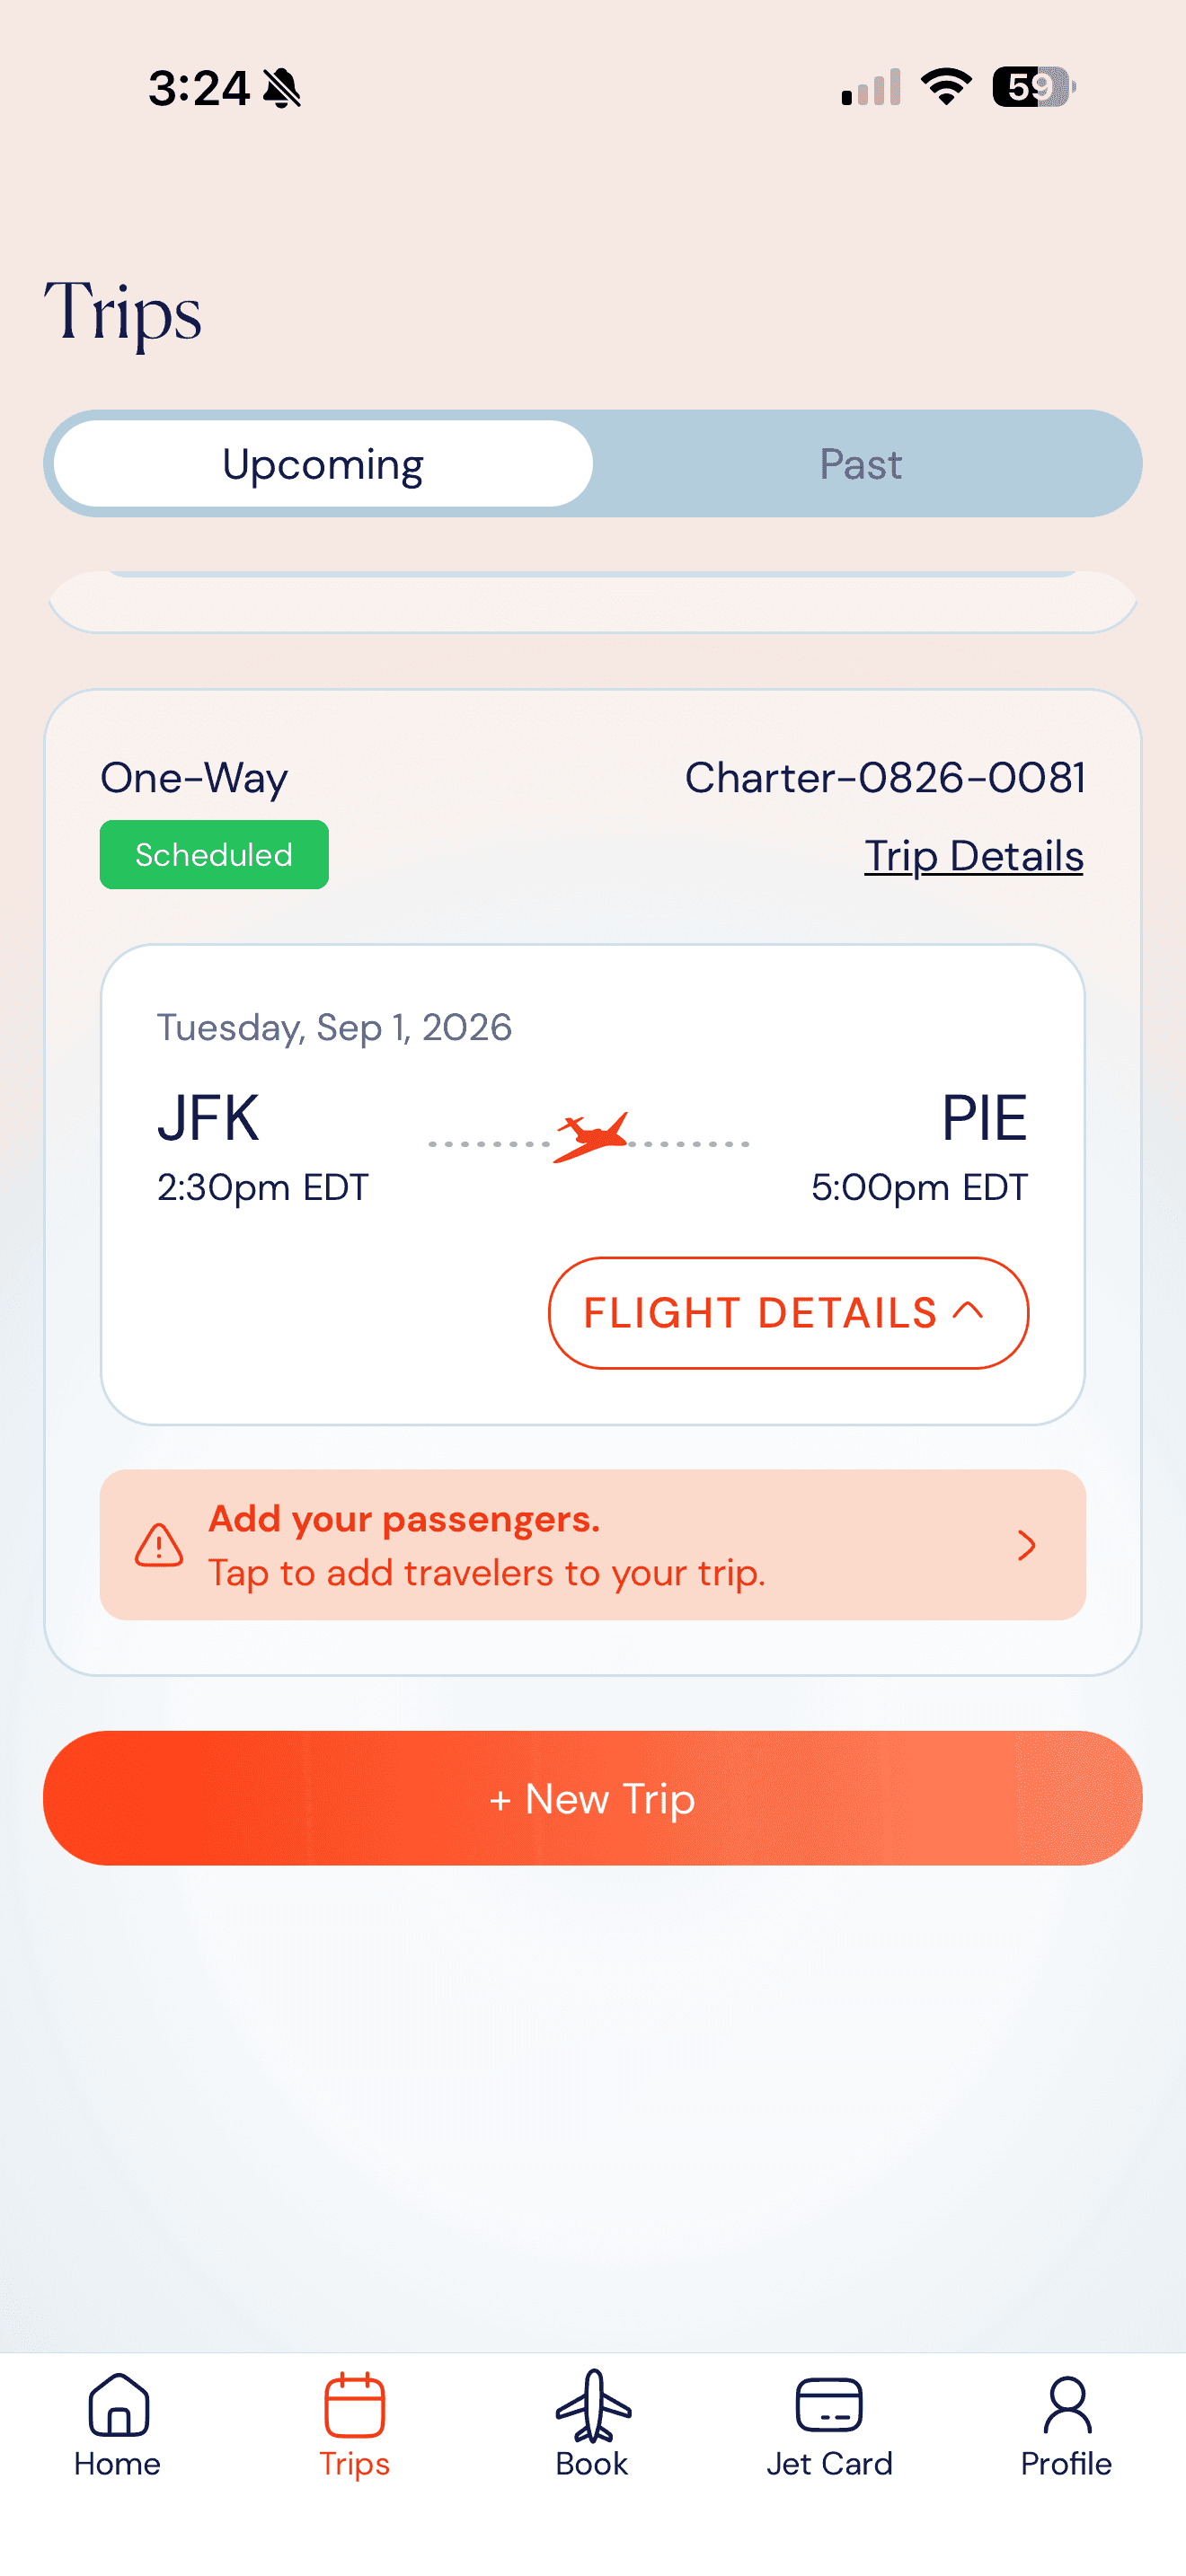
from upcoming trips
Tap the passenger prompt.
After your trip is scheduled, your trip card displays an orange Add your passengers banner. Tap it to begin verifying passengers for your trip.
- Multiple legs? Both appear on one screen.
- Required before takeoff.
- Also reachable from Trip Details > Need to add more passengers?
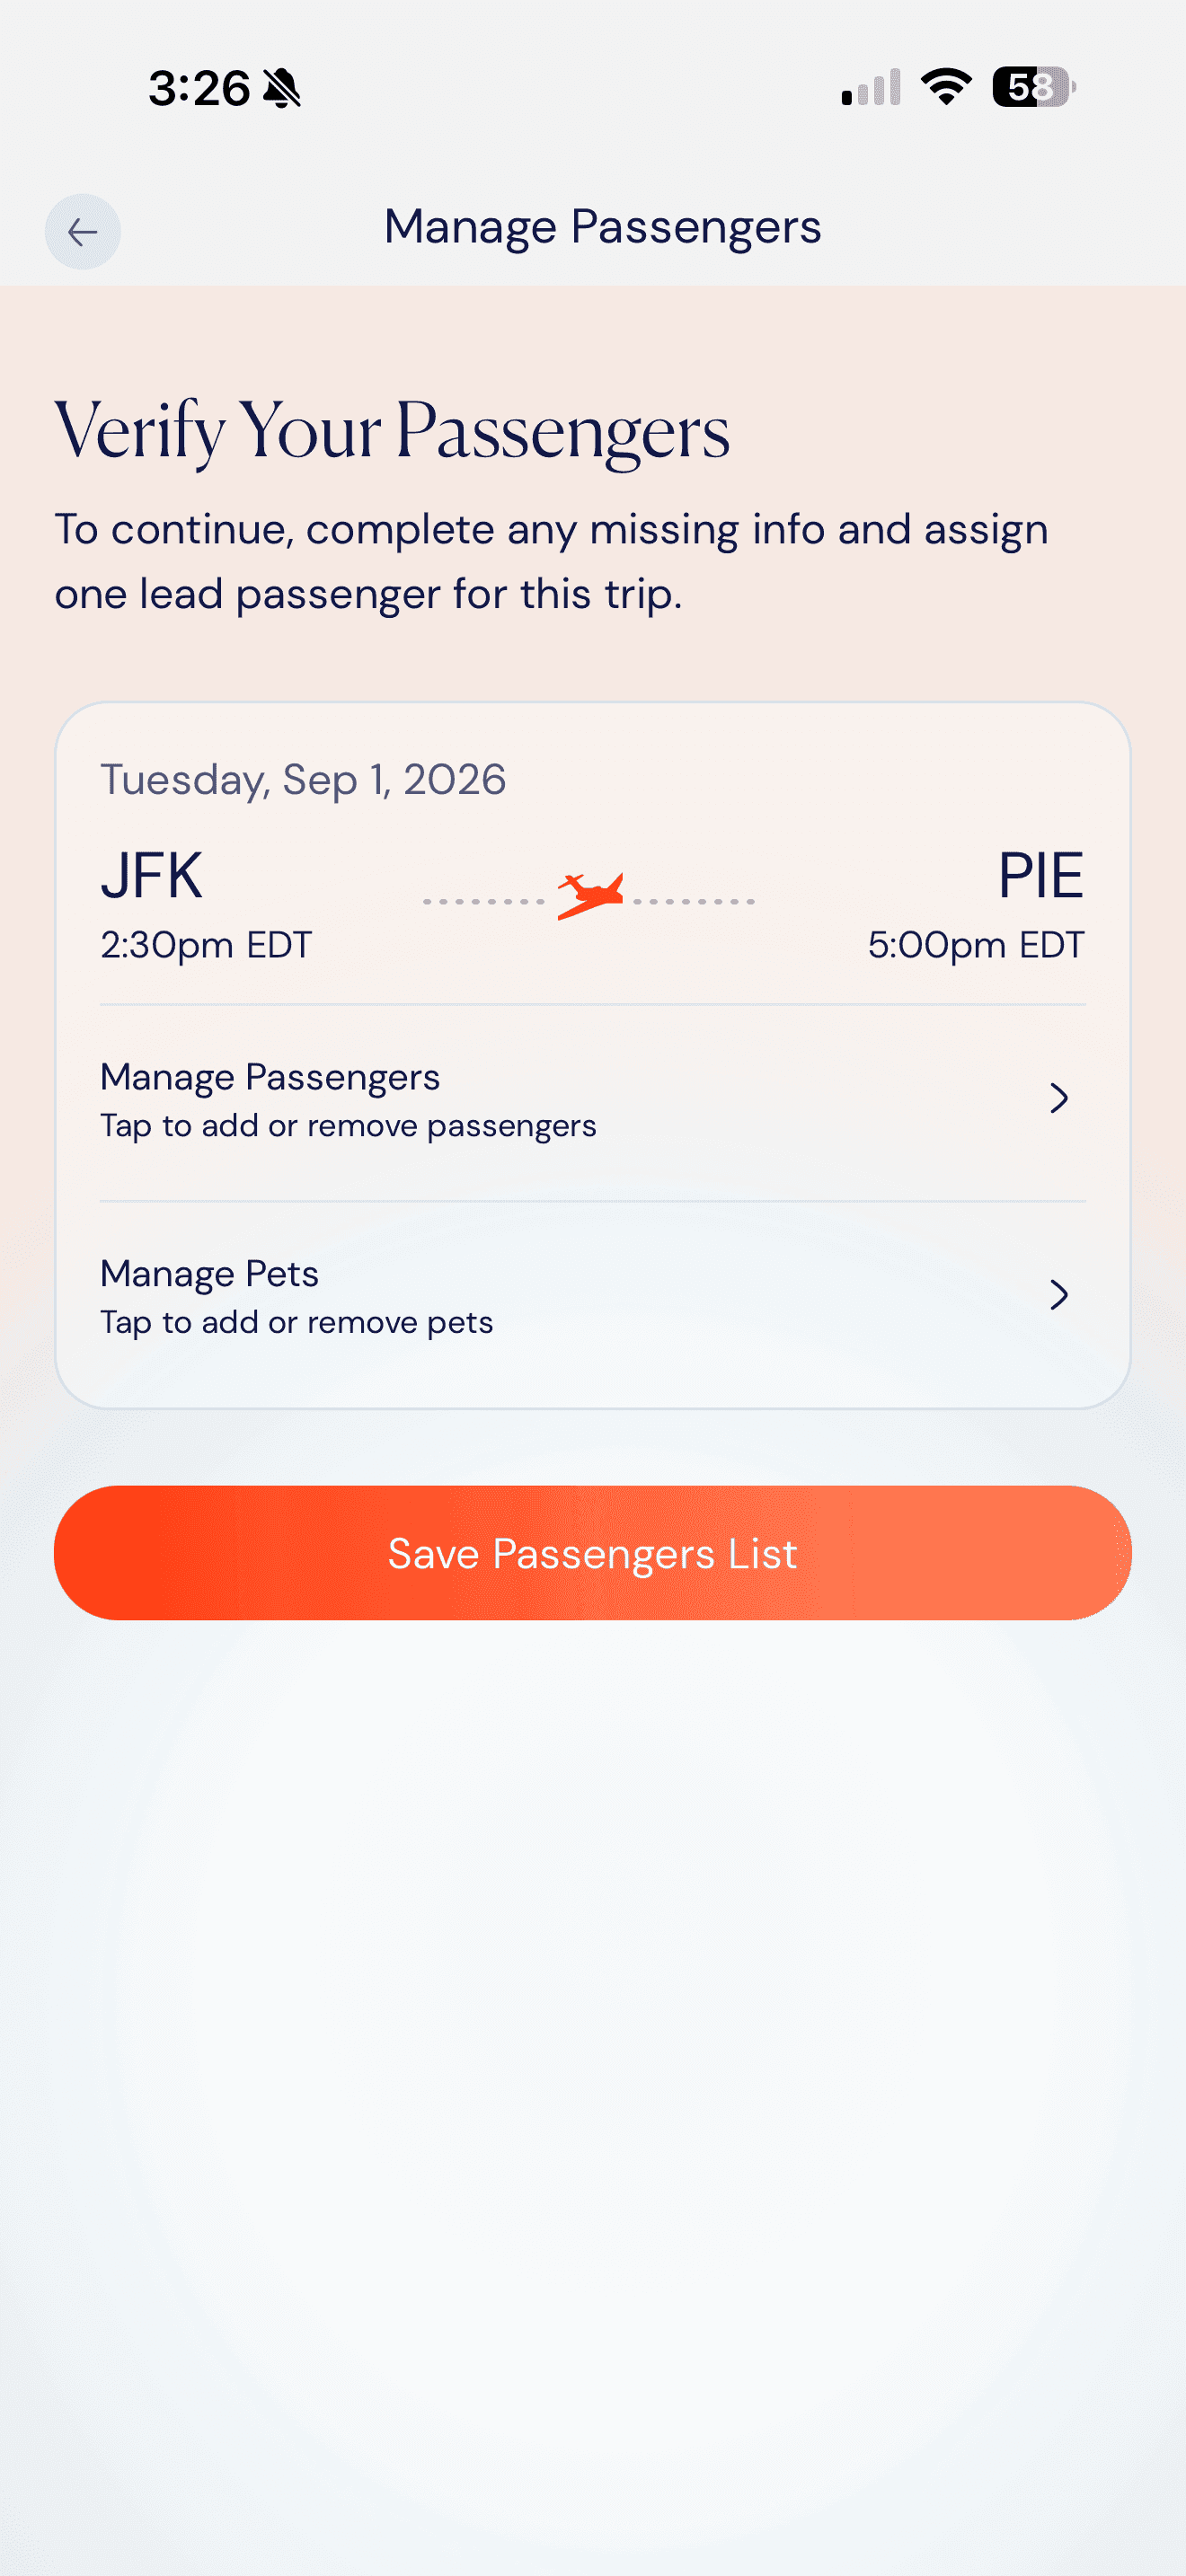
Verify your passengers
One section per leg.
Each leg get its own Manage Passengers and Manage Pets rows. Round-trips and multi-city itineraries show every leg vertically.
- Tap Manage Passengers to open the picker.
- Tap Manage Pets for animals on board.
- Tap Save Passengers List when you're finished.
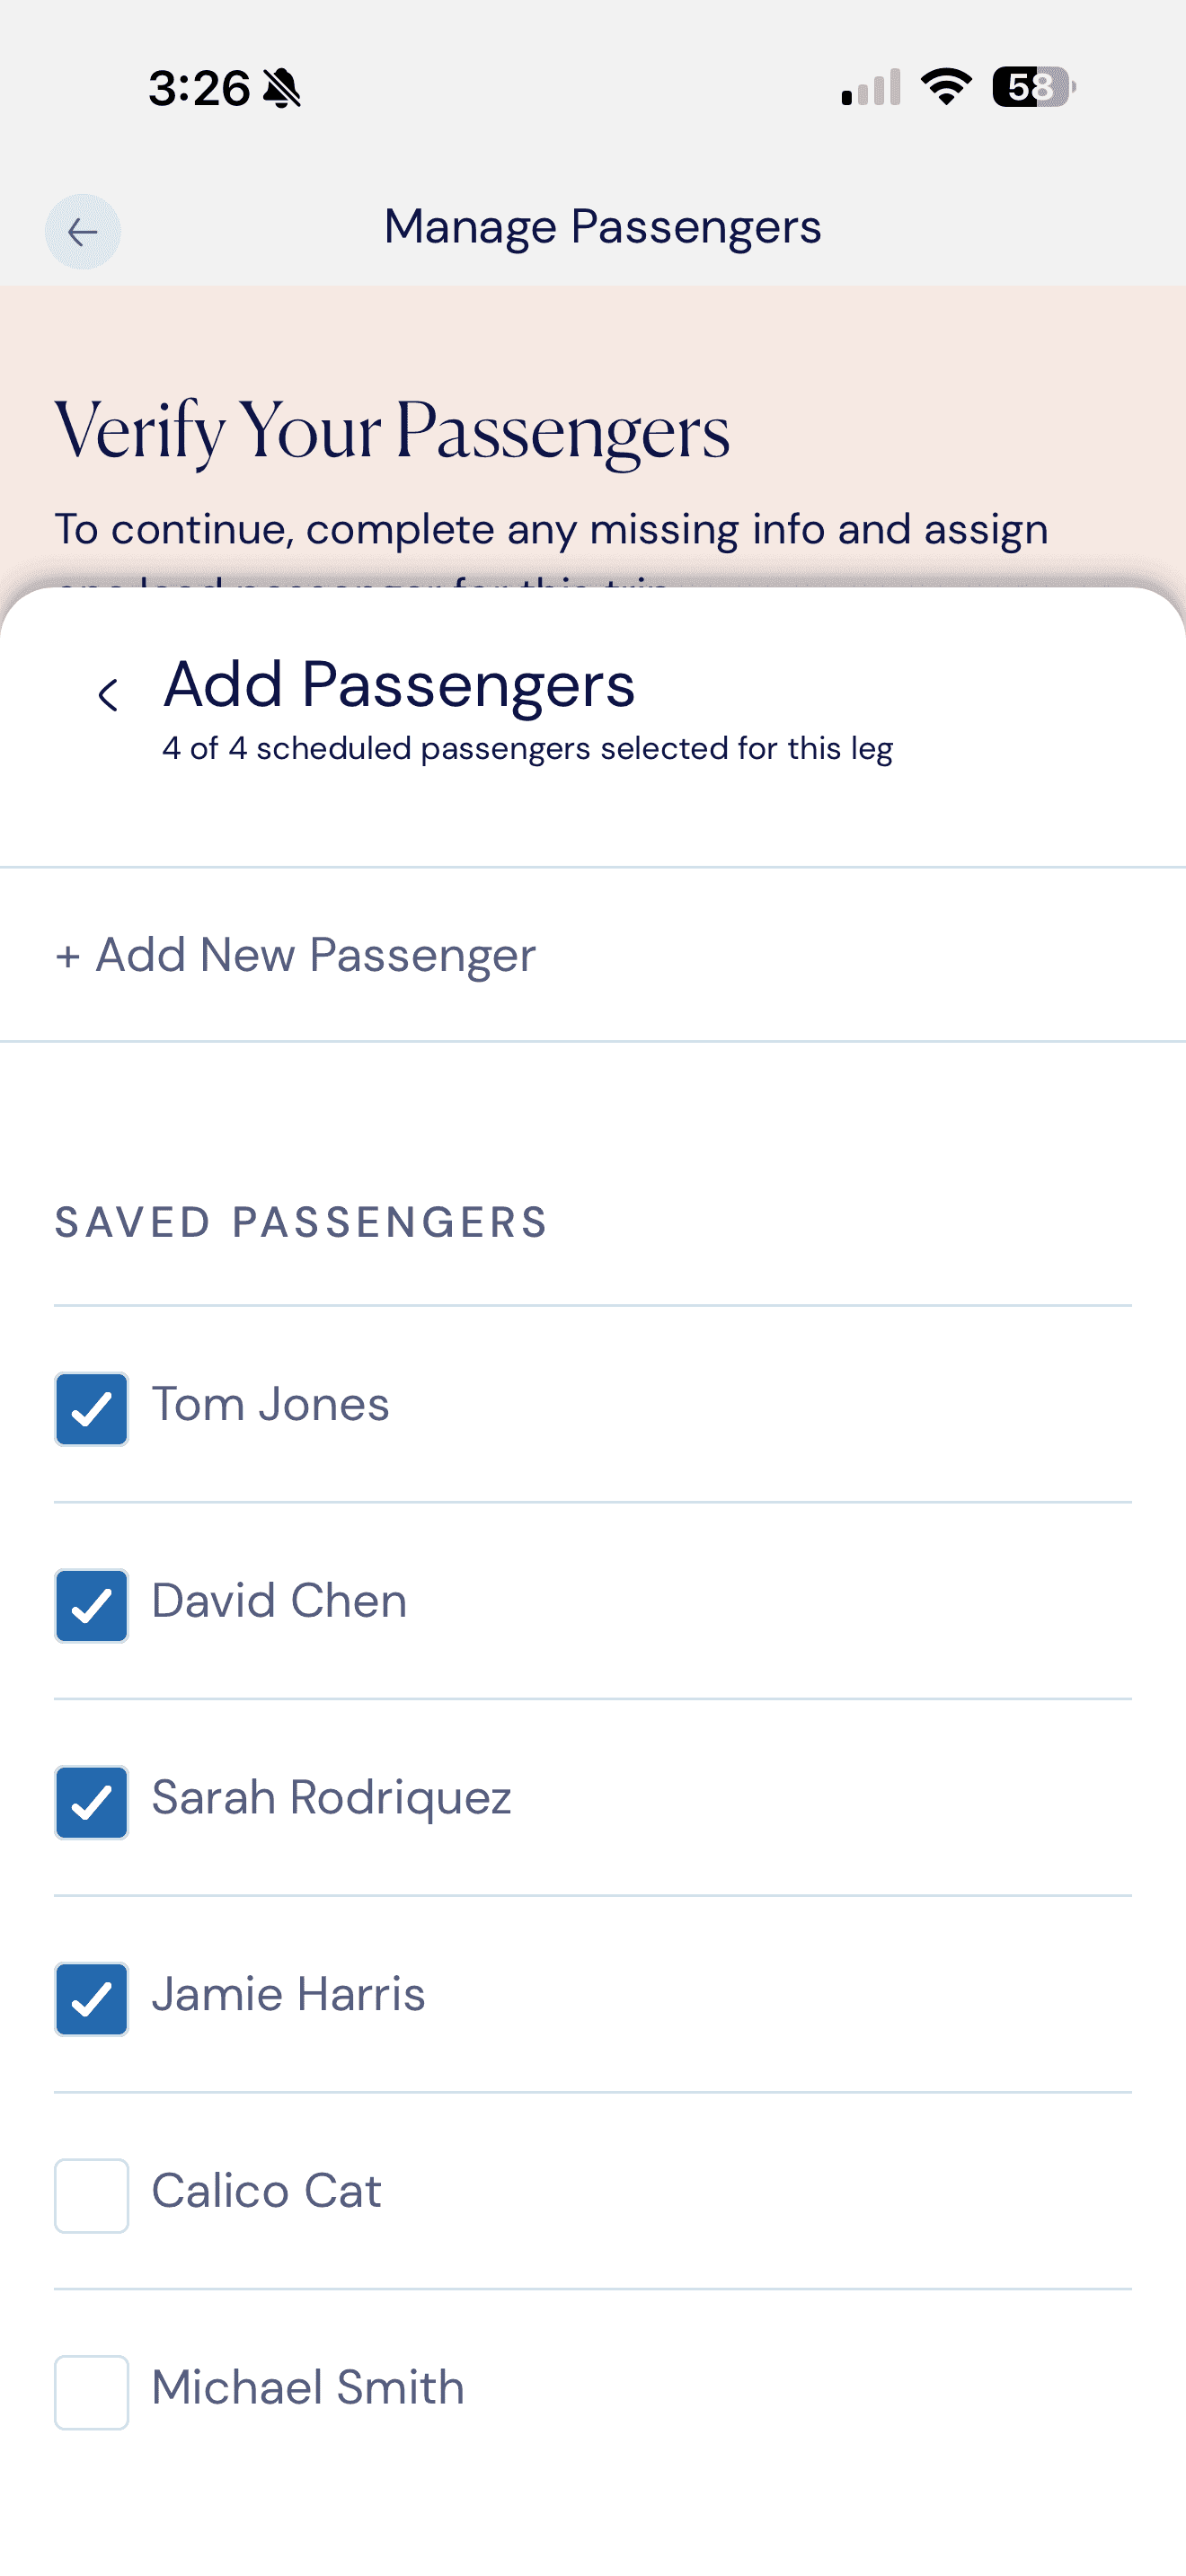
add passengers
Pick from your roster.
Your saved passenger list from prior trips opens automatically. Tap each traveler's checkbox to add them to this leg.
- Tap + Add New Passenger for first-timers.
- The progress indicator shows how many scheduled passengers have been added.
- Selections save when you close the sheet.
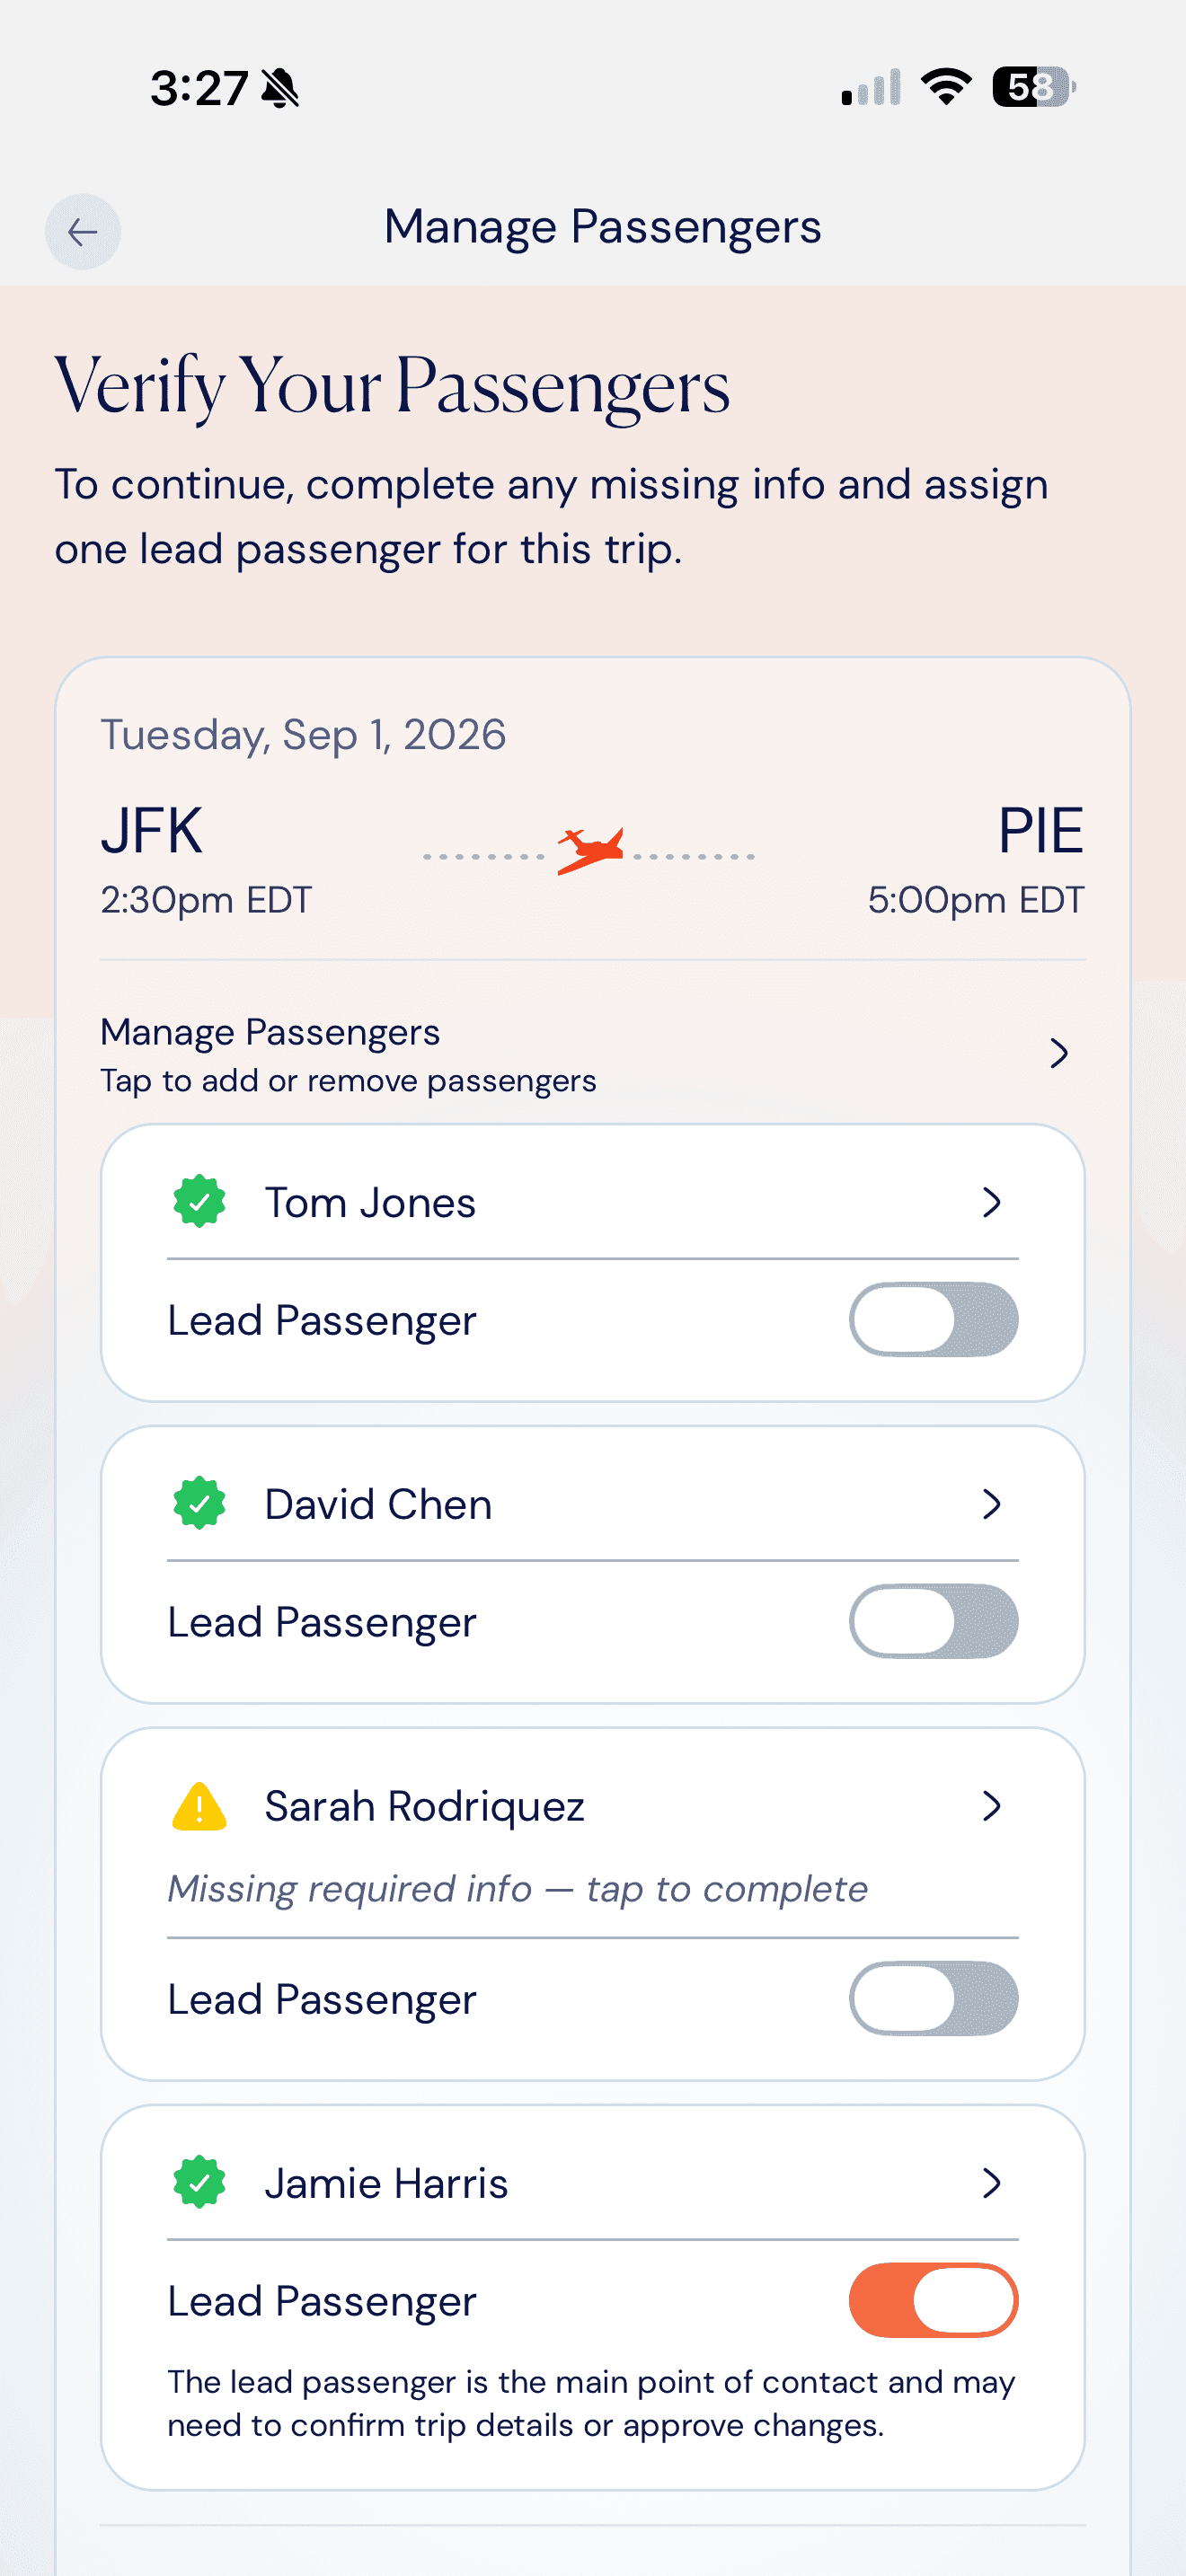
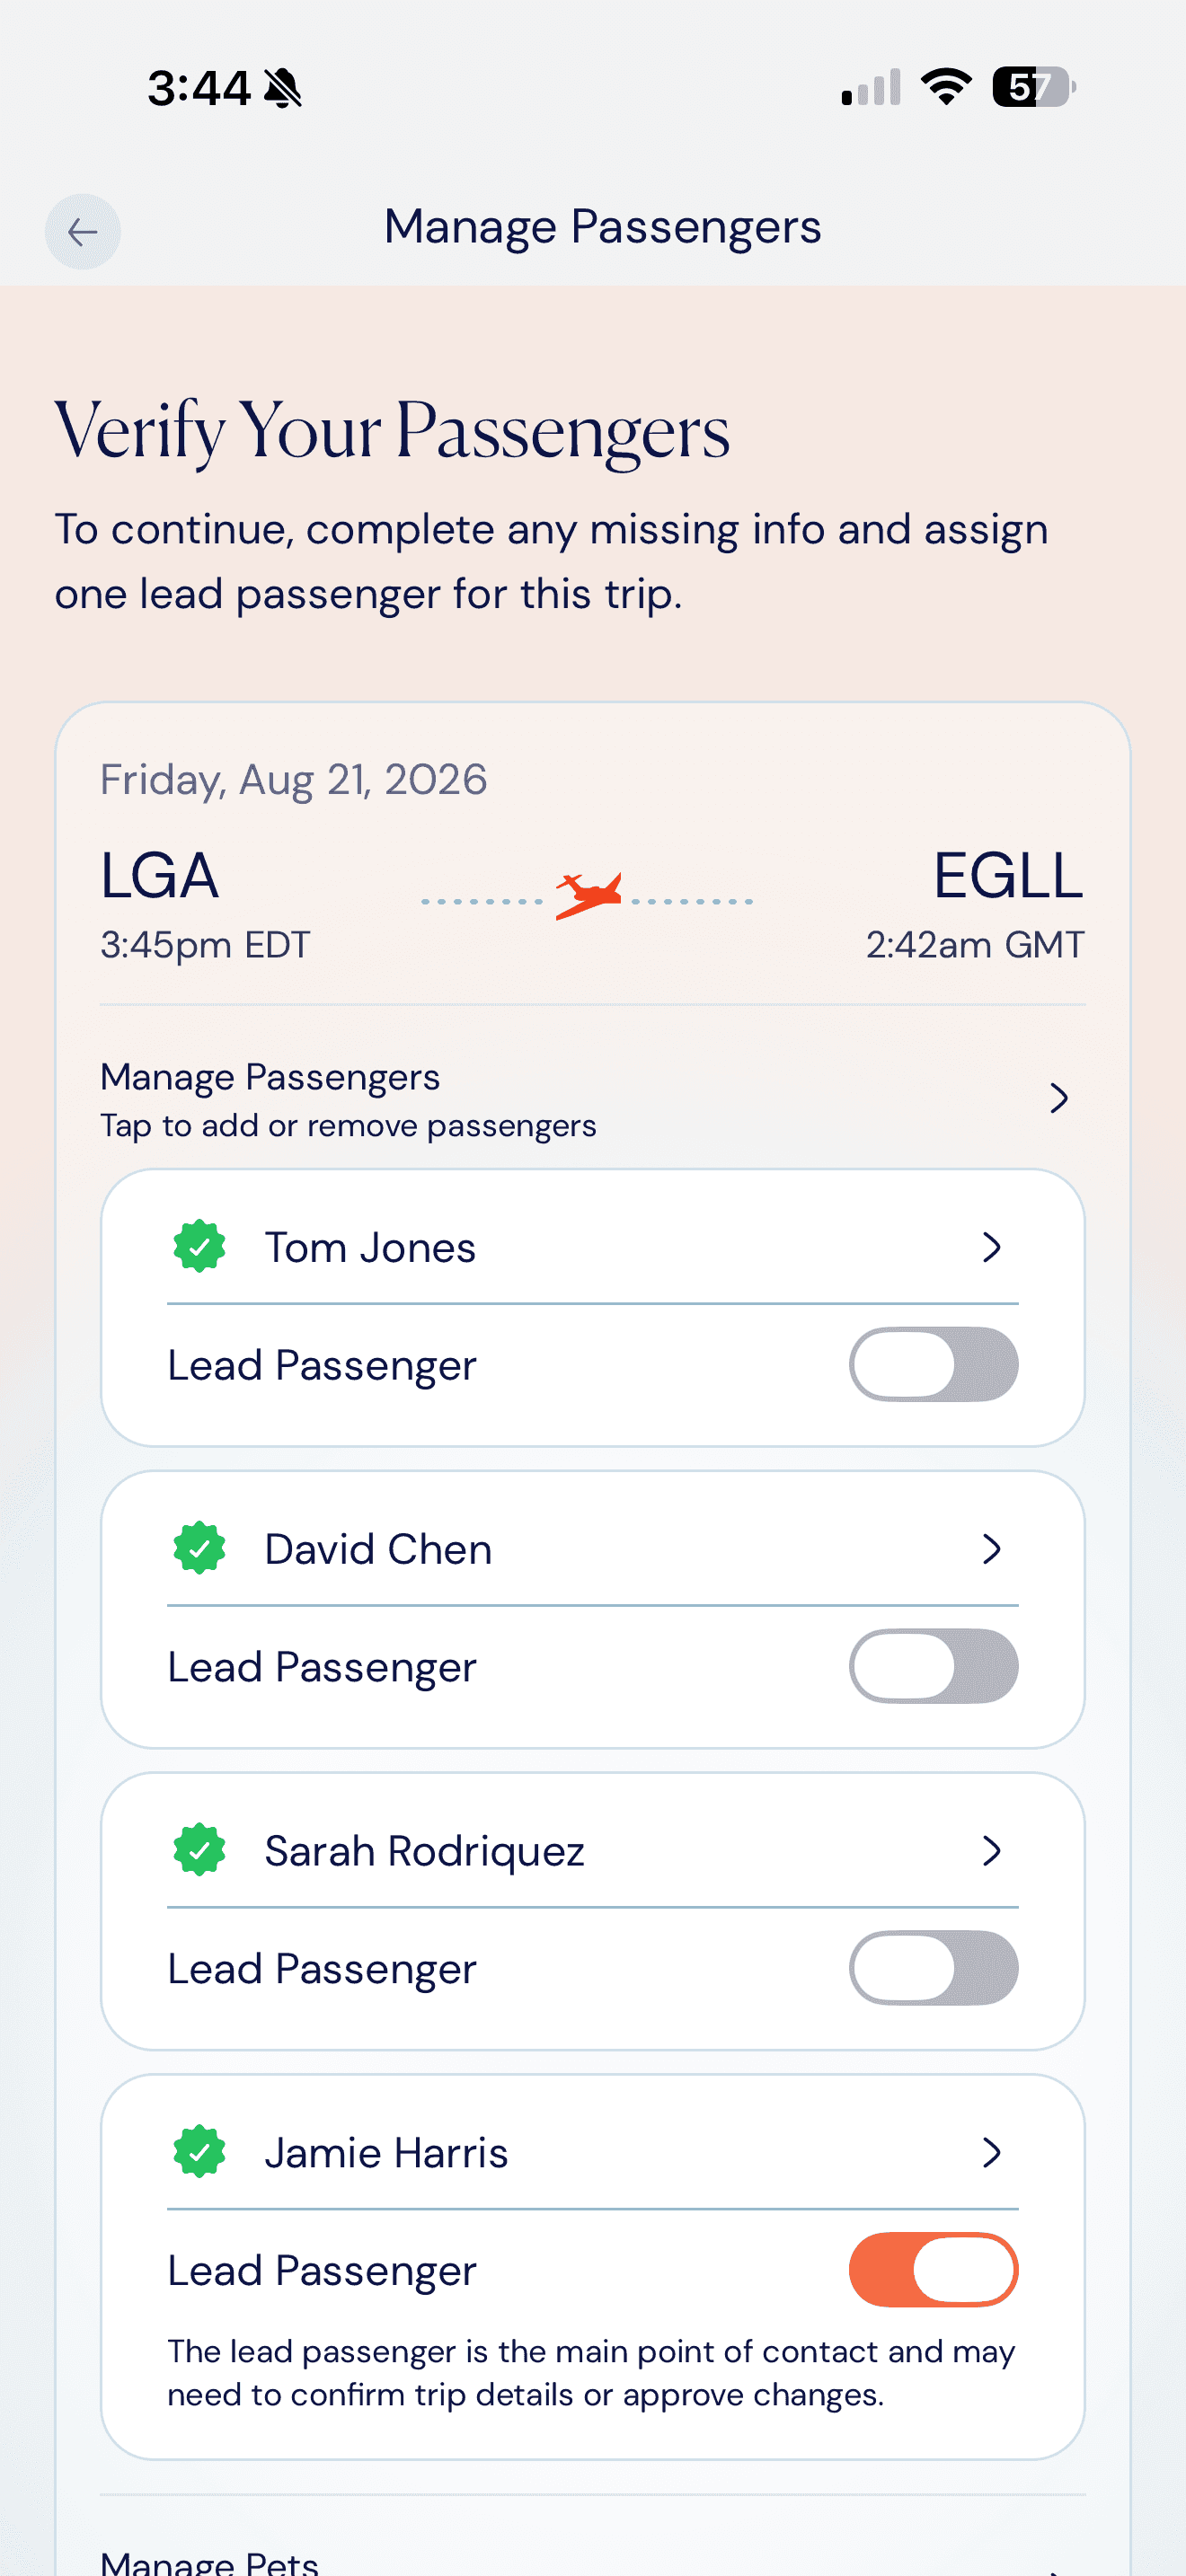
designate lead passenger
Choose the Lead Passenger.
The Lead Passenger is the primary contact for trip updates and operational communication. After adding travelers, each row shows their verification status and a Lead Passenger toggle. Exactly one passenger per leg must be marked lead.
- A yellow warning icon indicates missing required information.
- Tap the row to complete their profile.
- Toggle one passenger as Lead.
Why identification is required: Operators require a copy of every passenger's ID on file to clear FBO security and meet TSA/customs requirements for cross-border legs. Saved IDs can be reused on future trips – you only do this once per traveler.
Managing Passengers · Steps 5 – 7
Complete passenger profiles and upload IDs.
flyer information
Three sections per passenger.
Complete personal information, identification, and any pets traveling with them.
- Personal information – legal name, contact, DOB.
- Identification – passport or government-issued photo ID.
- Pets – optional, with carrier info.

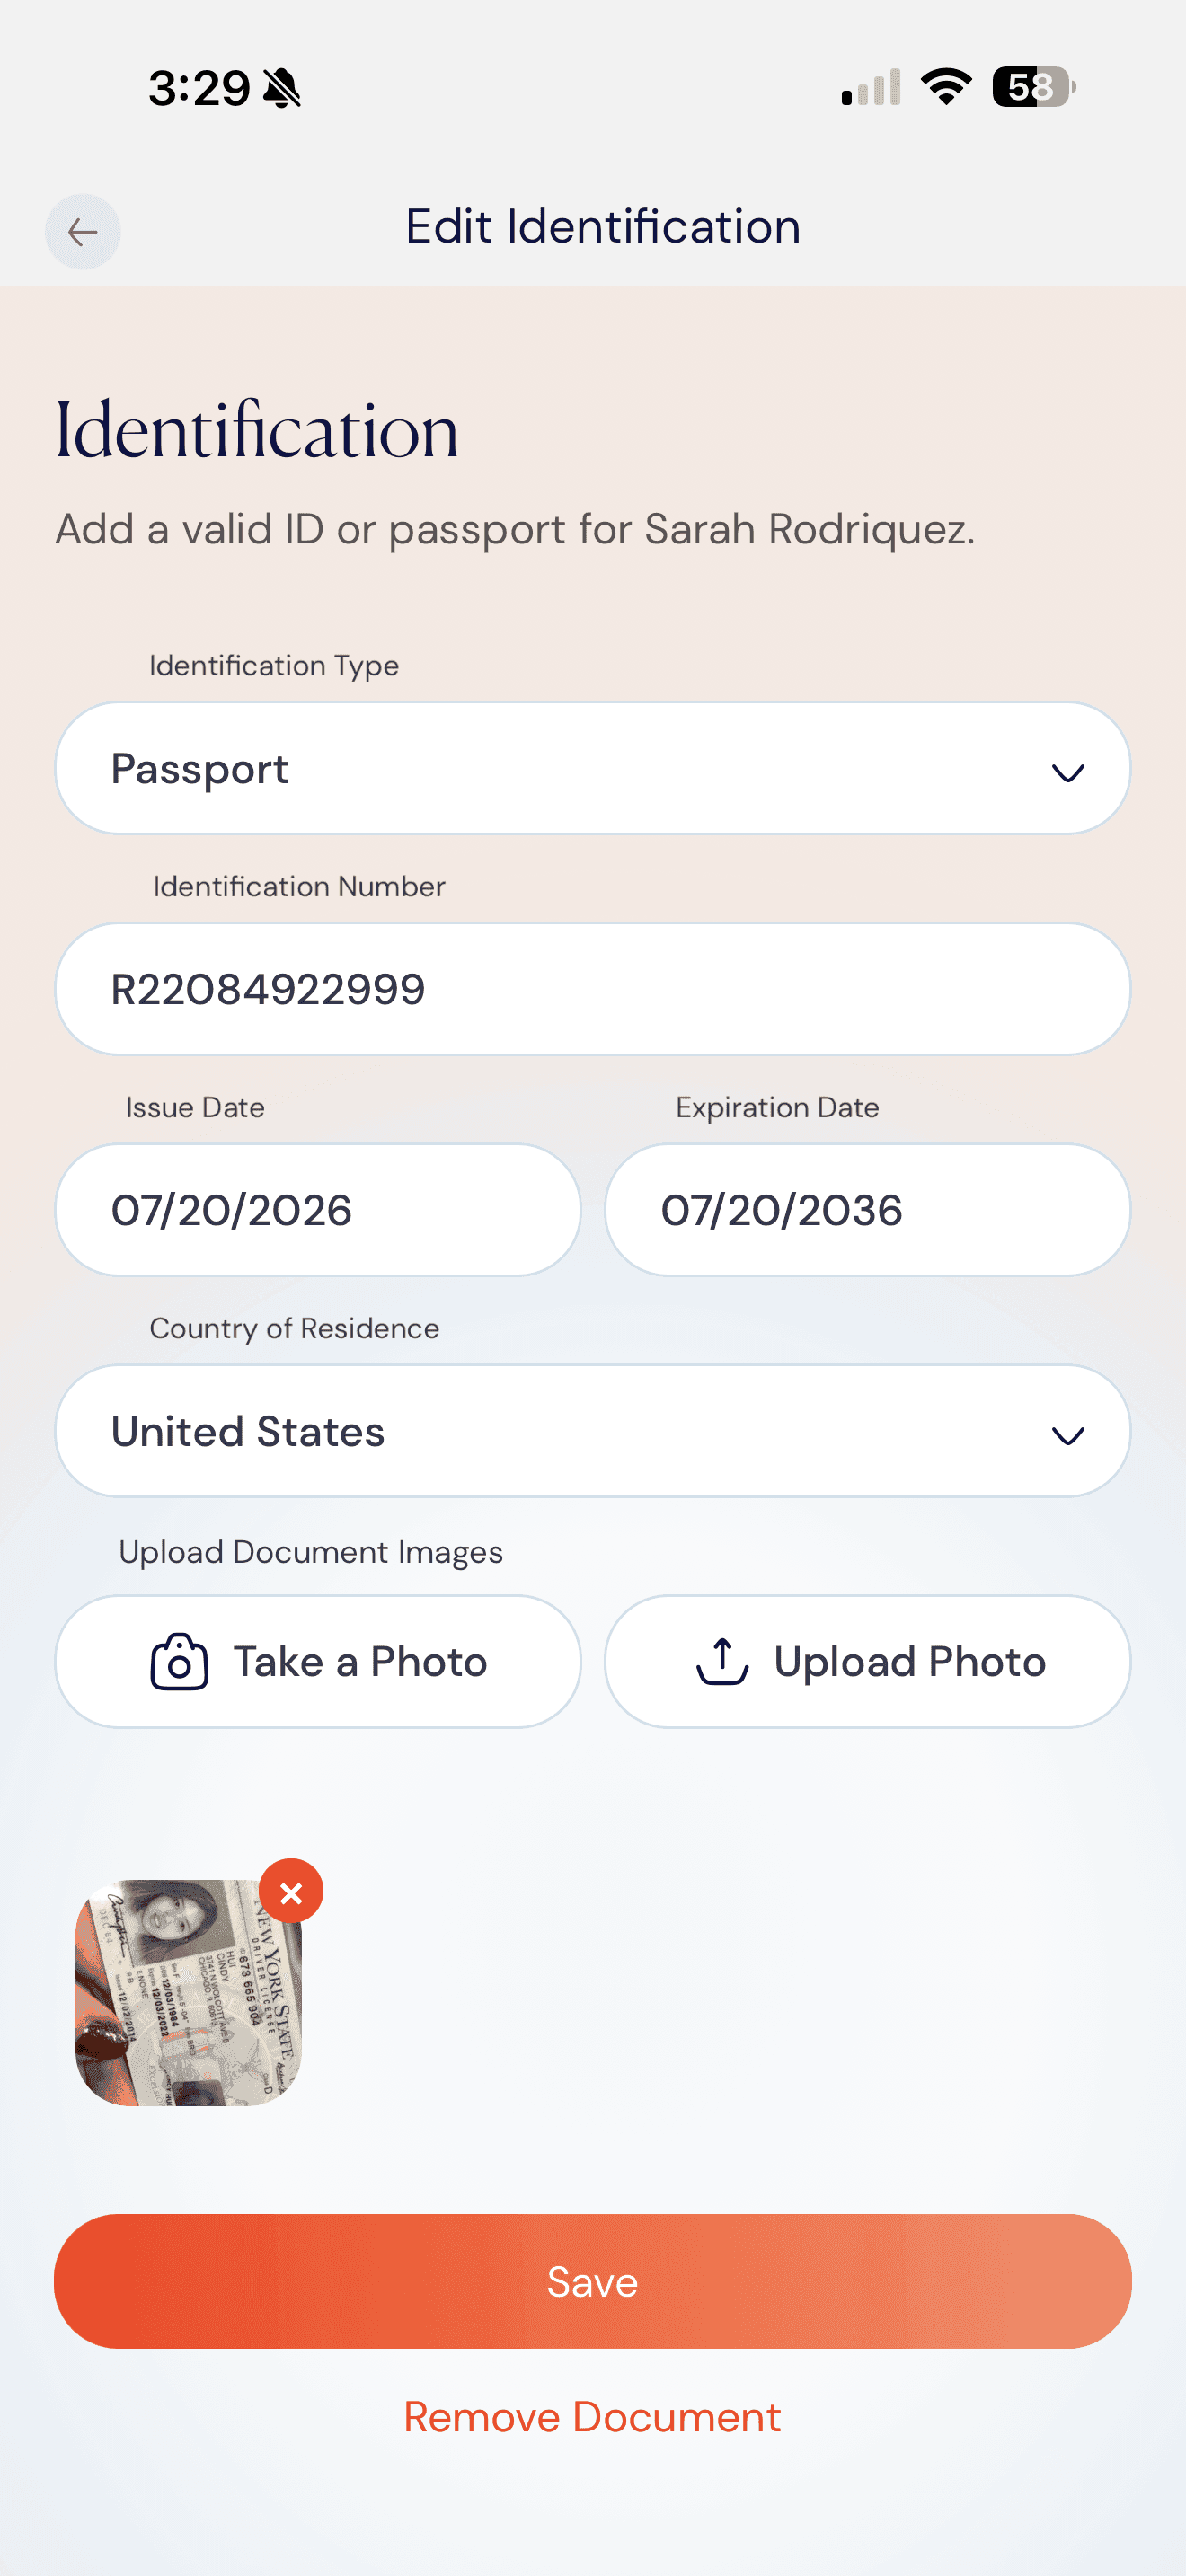
add identification
Photograph or upload a valid ID.
Choose ID type, enter the document number, issue and expiration dates, then snap a photo or upload from your camera roll.
- Passport, driver’s license, or government‑issued photo ID.
- Ensure the document is well-lit, fully visible, and unobstructed.
- Saved IDs persist across future trips.
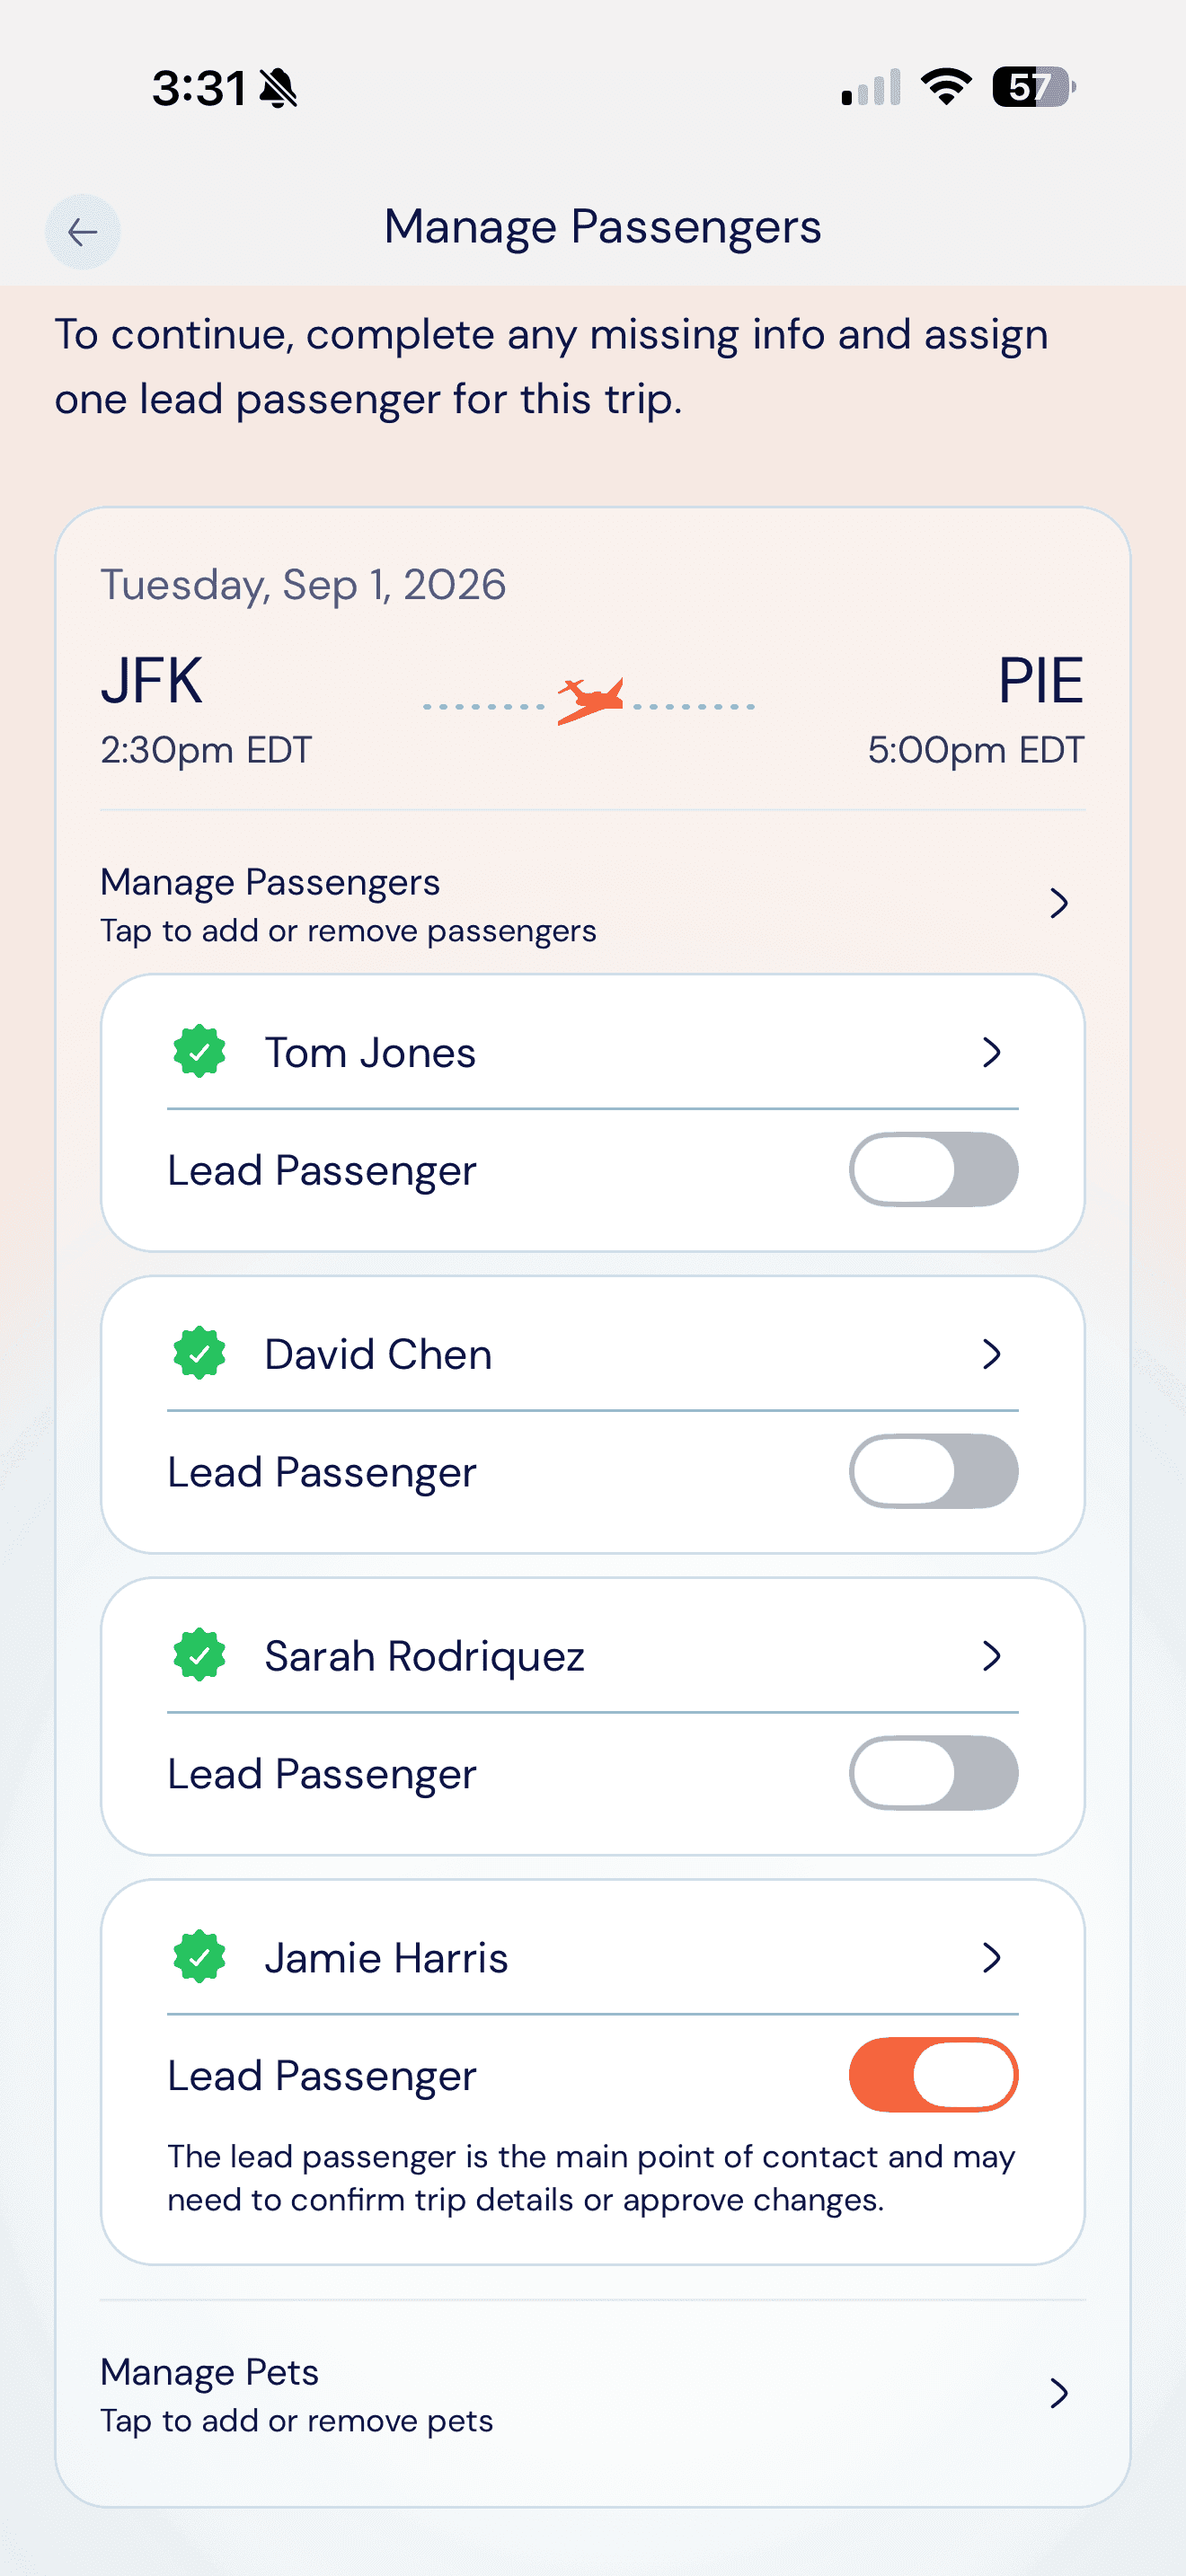
verified
Verification complete.
Once a passenger’s profile is complete and ID uploaded, their row shows a green verified badge. Repeat for every passenger on every leg, then tap Save Passengers List.
- Each leg saves independently.
- You can edit verified passengers any time before departure.
- Updates sync across all your upcoming trips.
international exception
ID required within 24 hours.
For international trips, every passenger must upload a valid ID at least 24 hours before departure. Until then, Save Passengers List remains disabled.
- Passport strongly recommended.
- Cutoff prevents security delays at the FBO.
- International itineraries also tag the trip card with a globe badge.
Why identification is required: Operators require a copy of every passenger's ID on file to clear FBO security and meet TSA/customs requirements for cross-border legs. Saved IDs can be reused on future trips – you only do this once per traveler.
Need Assistance?
Some trips can't be booked end‑to‑end inside the app. When a route, date, balance, aircraft, airport, or operation requires personalized coordination, the app surfaces an orange Booking assistance required banner. Submit the request and your Private Aviation Expert takes it from there.
Request Assistance FAQs
Common reasons your trip may require assistance.
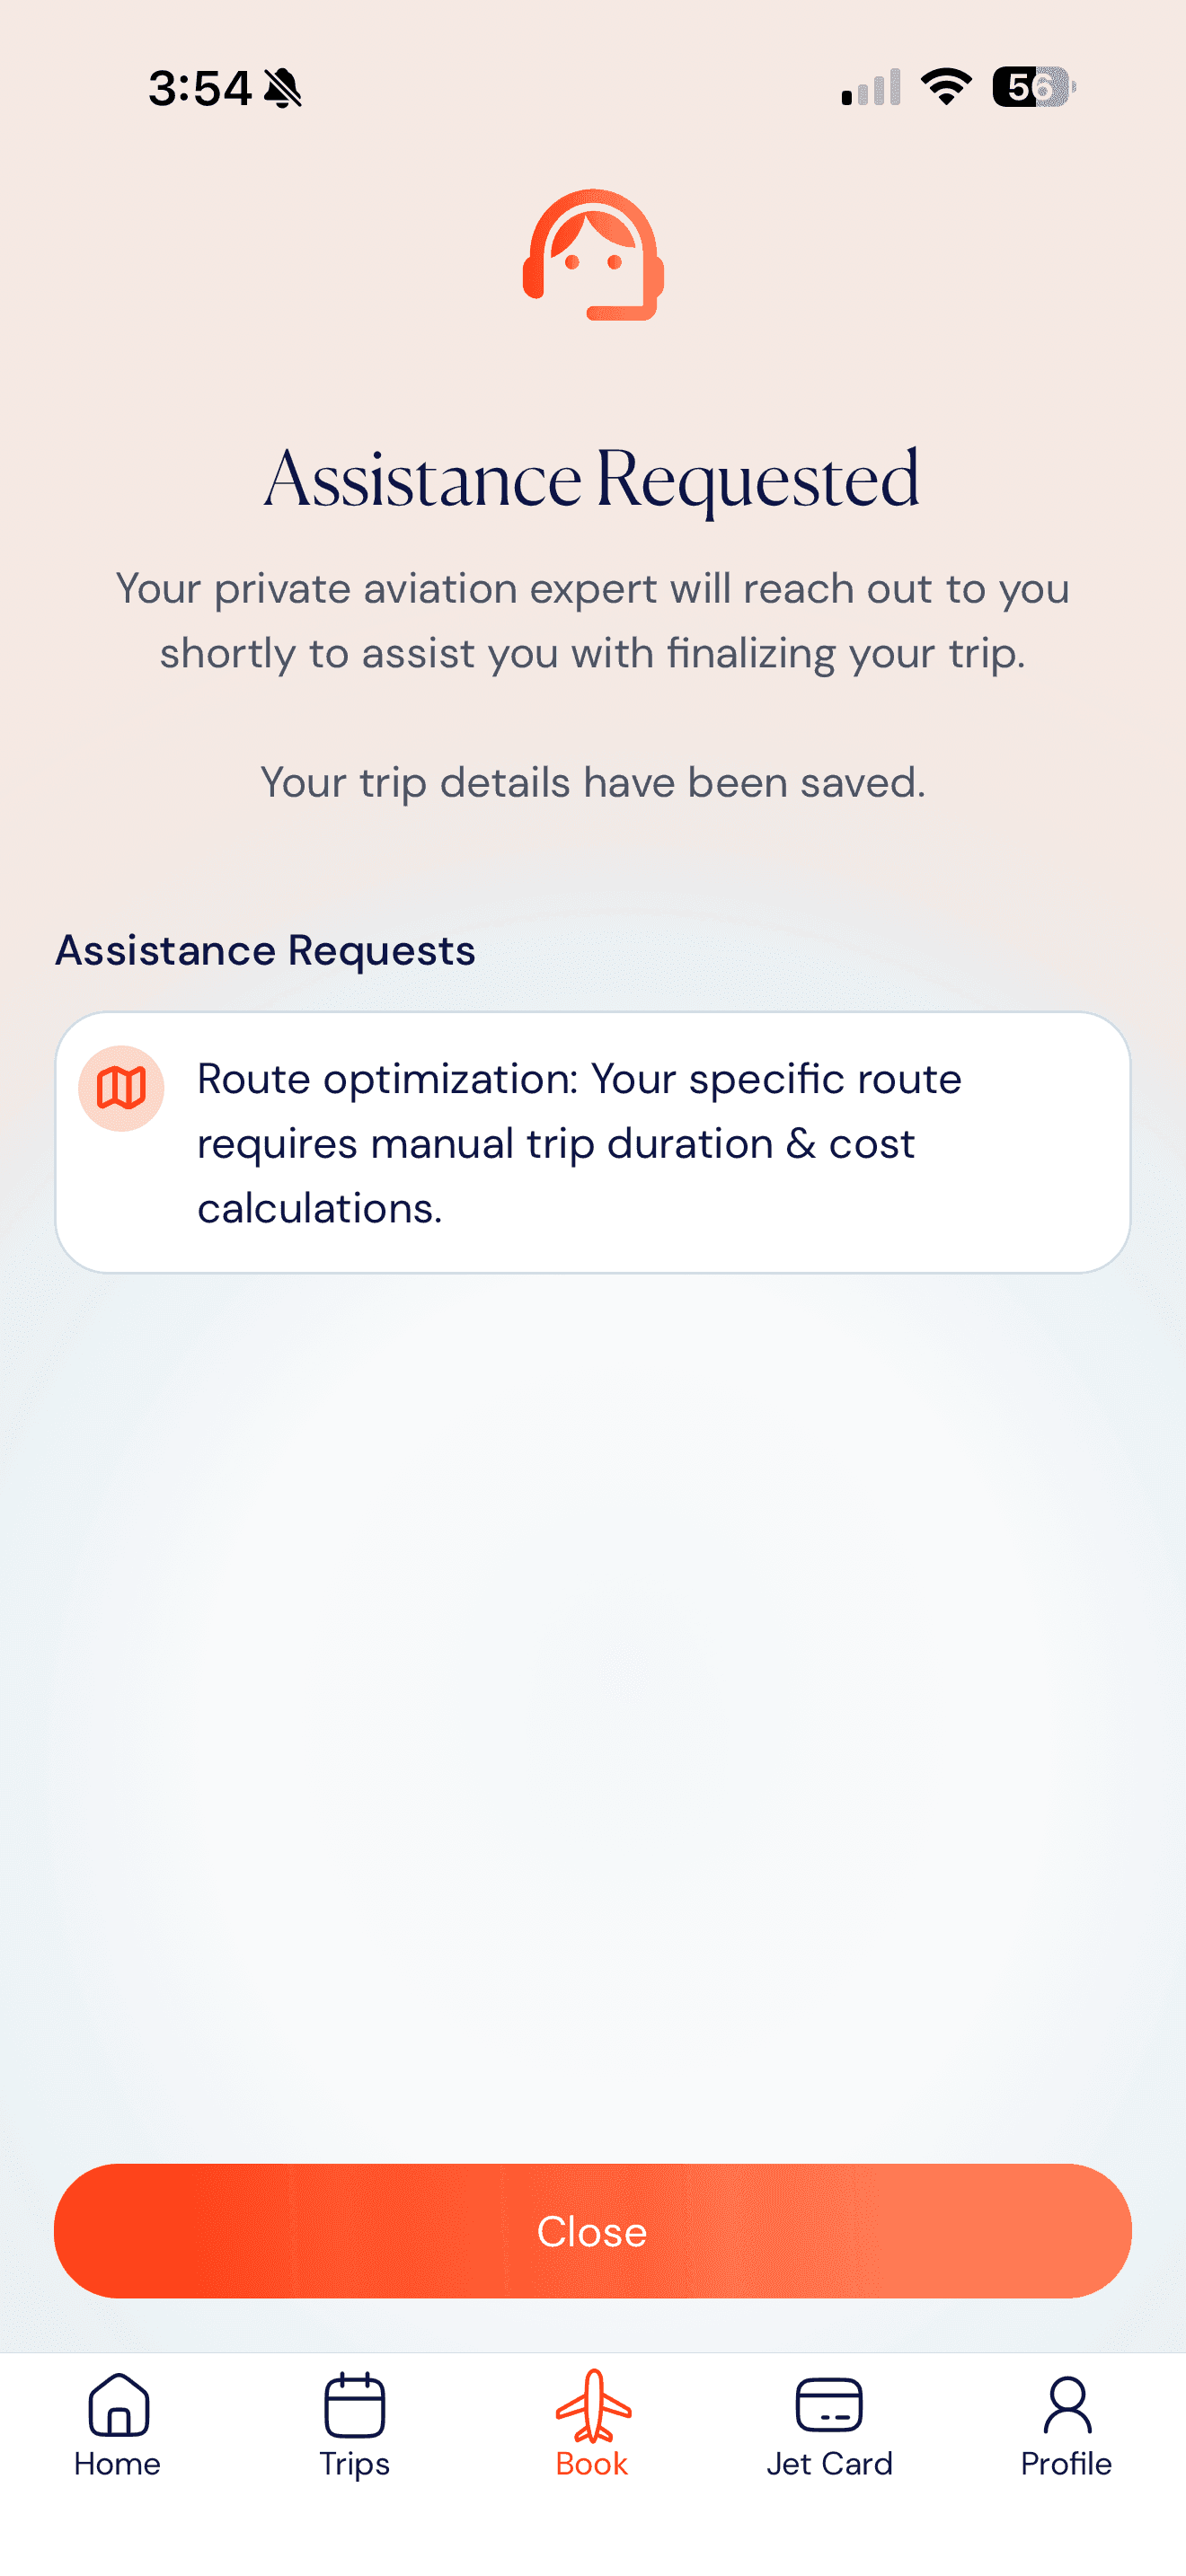
When ETE Can't Be Estimated
Route optimization.
Less common airports or unique itineraries may require manual routing and pricing before they can be confirmed.
- Triggered on Jet Card or Charter Booking: Basics.
- Tap Continue to save and submit.
- Your Private Aviation Expert will source pricing and routing options.
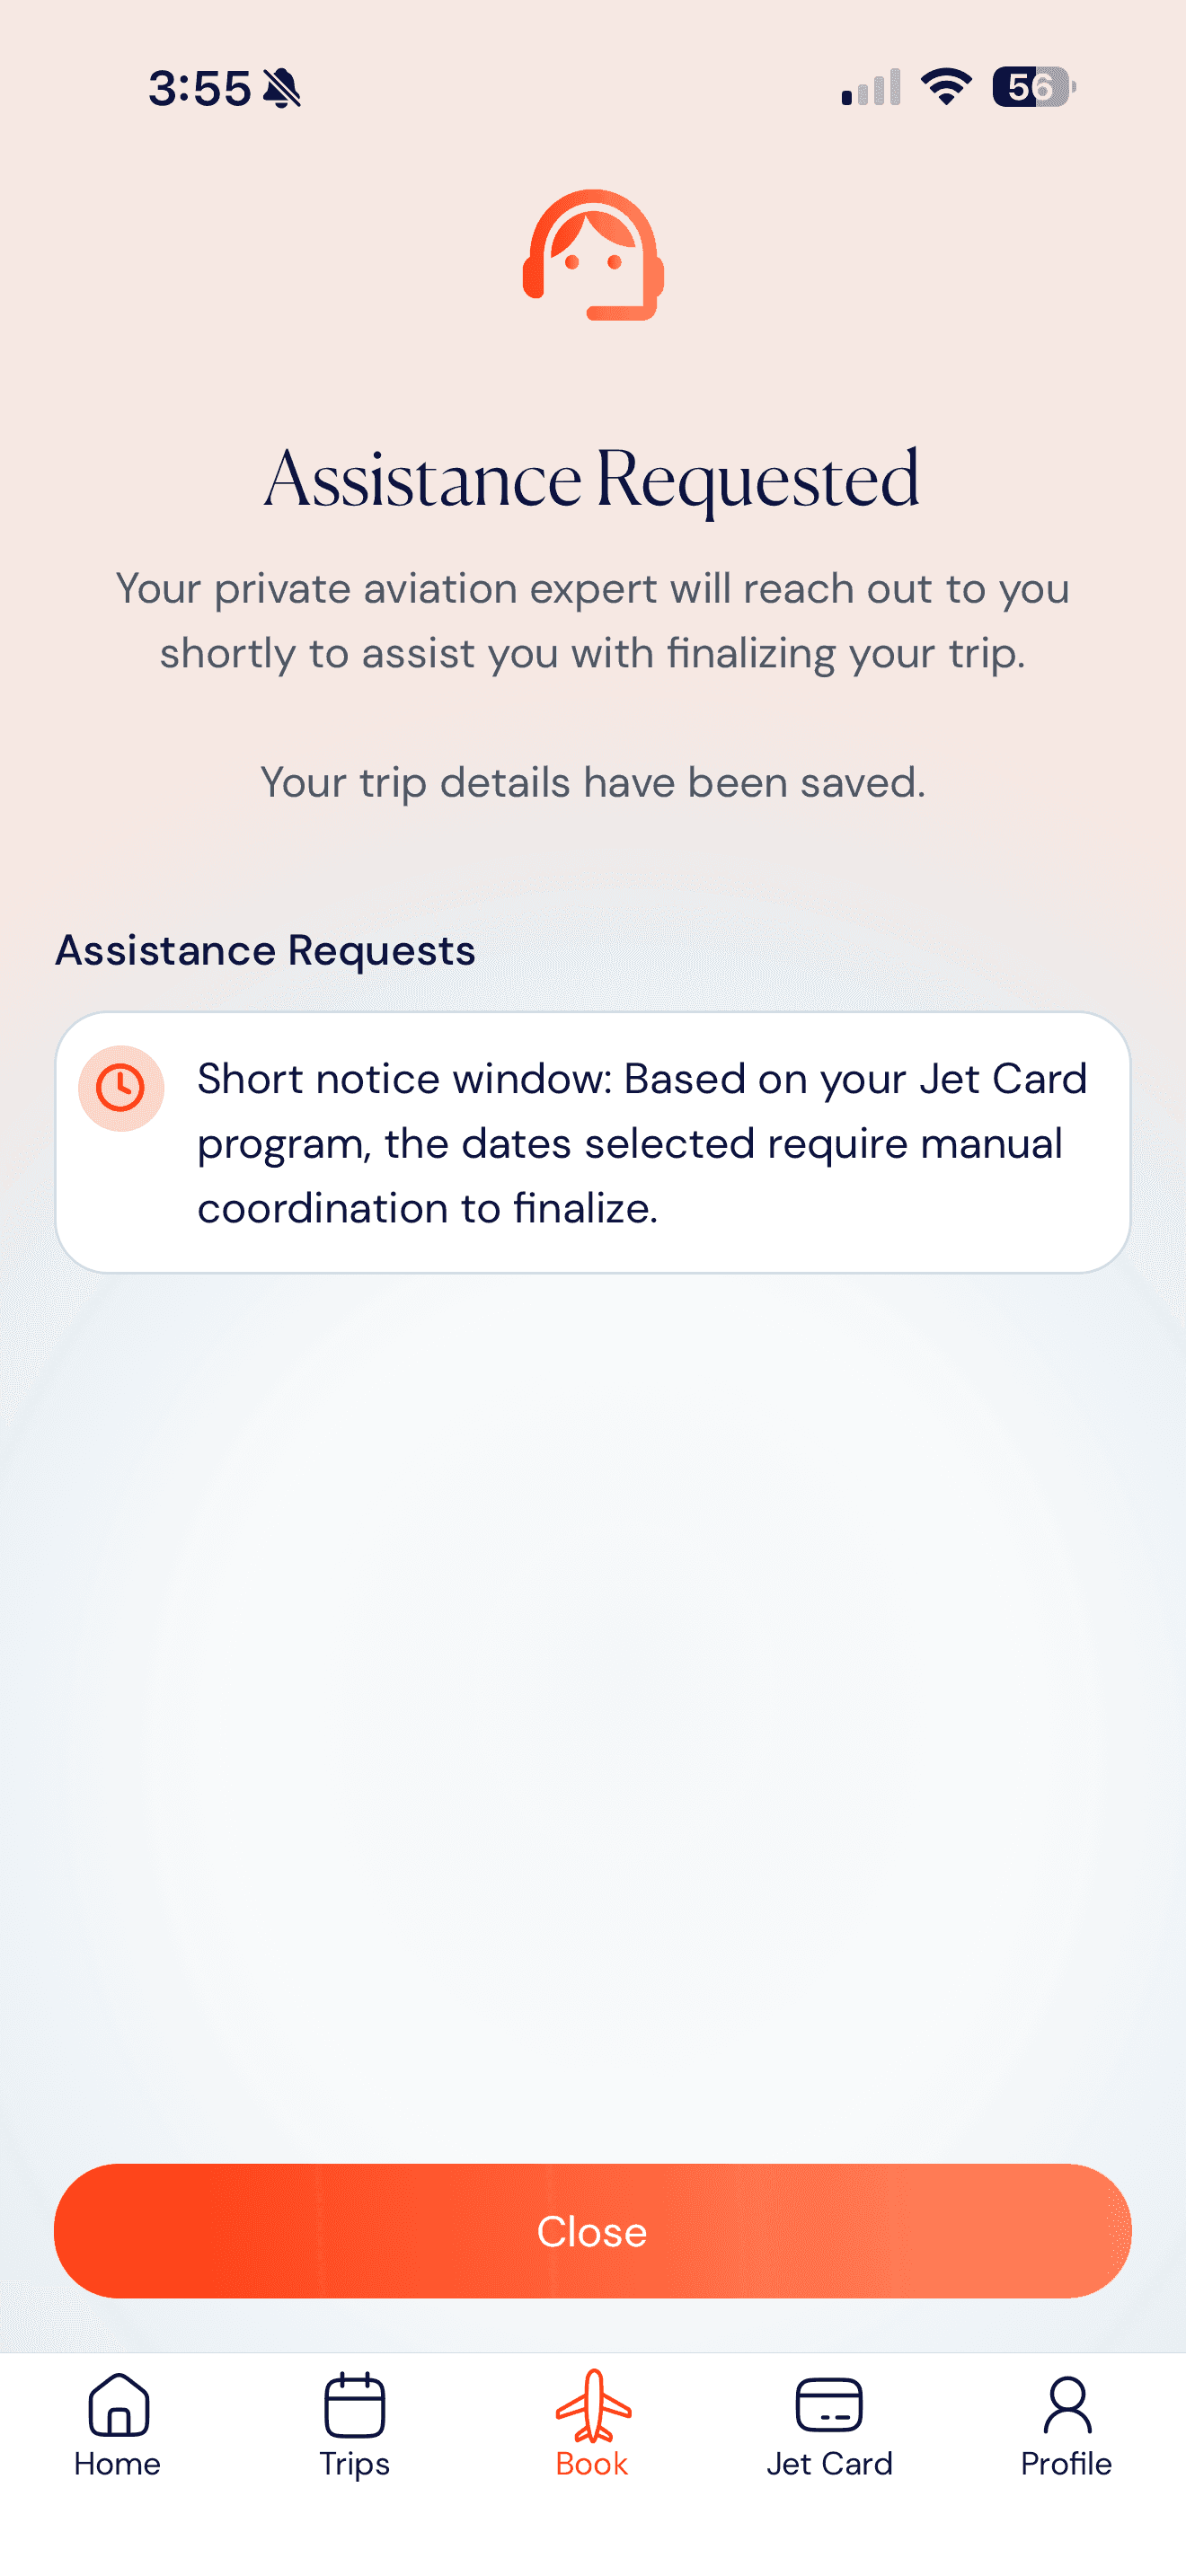
When Date Is Within Terms + 24 hrs
Short notice window.
If your selected date falls within your Jet Card’s standard booking window plus 24 hours, your request will be reviewed by your Private Aviation Expert before it is confirmed.
- Triggered on Jet Card or Charter Booking: Date Selection.
- You can still submit your request.
- Your Private Aviation Expert will confirm availability and finalize your trip.
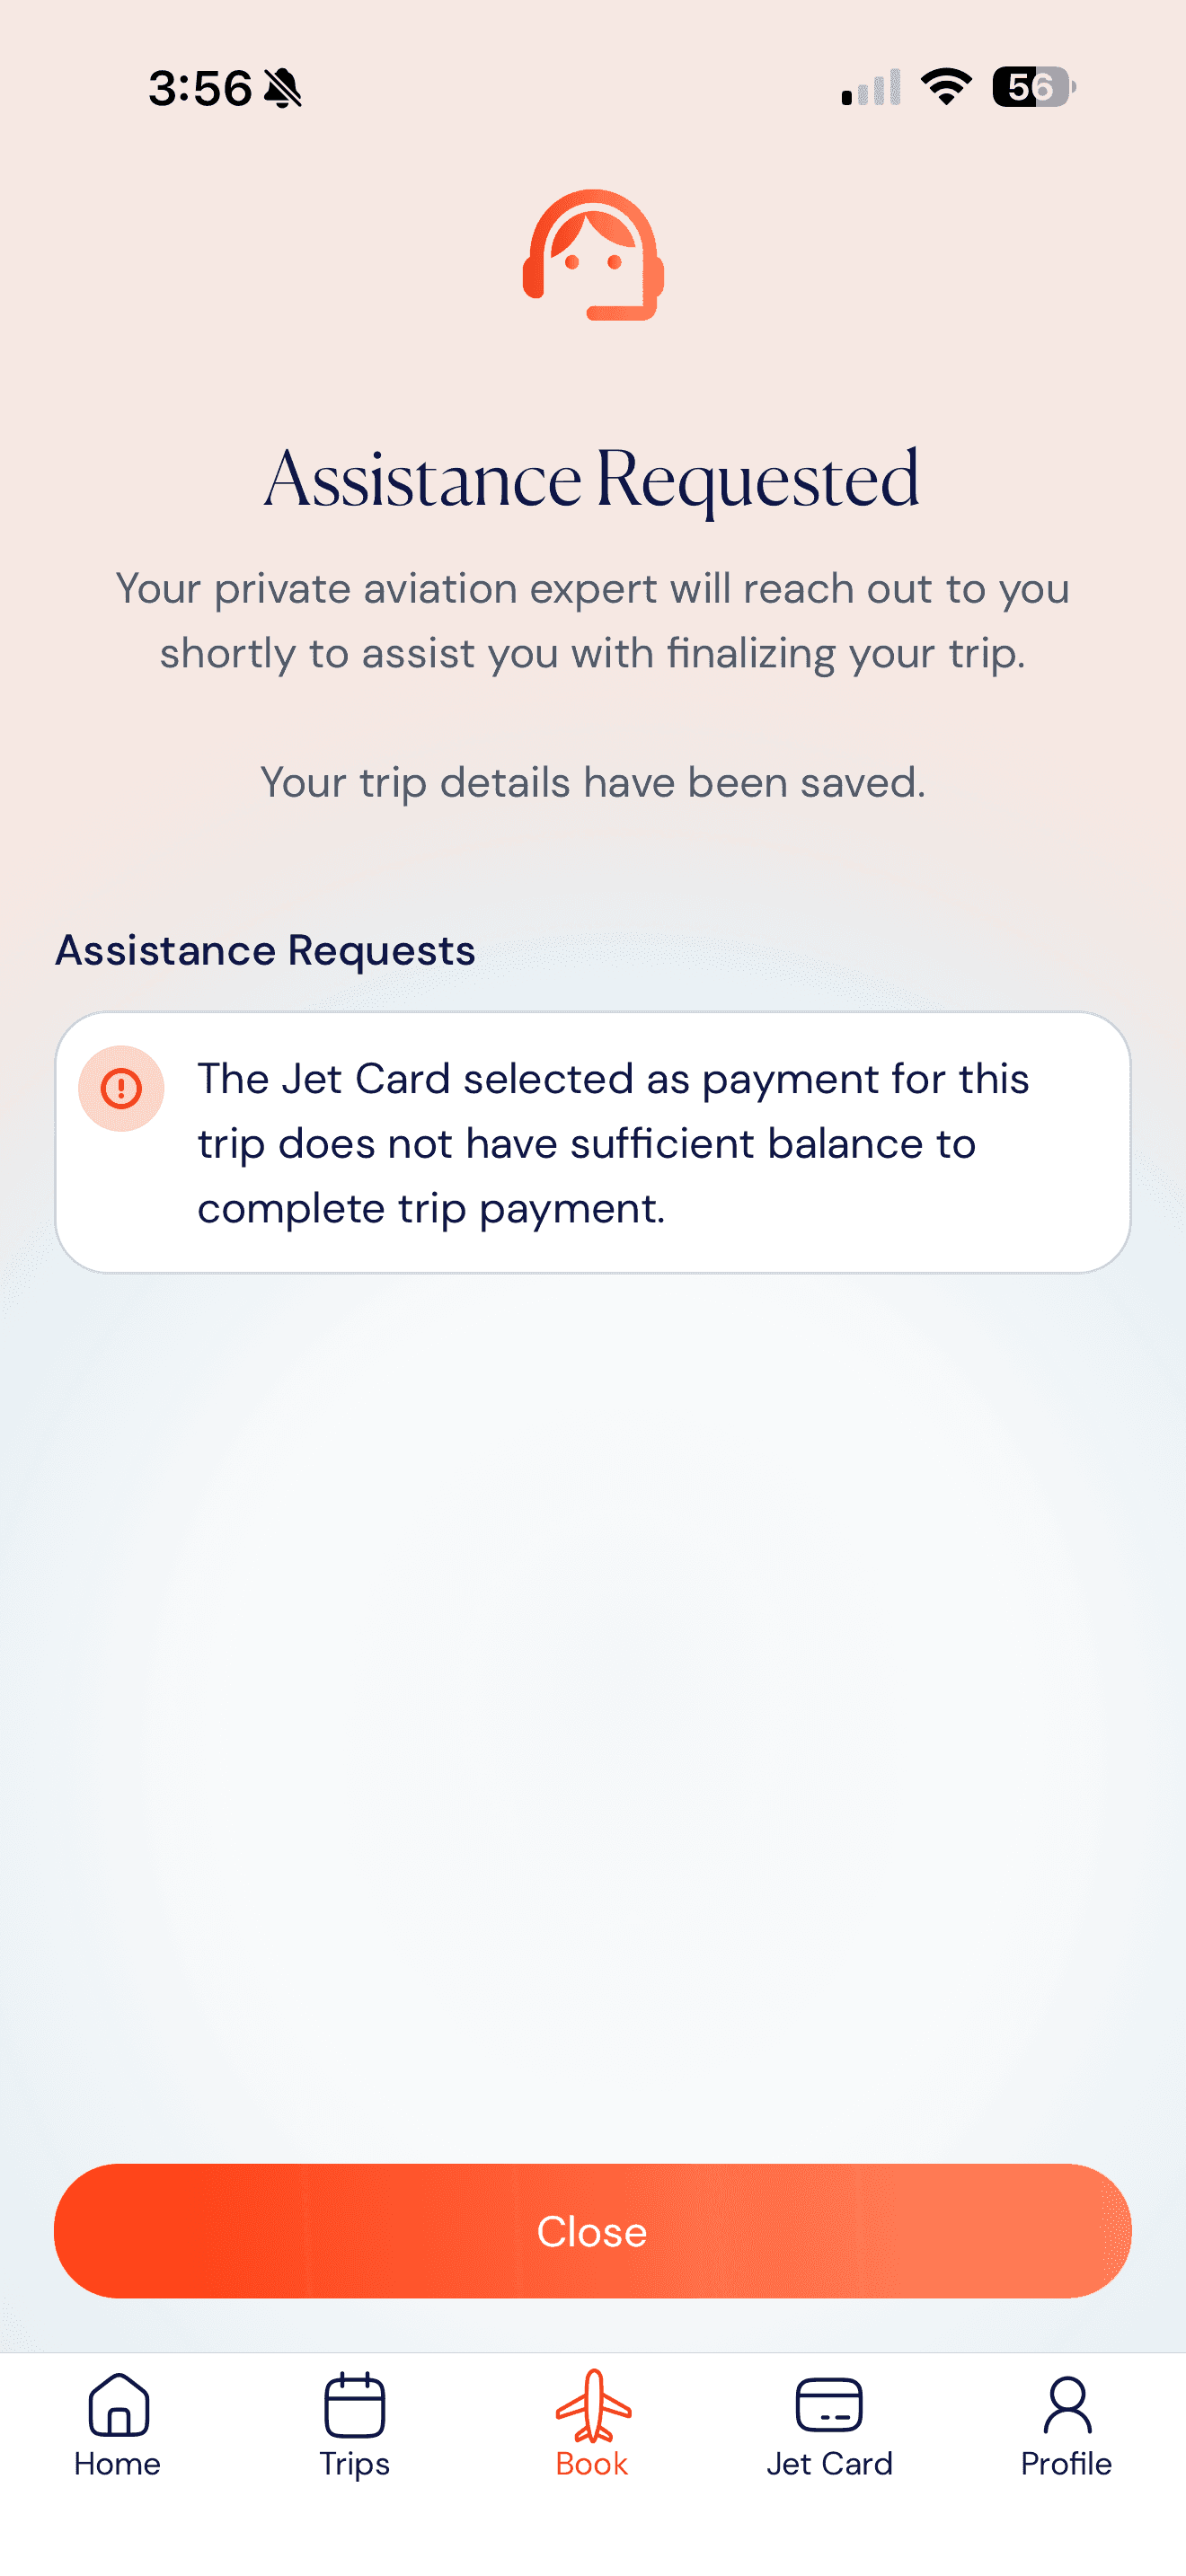
when trip exceeds balance
Insufficient Jet Card balance.
Your Jet Card doesn’t have enough remaining hours or funds to complete this trip. Your Private Aviation Expert will review your options and help finalize your booking.
- Triggered on Jet Card or Charter Booking: Finalize.
- Your Private Aviation Advisor will contact you.
- Trip remains in Assistance Requested until resolved.
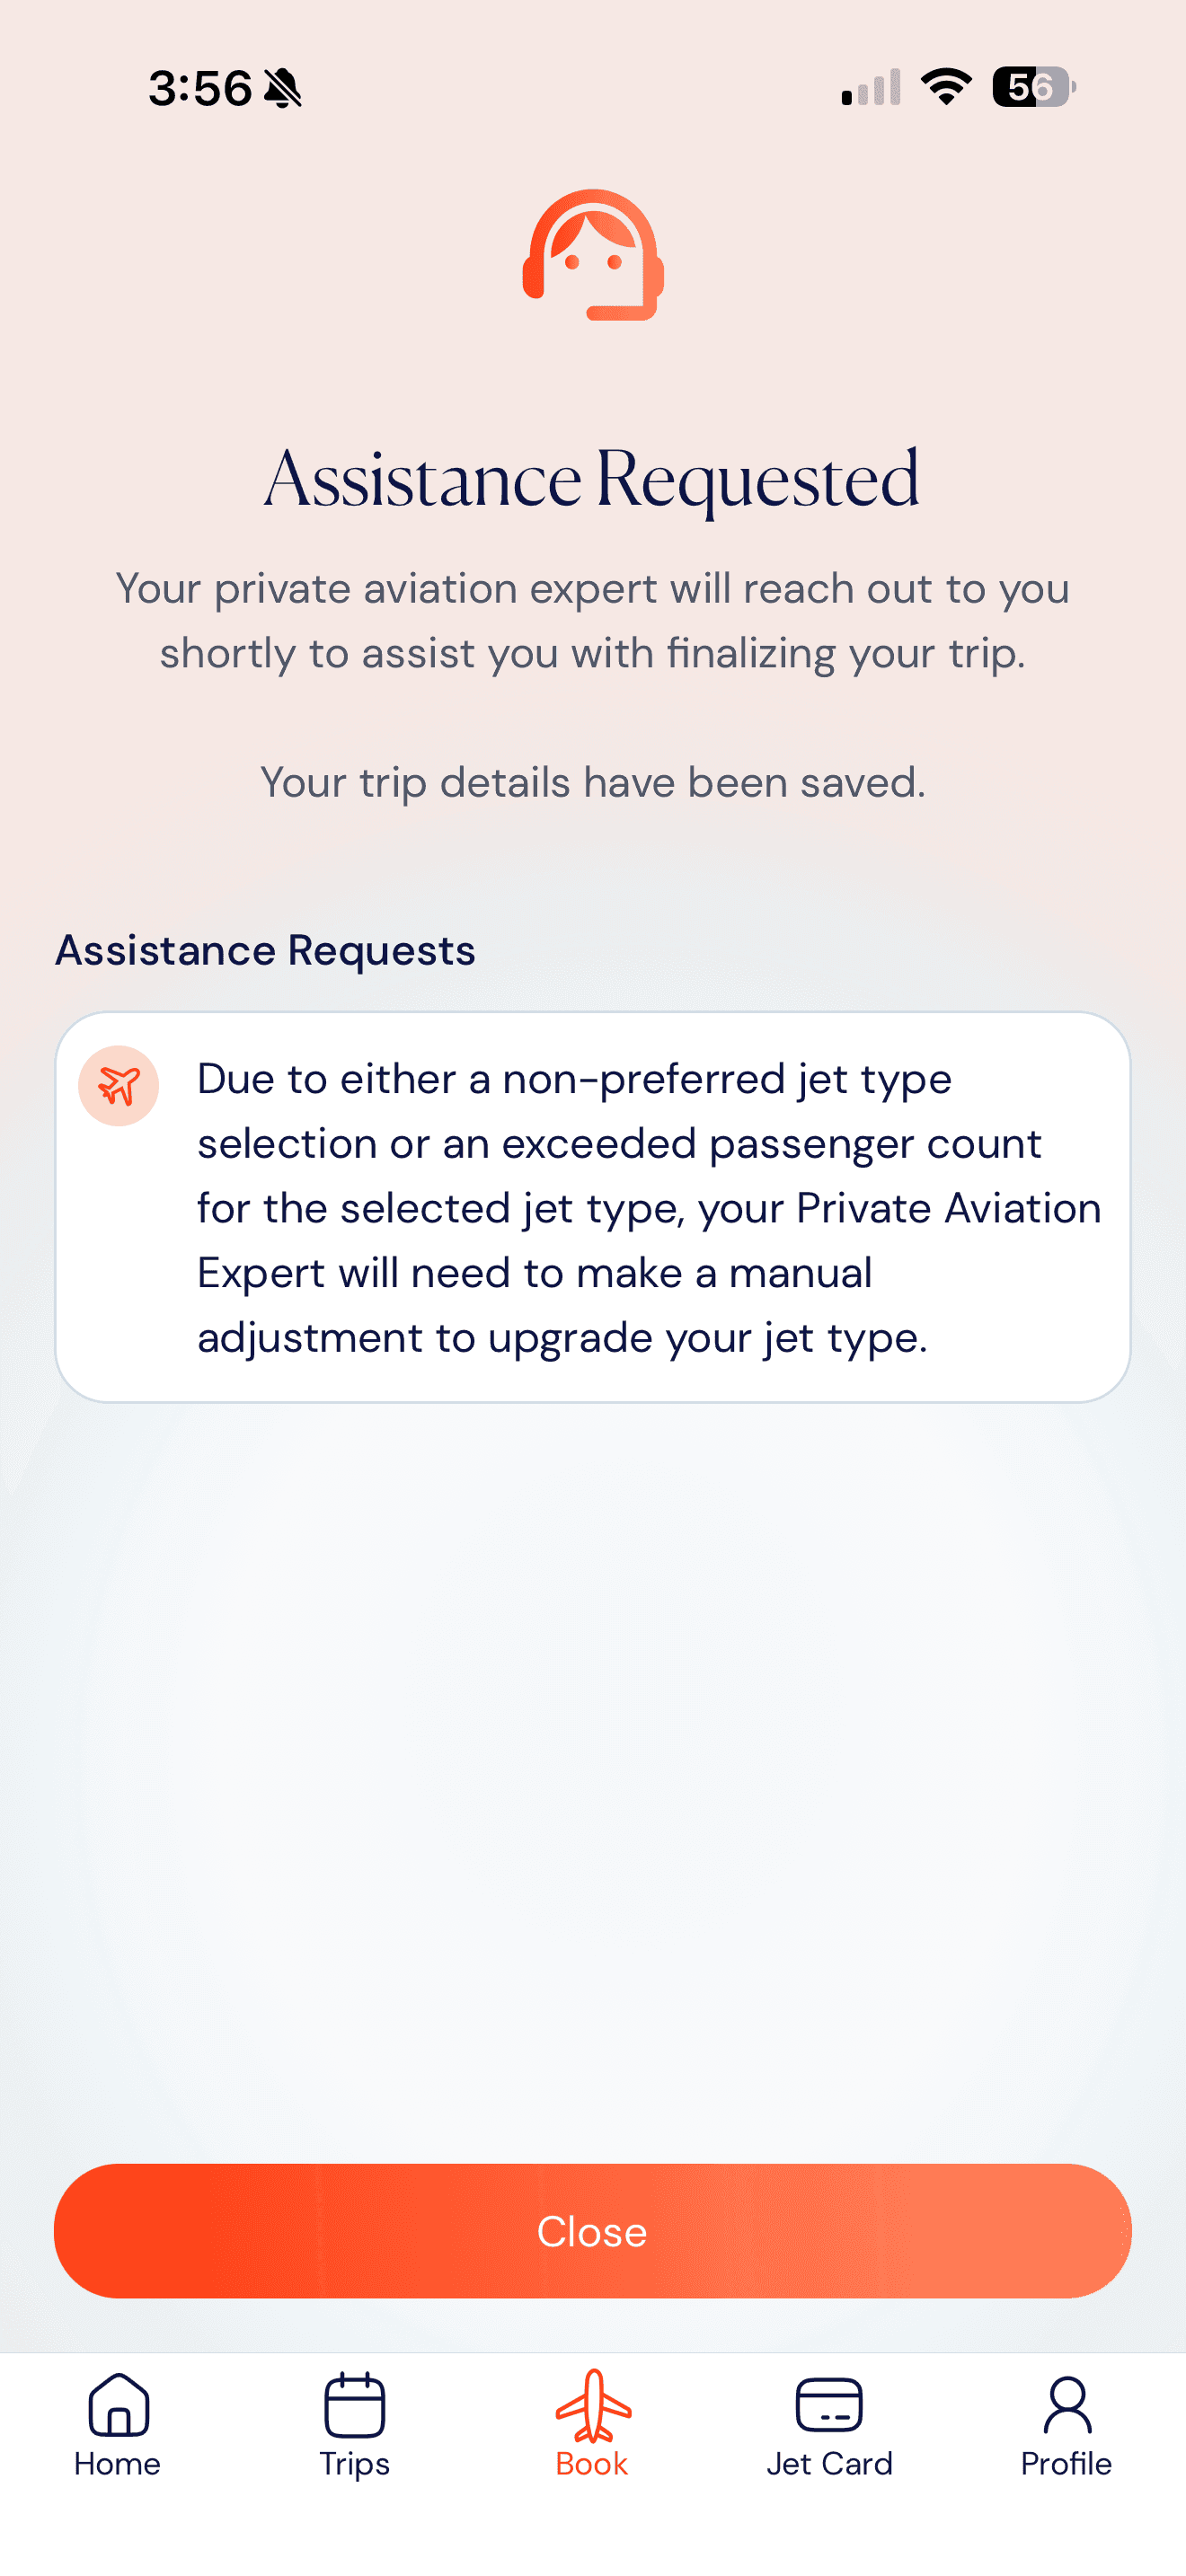
Non-Preferred Jet Selected
Jet type upgrade.
If the aircraft class you select isn't your Jet Card's preferred — or if passenger count exceeds capacity — your Private Aviation Expert will manually adjust the booking to upgrade.
- You'll see this after selecting an aircraft.
- Additional hourly charges may apply.
- Your Private Aviation Expert will explain any differences before confirming your trip.
Always human backed: The app submits your request, and your Private Aviation Expert and their team handles the rest. They'll contact you by phone or email, and your trip details will remain saved in My Trips.
Assistance FAQs
Common reasons your trip may require assistance.
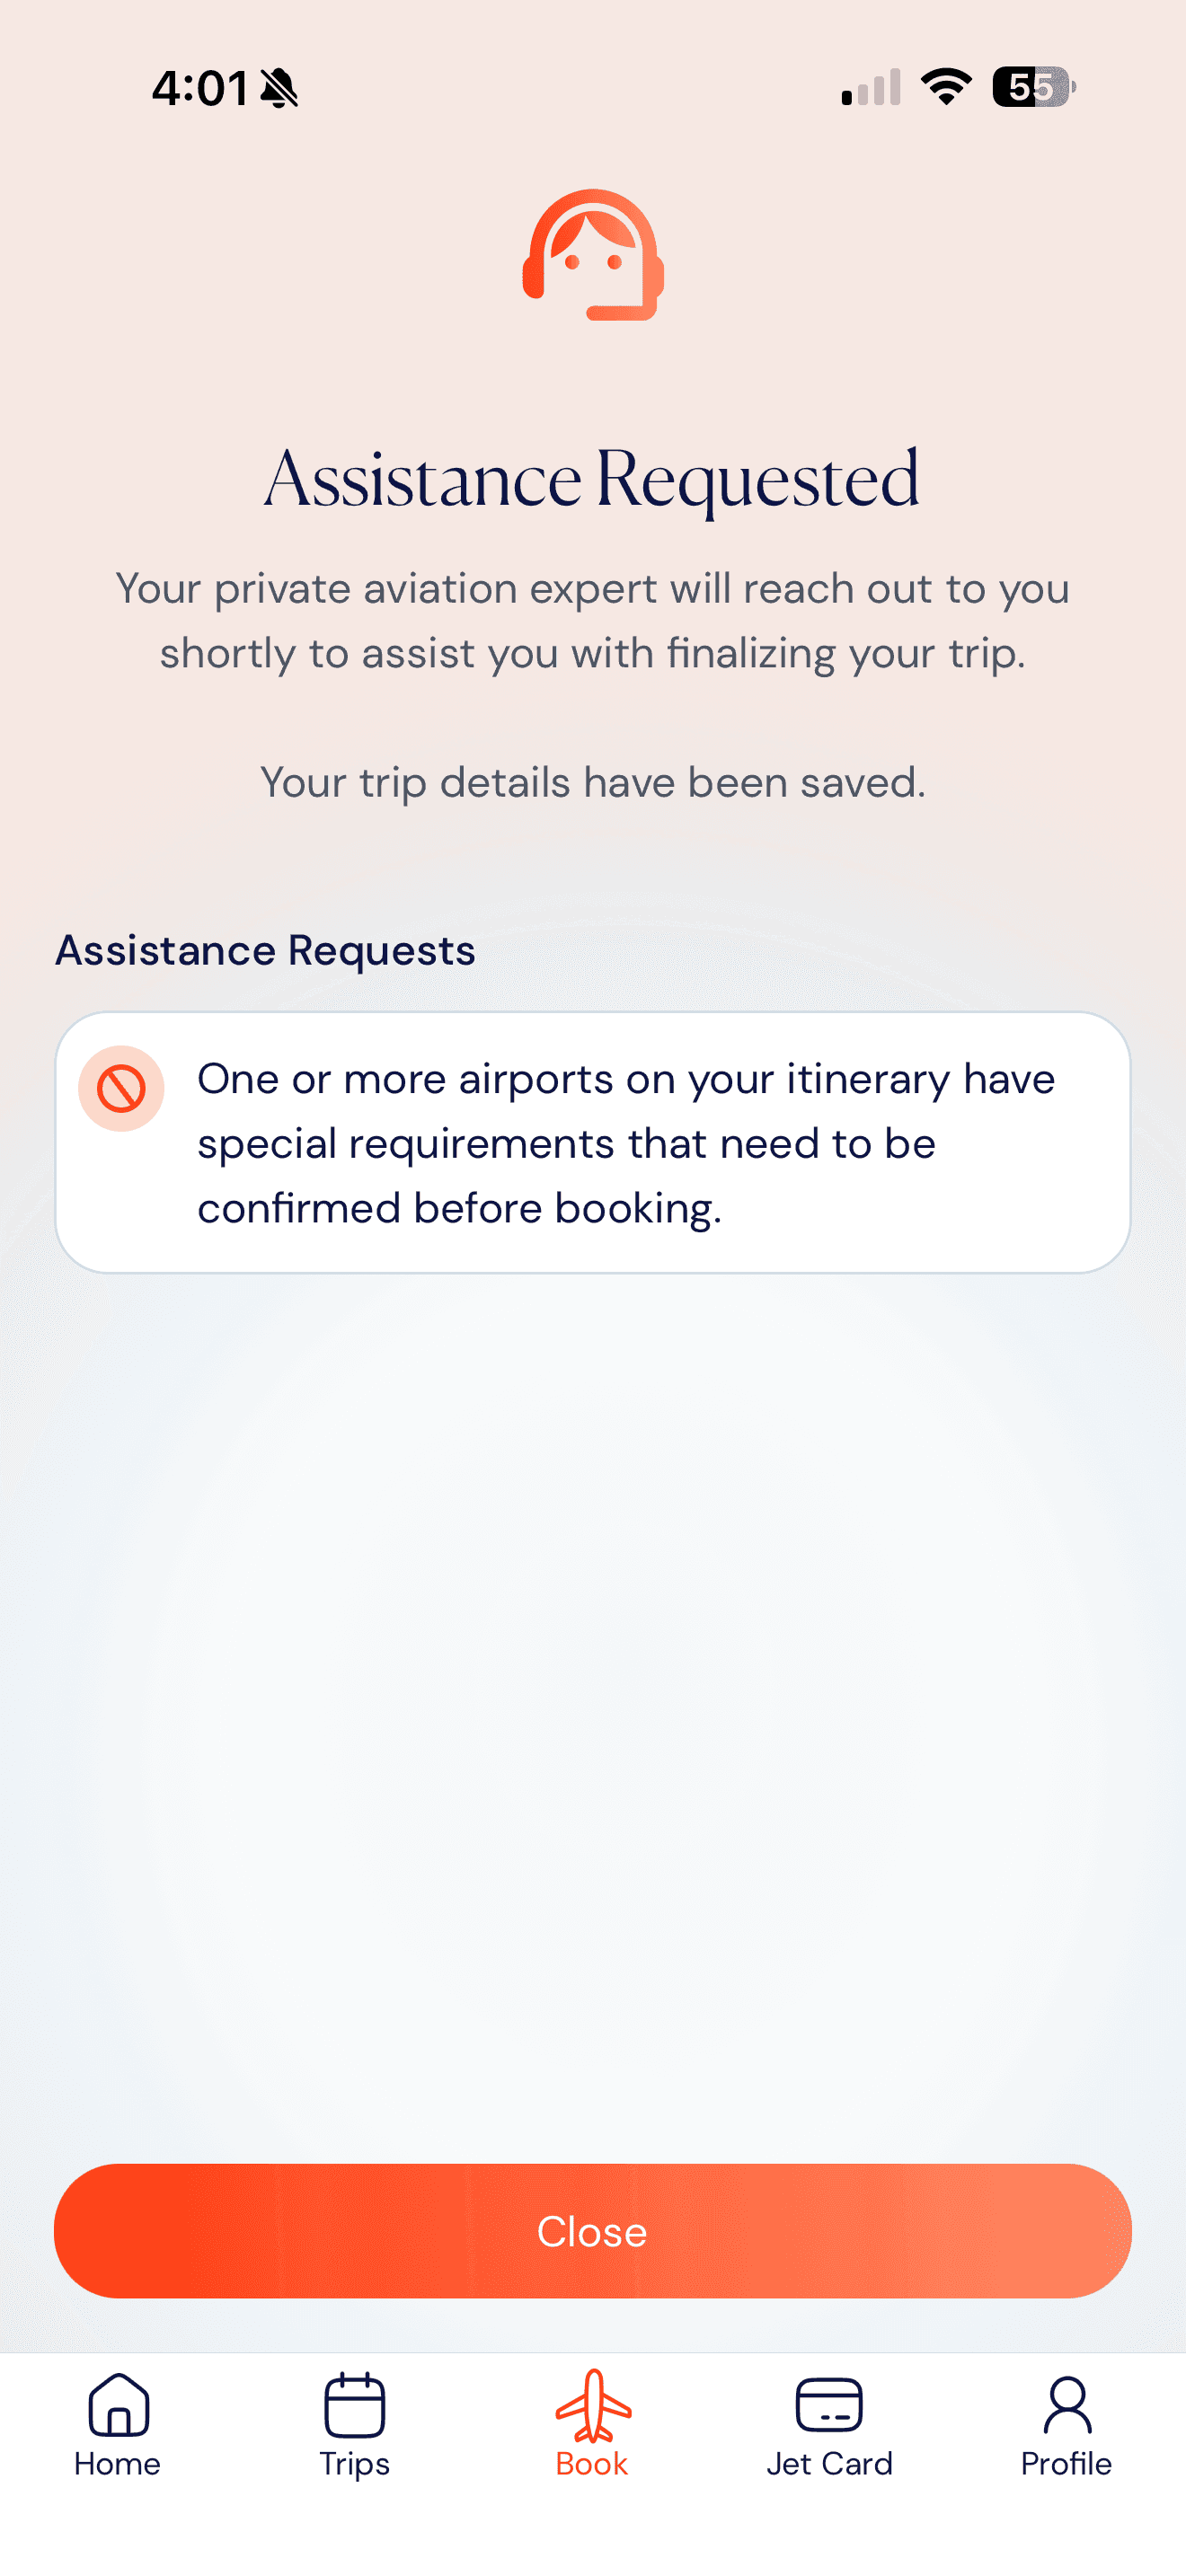
airport confirmation
Airport special requirements.
Some airports have special requirements and must be confirmed before booking.
- Triggered on Jet Card or Charter Booking: Route.
- Your Private Aviation Expert will confirm the airport details.
- Your booking is finalized once cleared.
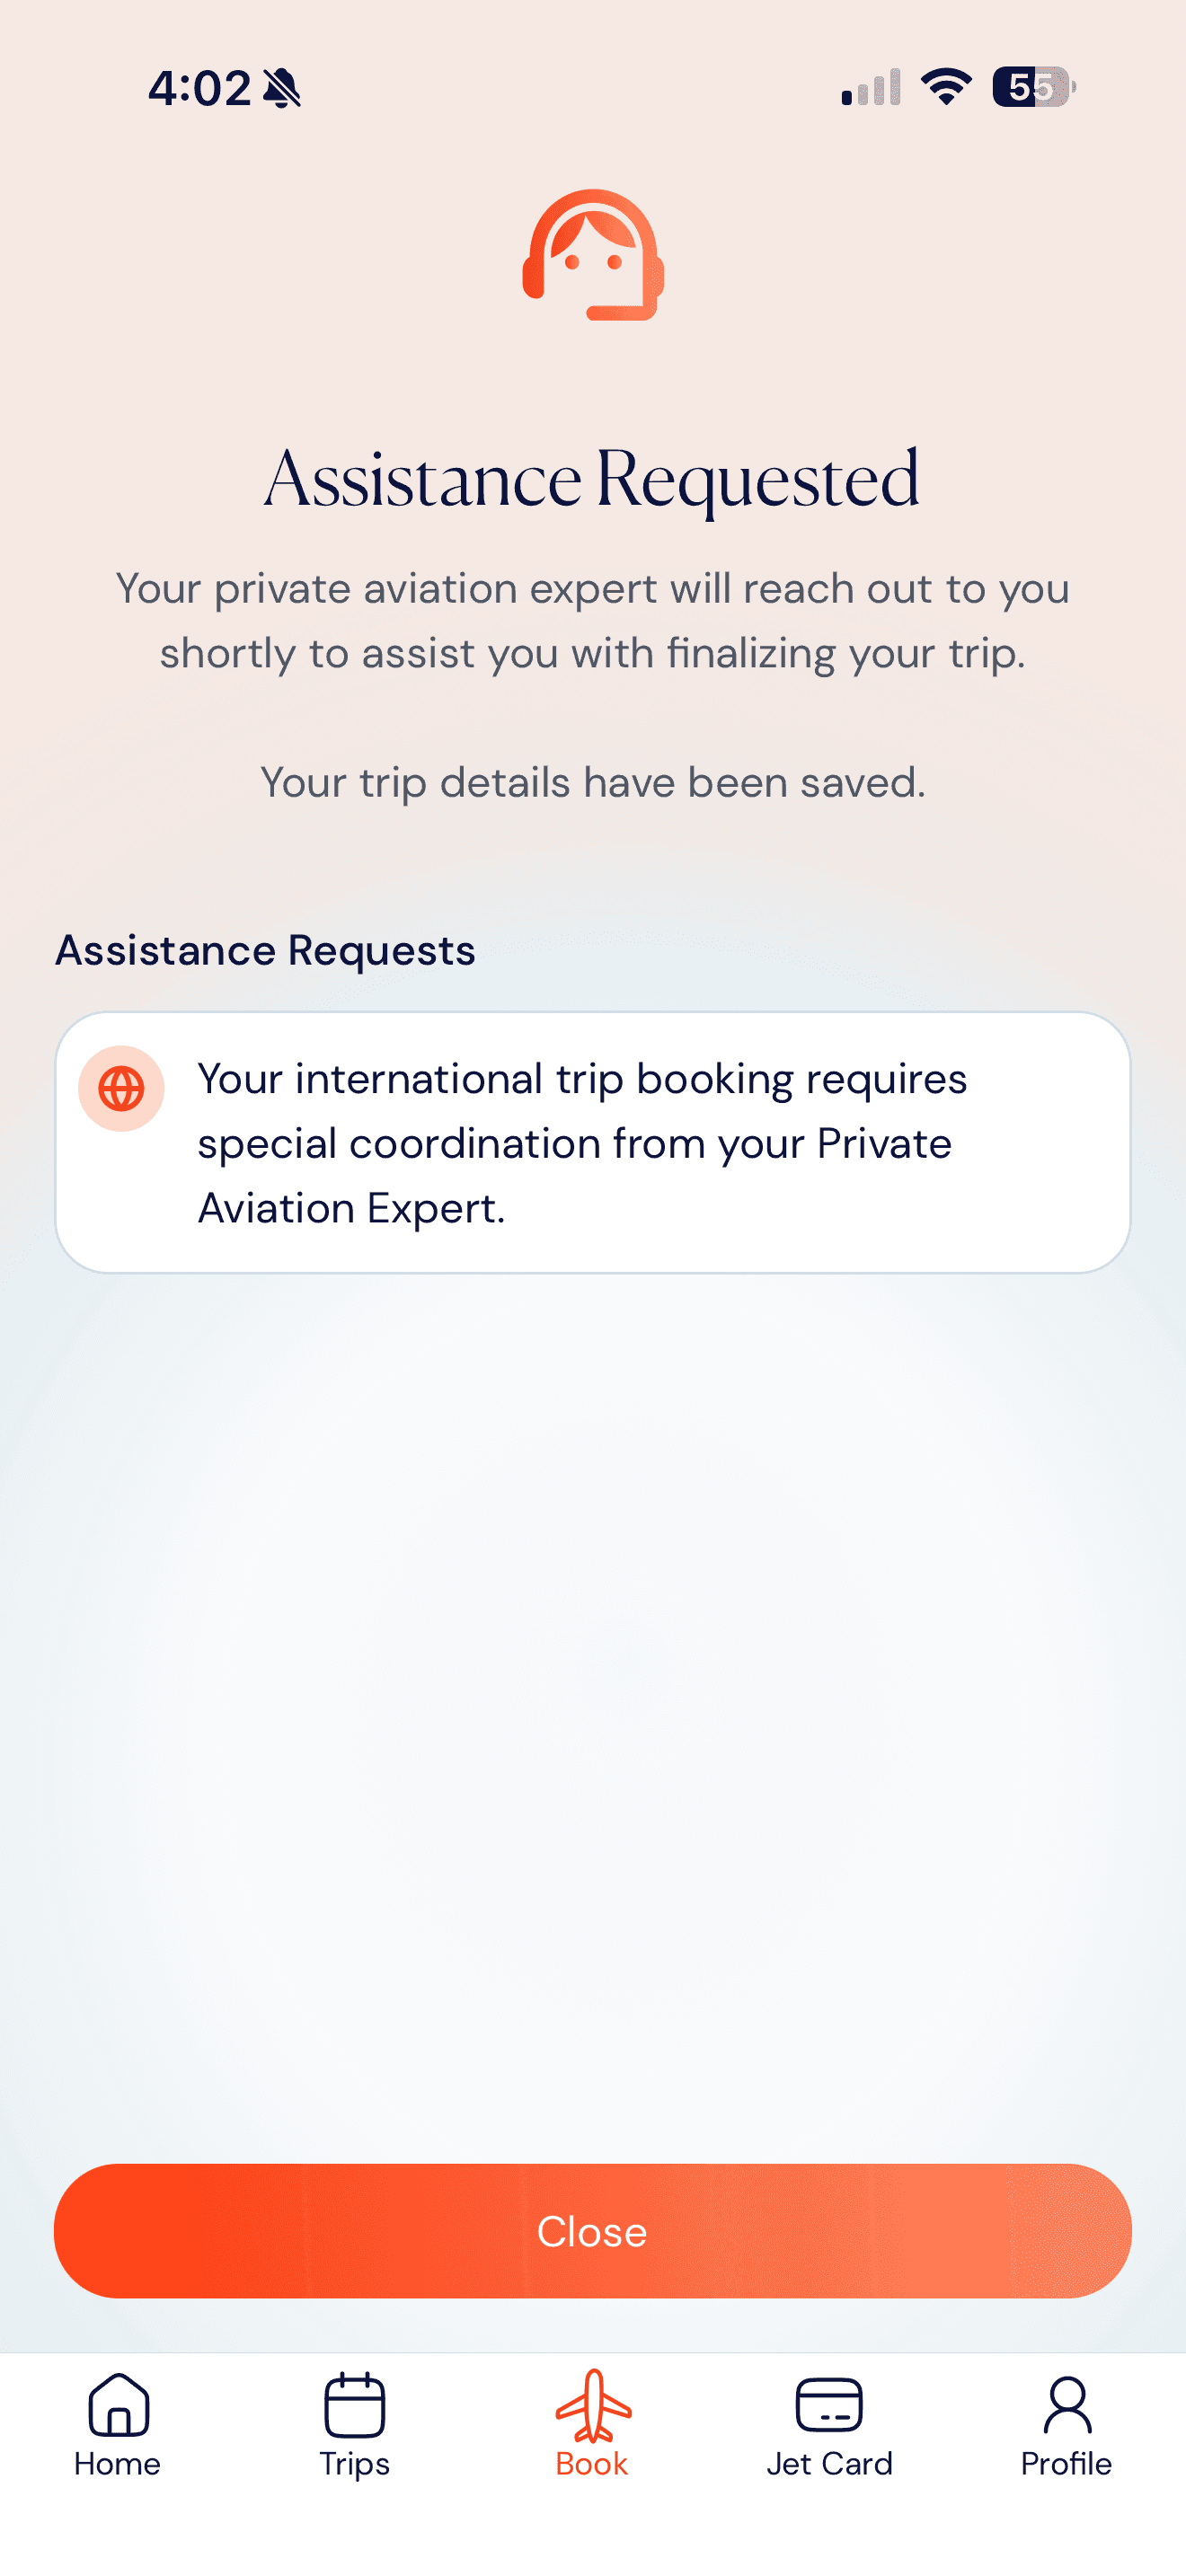
International Trip Selected
International coordination.
Cross-border flights require customs, immigration, and FBO coordination before your trip can be confirmed.
- Triggered when your origin or destination is international.
- Your Private Aviation Expert will confirm details.
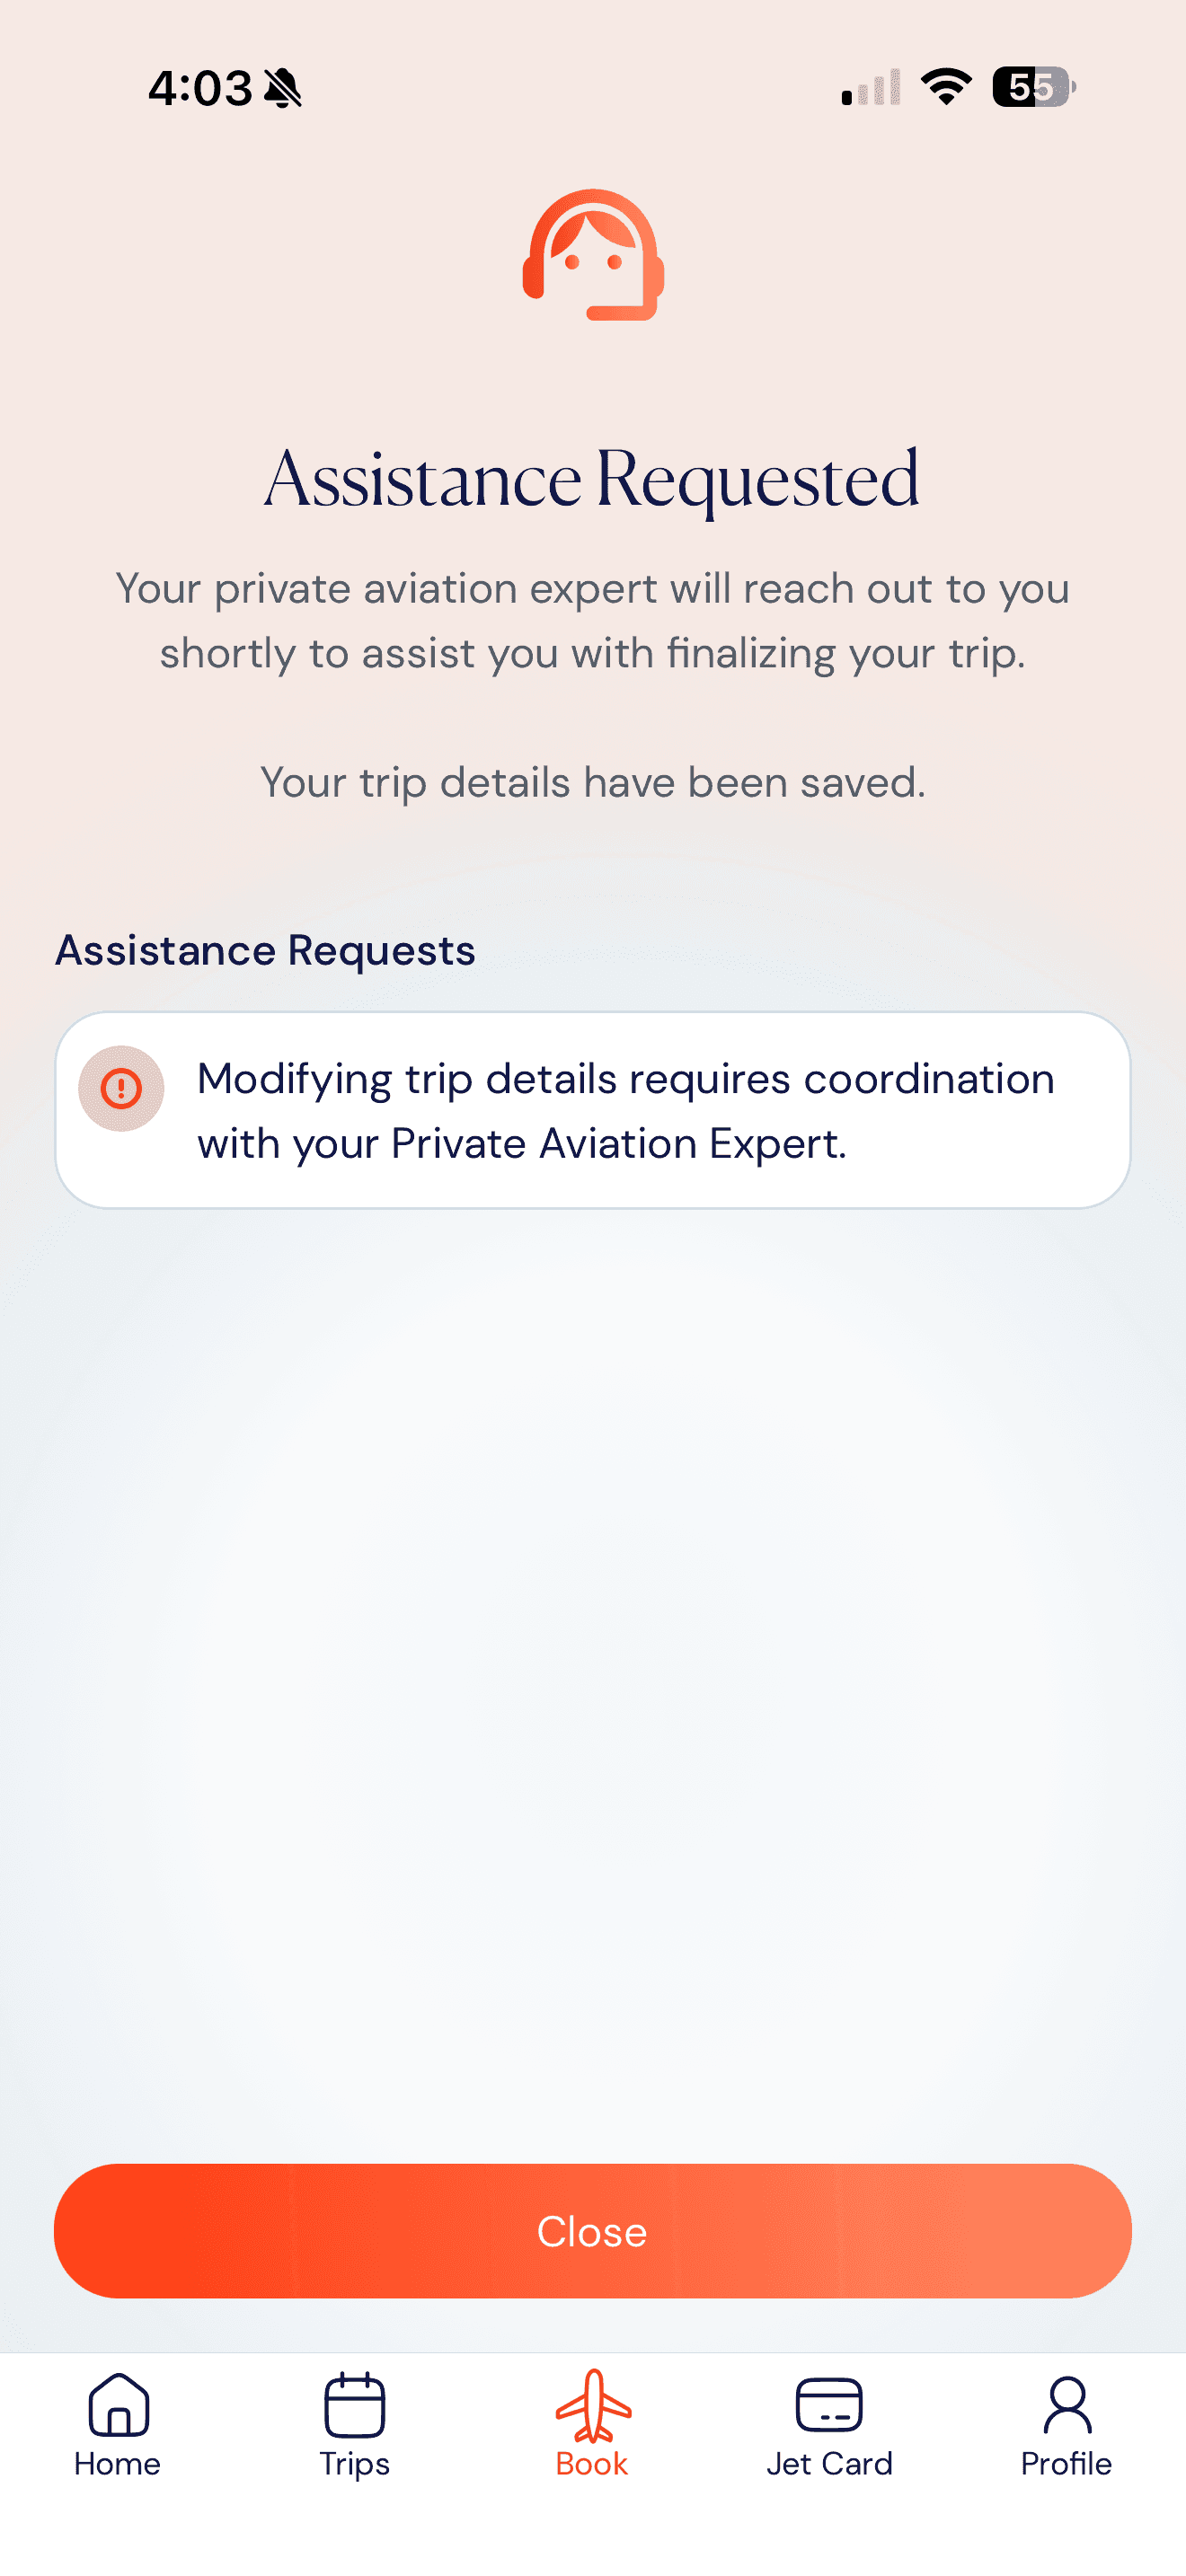
trip changes
Modifying trip details.
Some trip changes require your booking to be reviewed again before they can be confirmed.
- From Trips › Trip Details › Modify Trip.
- Changes are coordinated by your Private Aviation Expert.
- Common changes include dates, route, and aircraft.
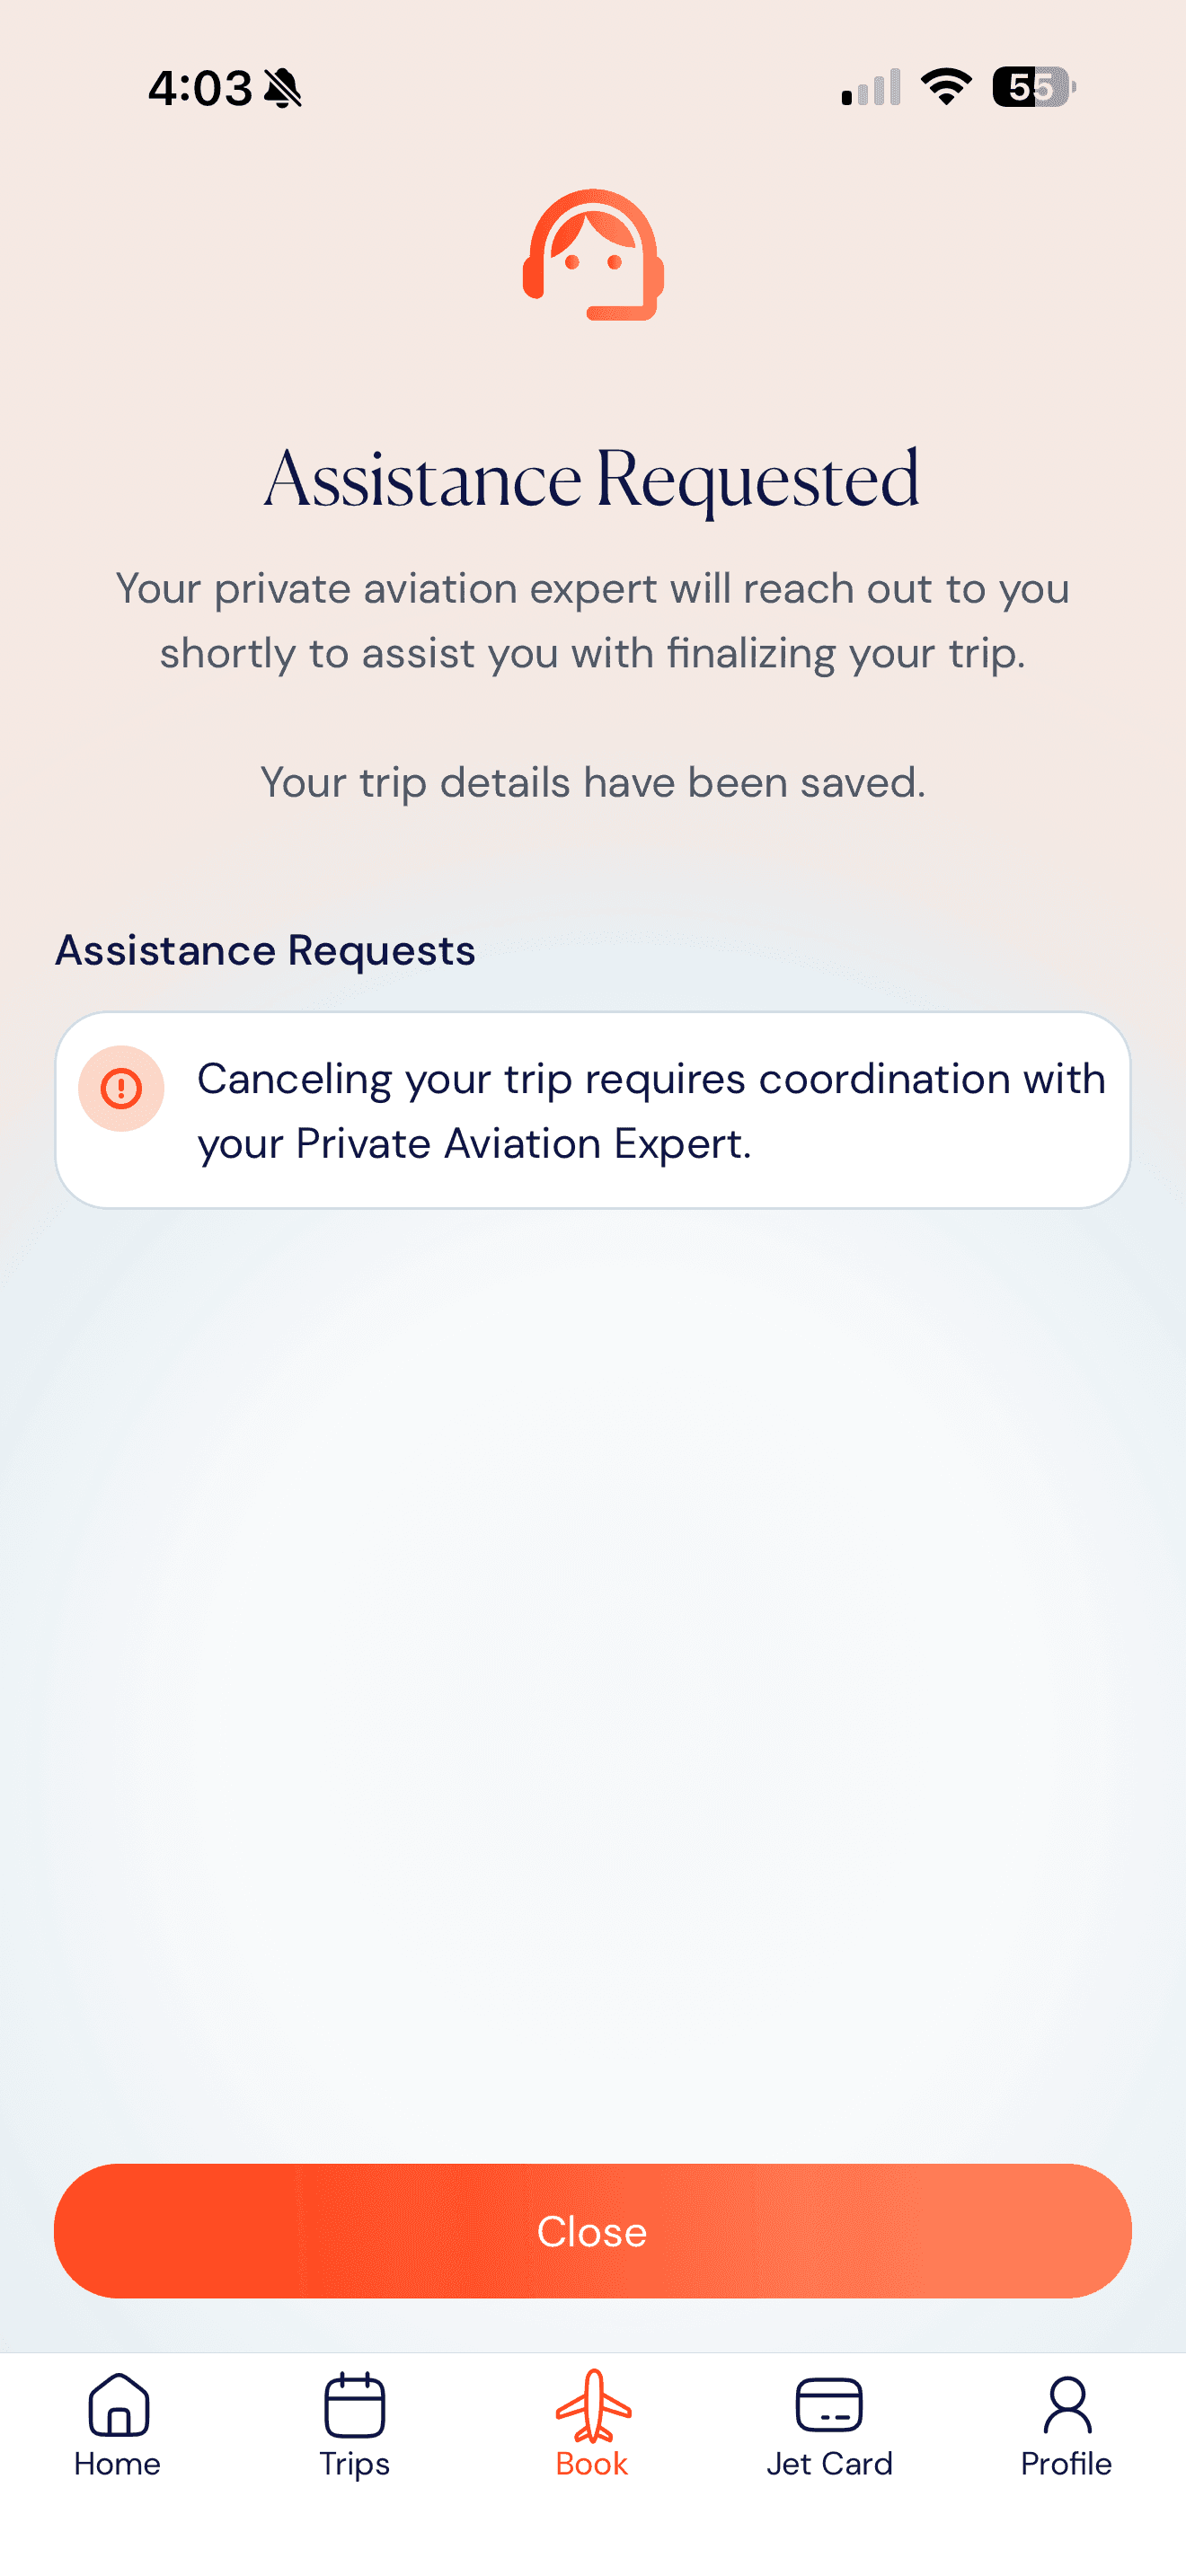
trip cancellation
Canceling a trip.
Trip cancellations are handled by your Private Aviation Expert so any applicable fees and refunds are processed correctly.
- From Trips › Trip Details › Cancel Trip.
- Cancellation fees may apply within 3–5 days of departure.
- Peak Day travel requires a 5-day cancellation window.
Always human backed: The app submits your request, and your Private Aviation Expert and their team handles the rest. They'll contact you by phone or email, and your trip details will remain saved in My Trips.
Purchase a Jet Card
Jets.com offers two prepaid programs — Access Pass (fixed flight hours at a guaranteed hourly rate for your chosen jet type) and Access+ (flight funds usable across every jet type). This guide walks purchasing a card from the offers list through signing the contract and completing payment.
Purchase a Jet Card • Steps 1 – 3
Browse Jet Card options and choose your preferred cabin class
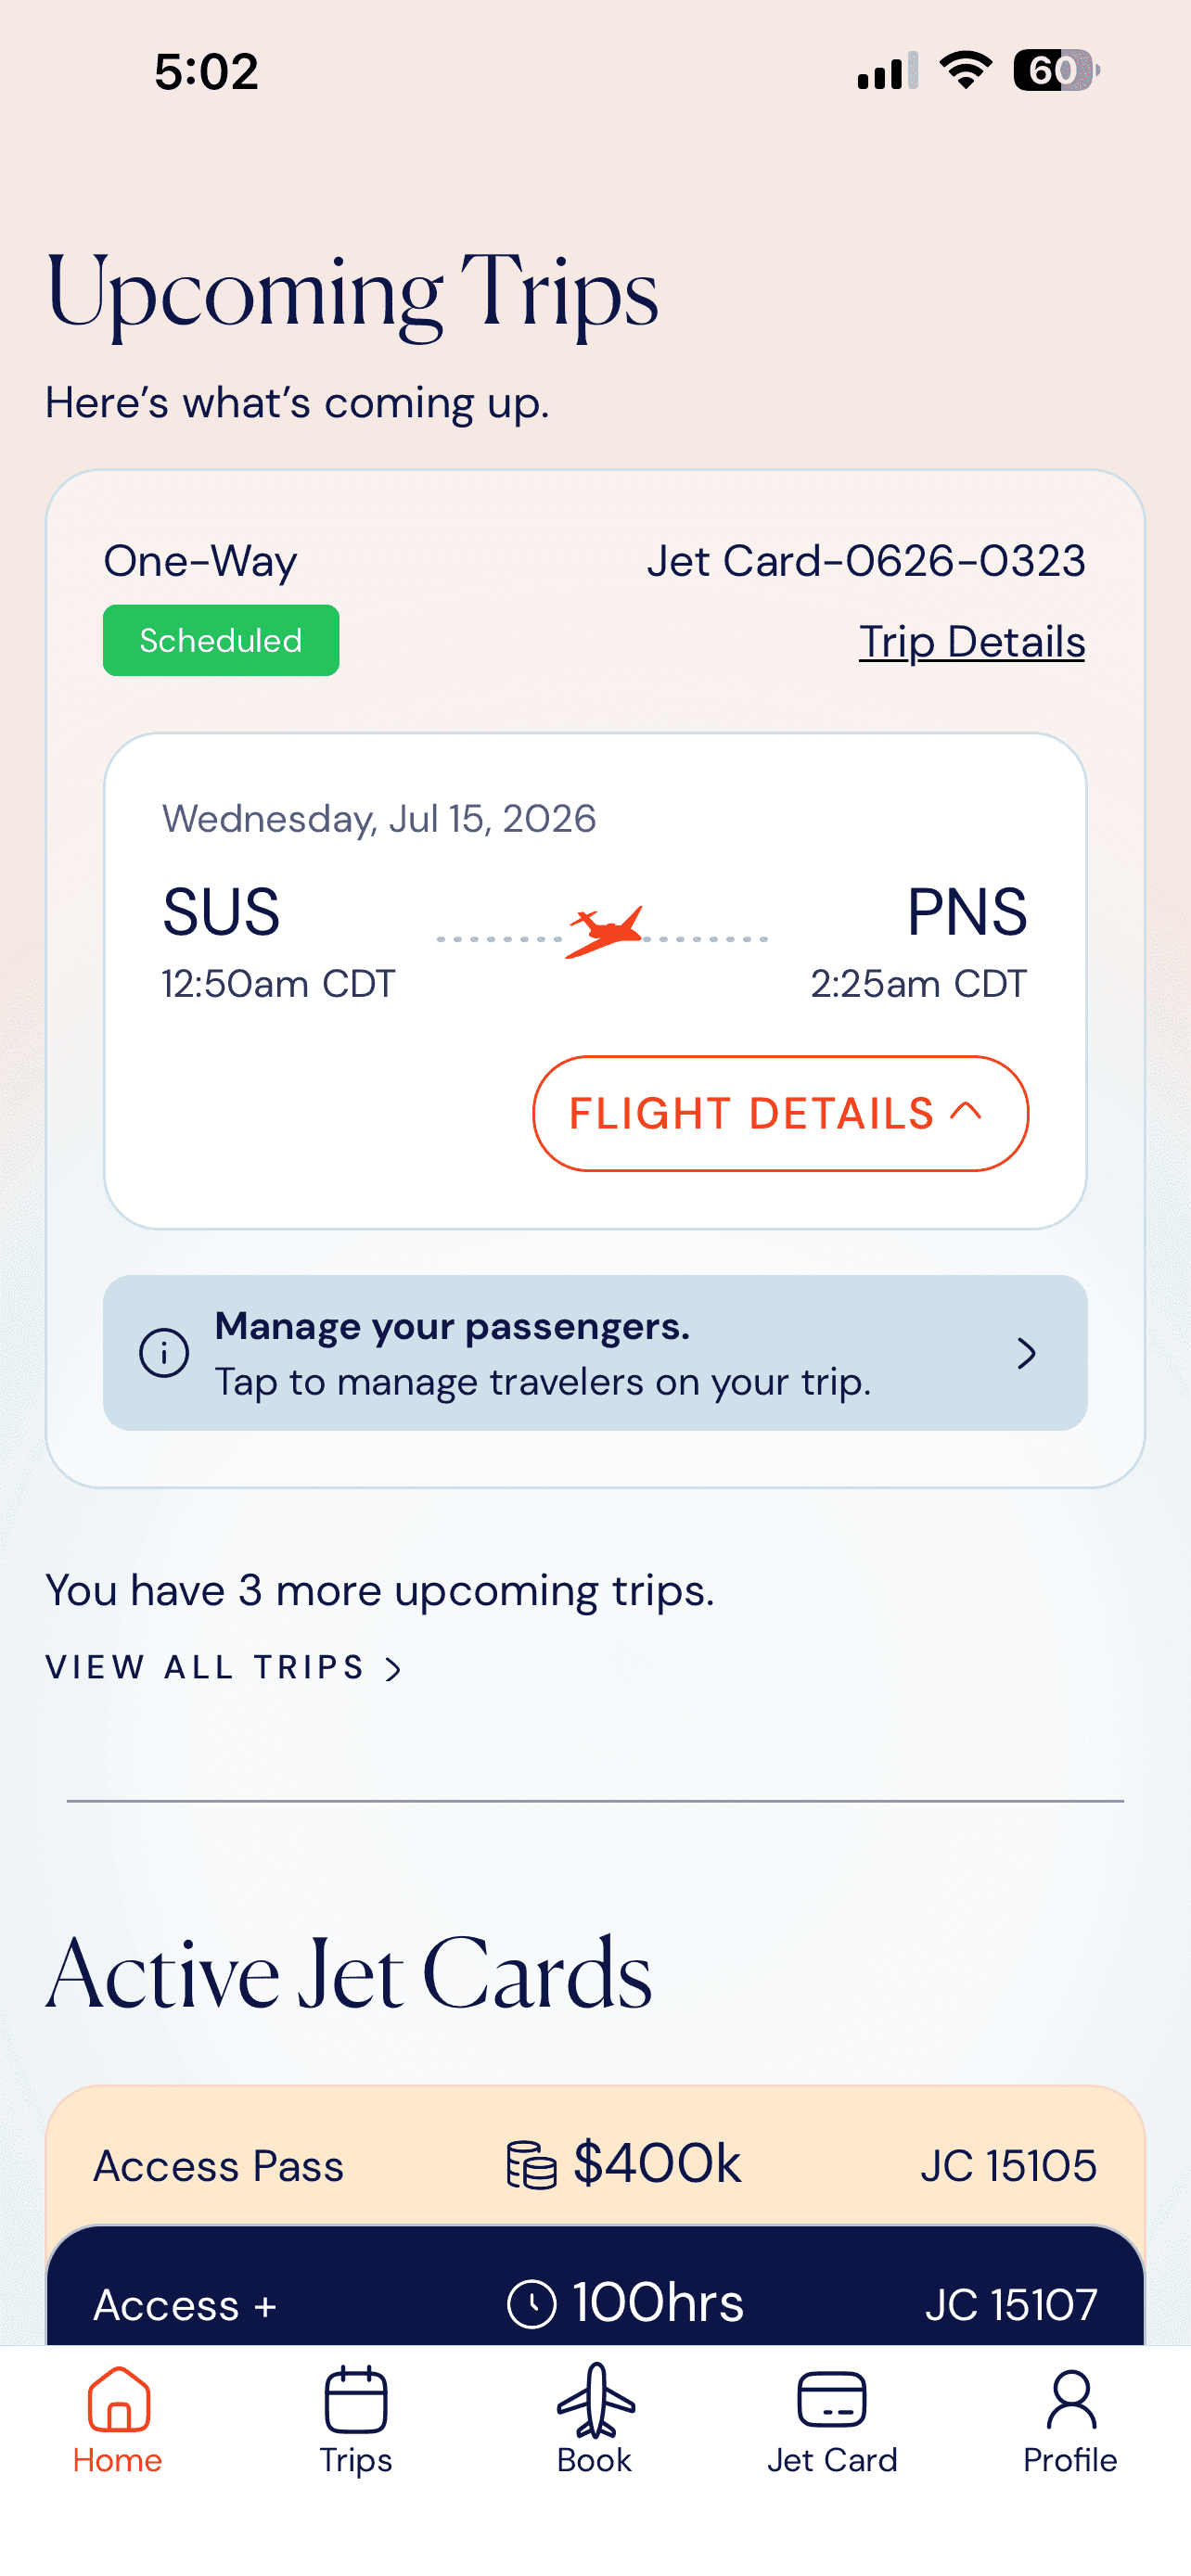
start here
Browse available Jet Cards.
Your Home Screen displays any Active Jet Cards you already own, along with current Jet Card offers. Scroll down to explore available programs.
- Your existing Jet Cards appear on Home.
- Current programs available for sale appear below in Jet Card Offers.
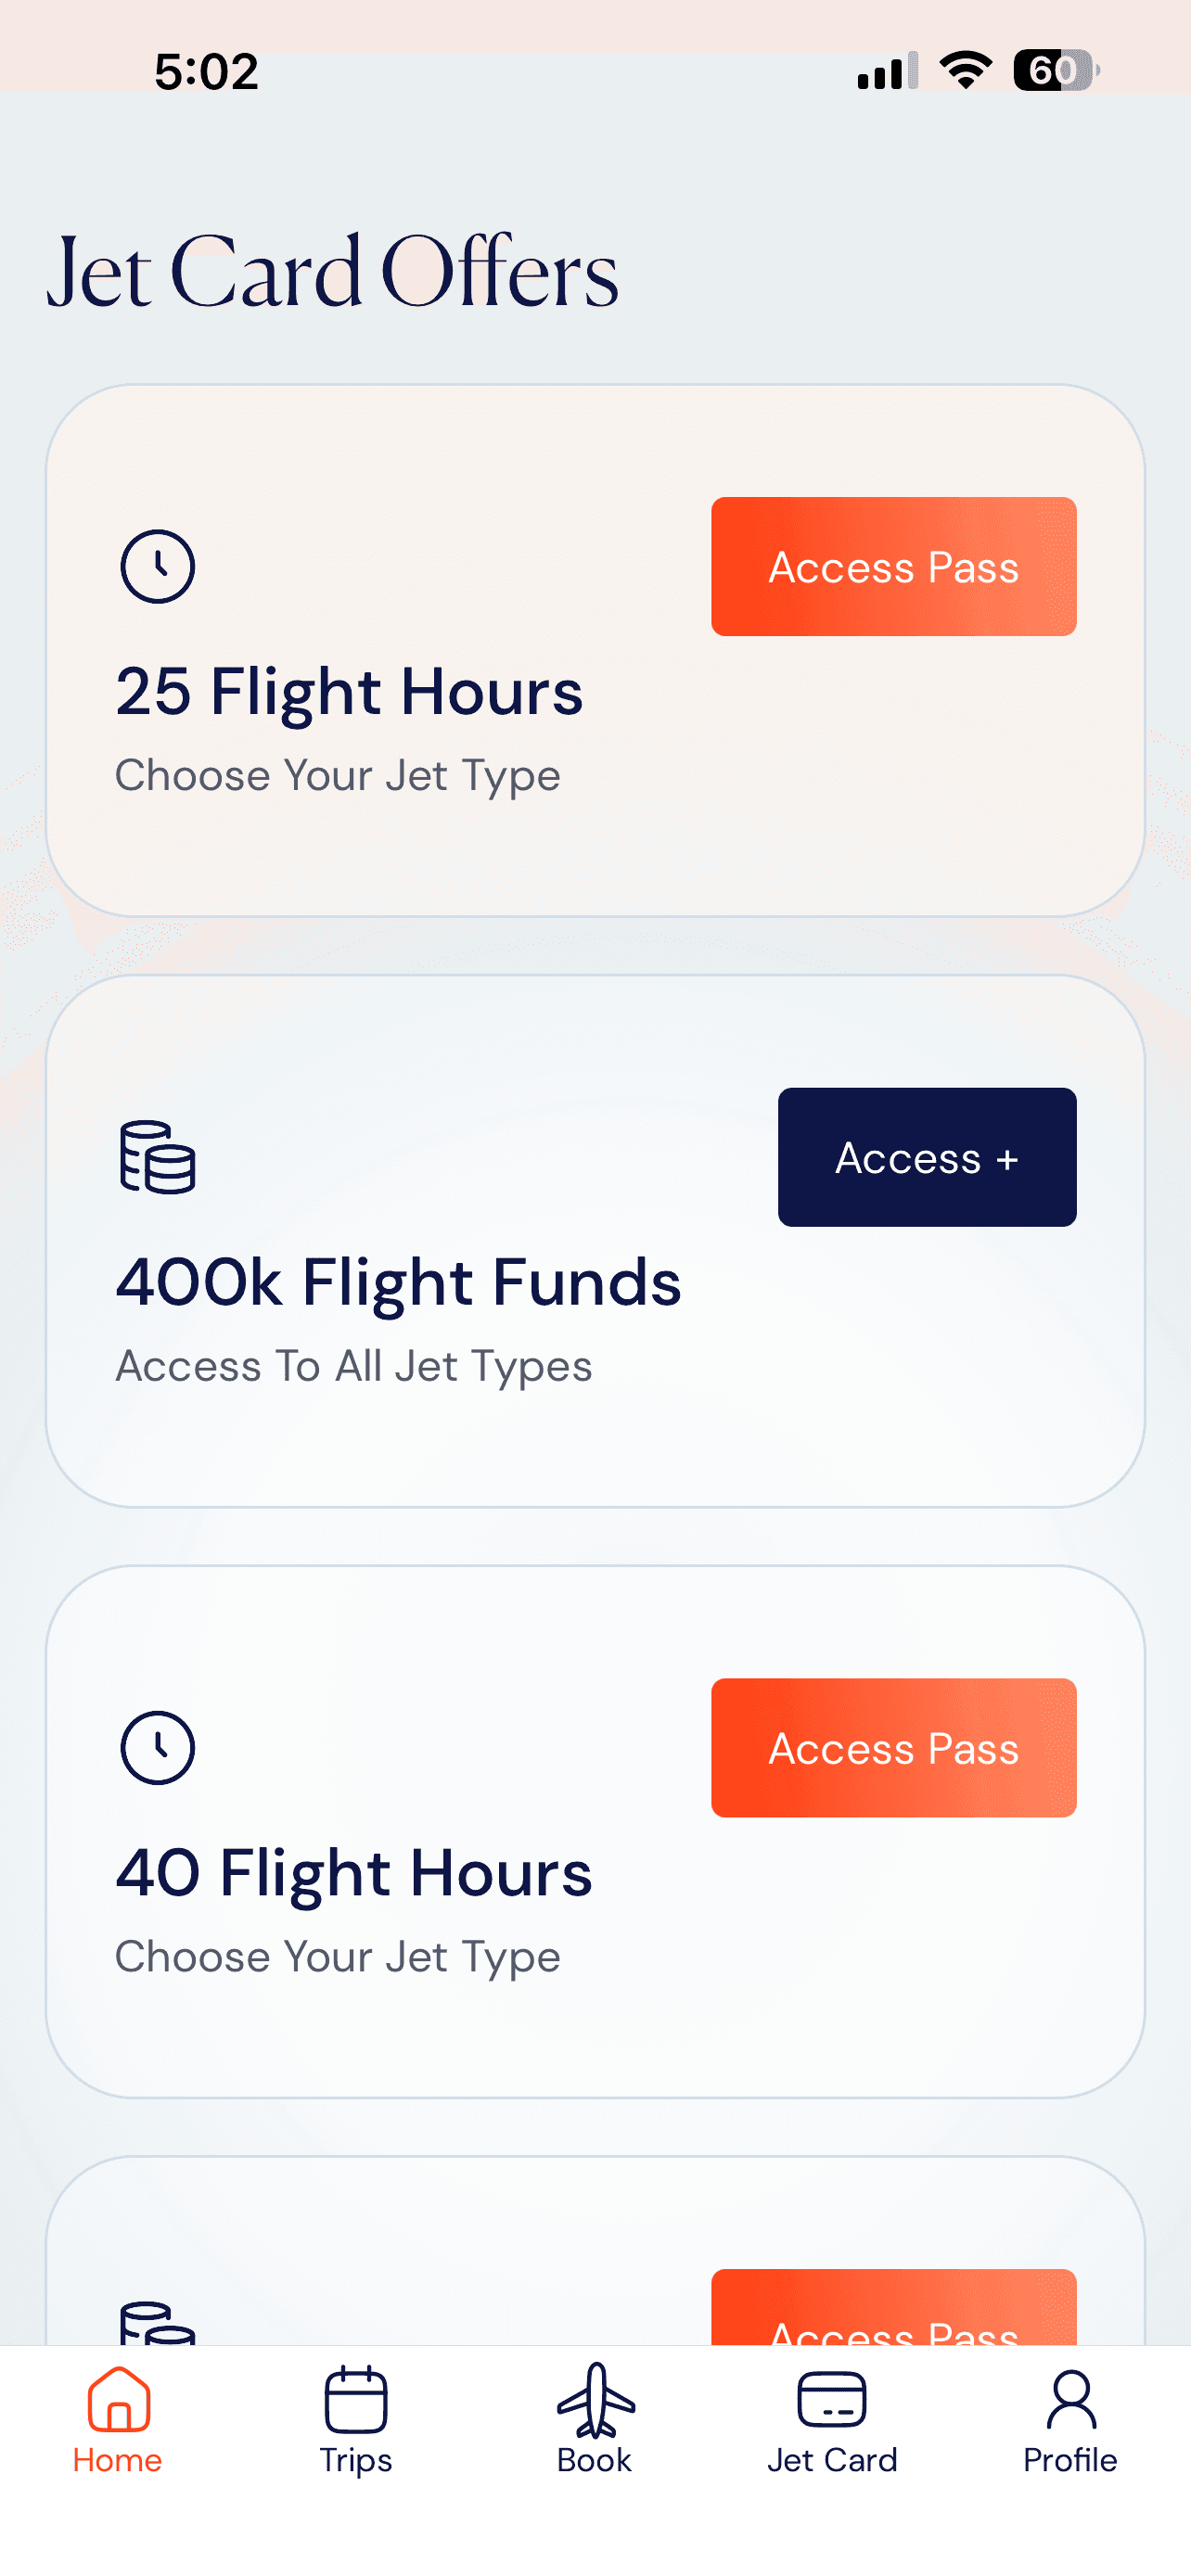
Jet Card Offers
Choose a program.
Browse available Jet Cards and select the option that best fits your travel needs. Tap any Card to view pricing and details.
- Access Pass: Fixed hourly rates for your preferred cabin class, guaranteed for the life of the Card.
- Access+: Fly any cabin class at your locked hourly rate. Fewer Peak Days and shorter callout windows.
- Tap any offer to expand its details.
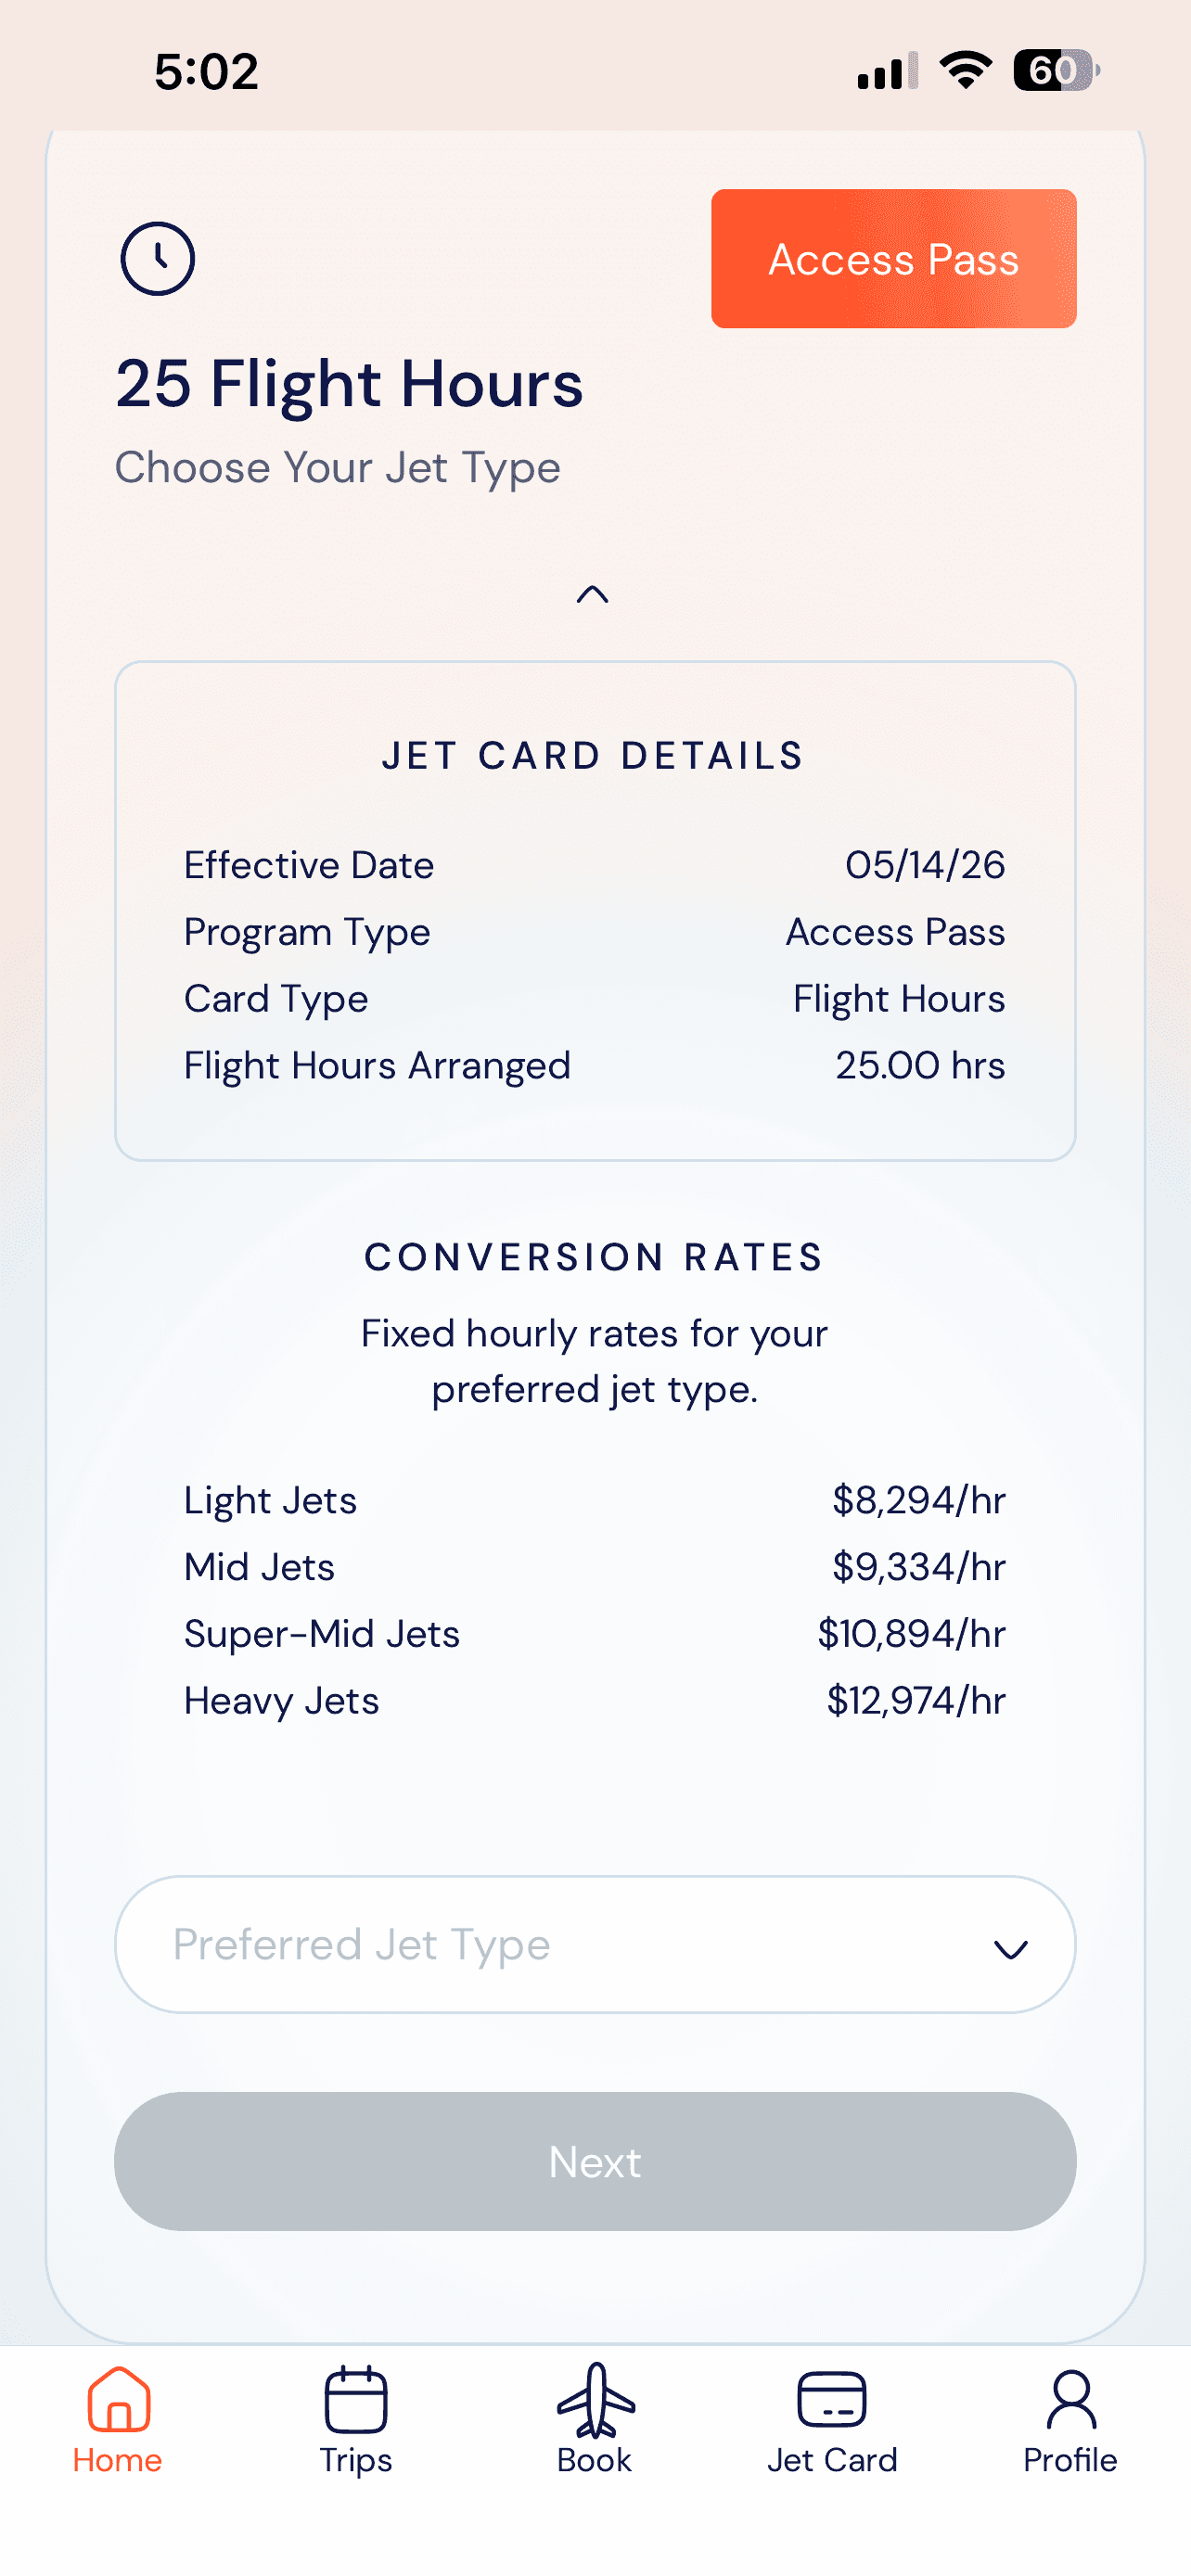
Details & Rates
Set your preferred jet type.
Review the program details, including your effective date, flight hours, and fixed hourly rates. Select your preferred aircraft category, then tap Next.
- View hourly rates by aircraft category.
- Select your preferred cabin class.
- Next remains disabled until a selection is made.
Access Pass vs. Access+. Access Pass locks a guaranteed hourly rate for one jet type — ideal if you fly a consistent cabin class. Access+ holds flight funds usable across every jet type for maximum flexibility.
Purchasing a Jet Card · Steps 4 – 6
Sign your contract and confirm your Jet Card.
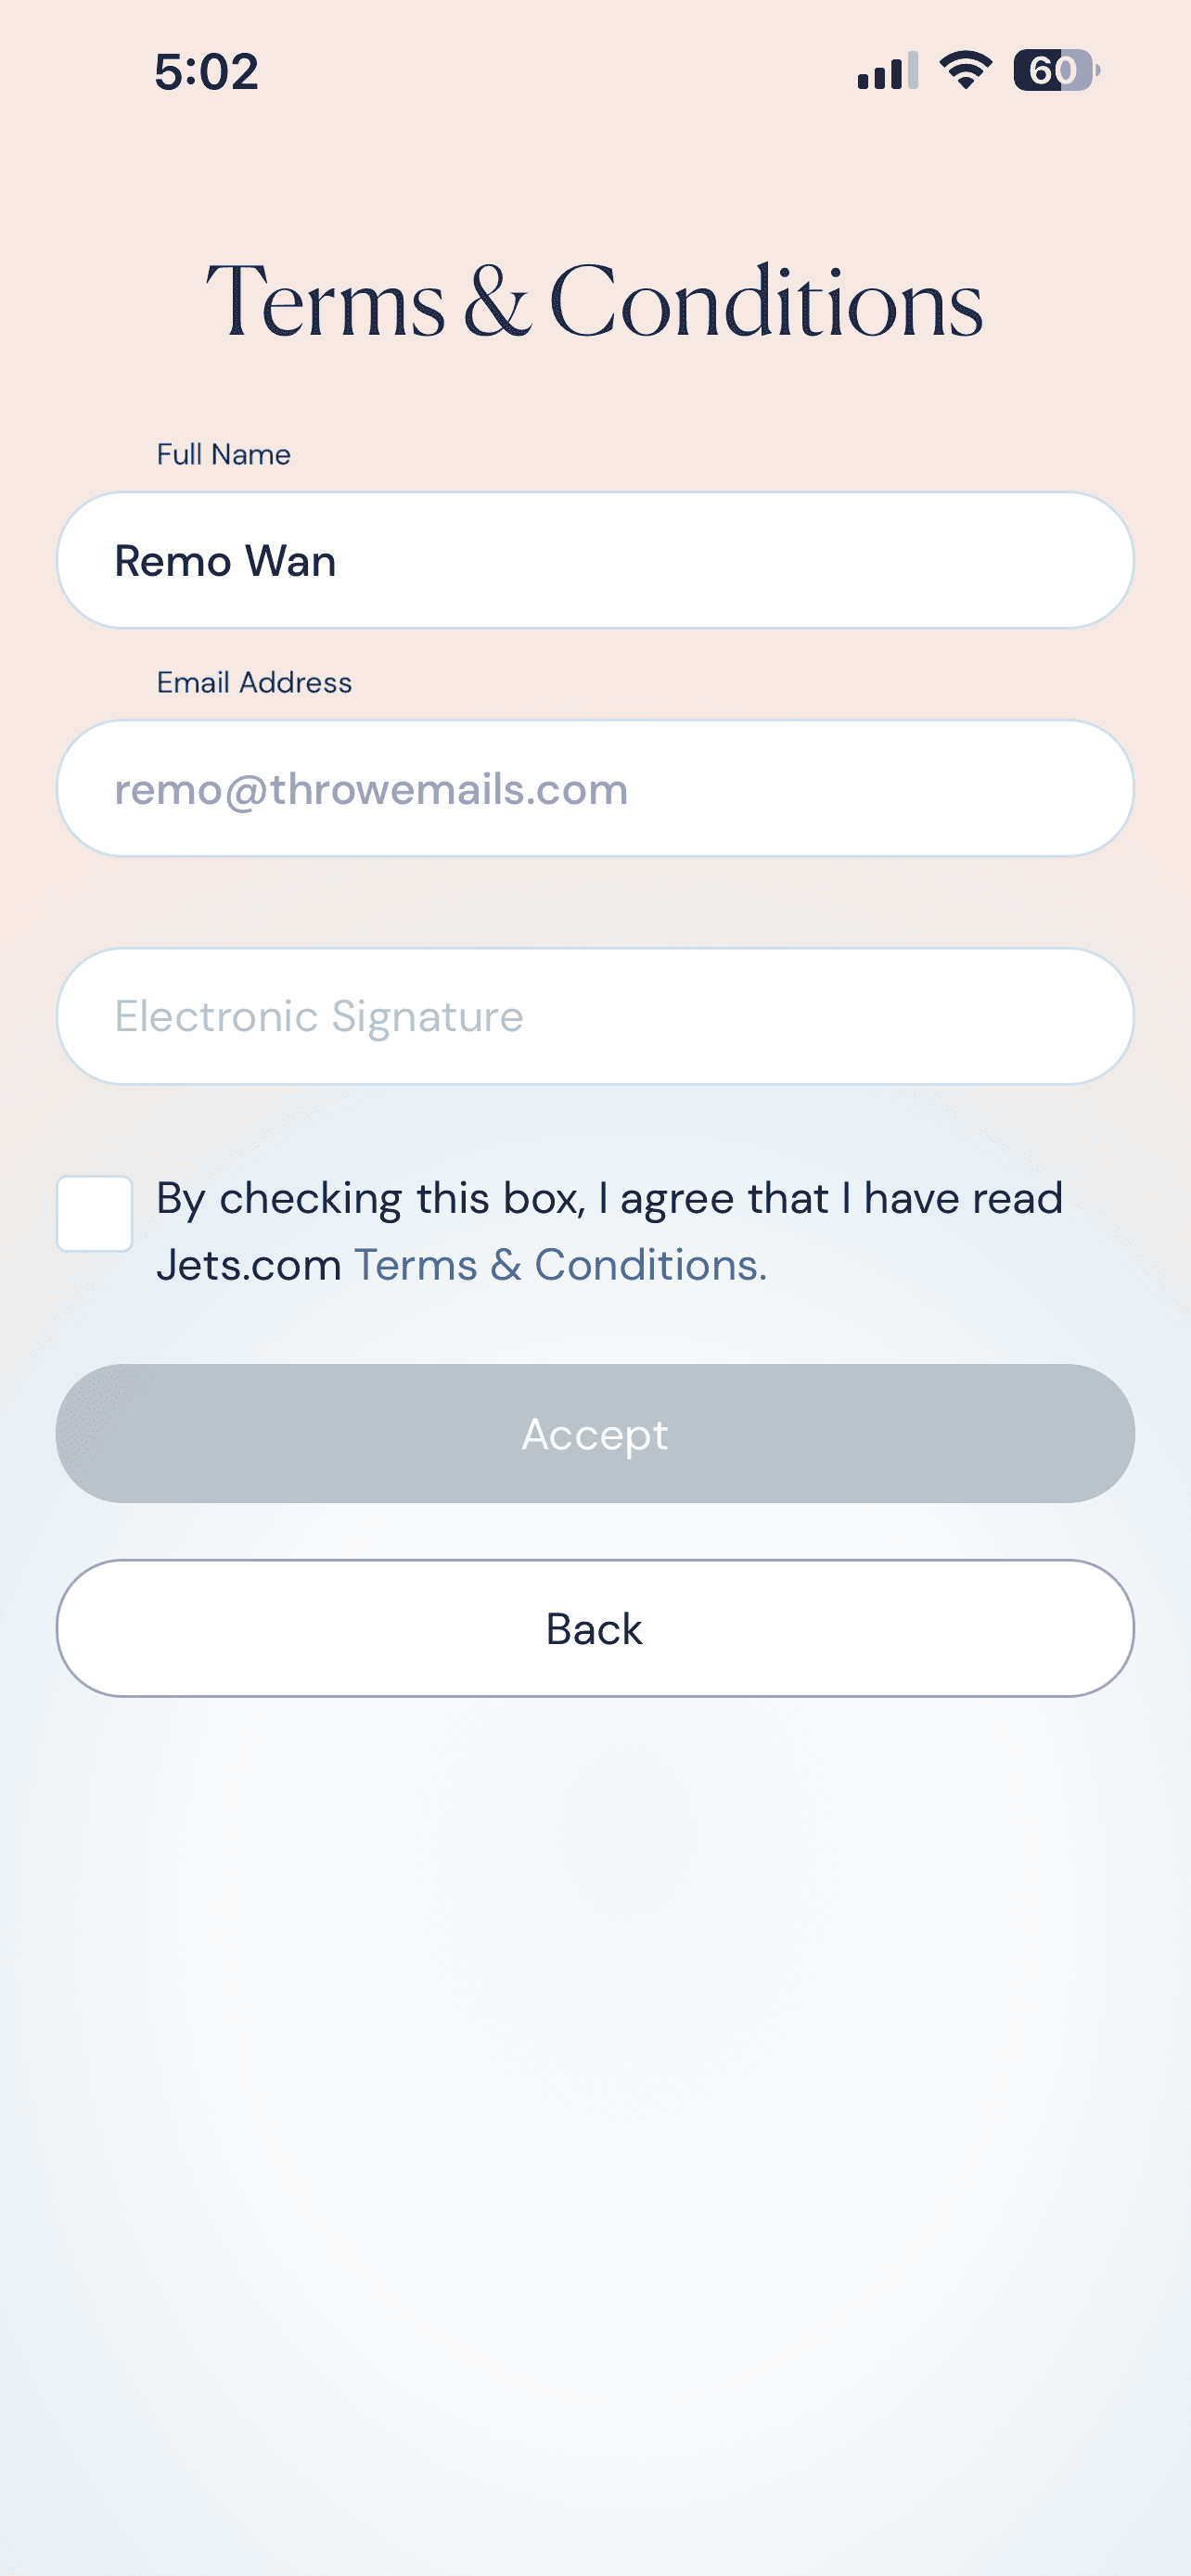
Terms & Conditions
Sign your contract.
Confirm your name and email, add your electronic signature, then check the box to accept the Jets.com Terms & Conditions.
- Your signature is timestamped and saved automatically.
- Accept remains disabled until the box is checked.
- Tap Back to revisit rates.
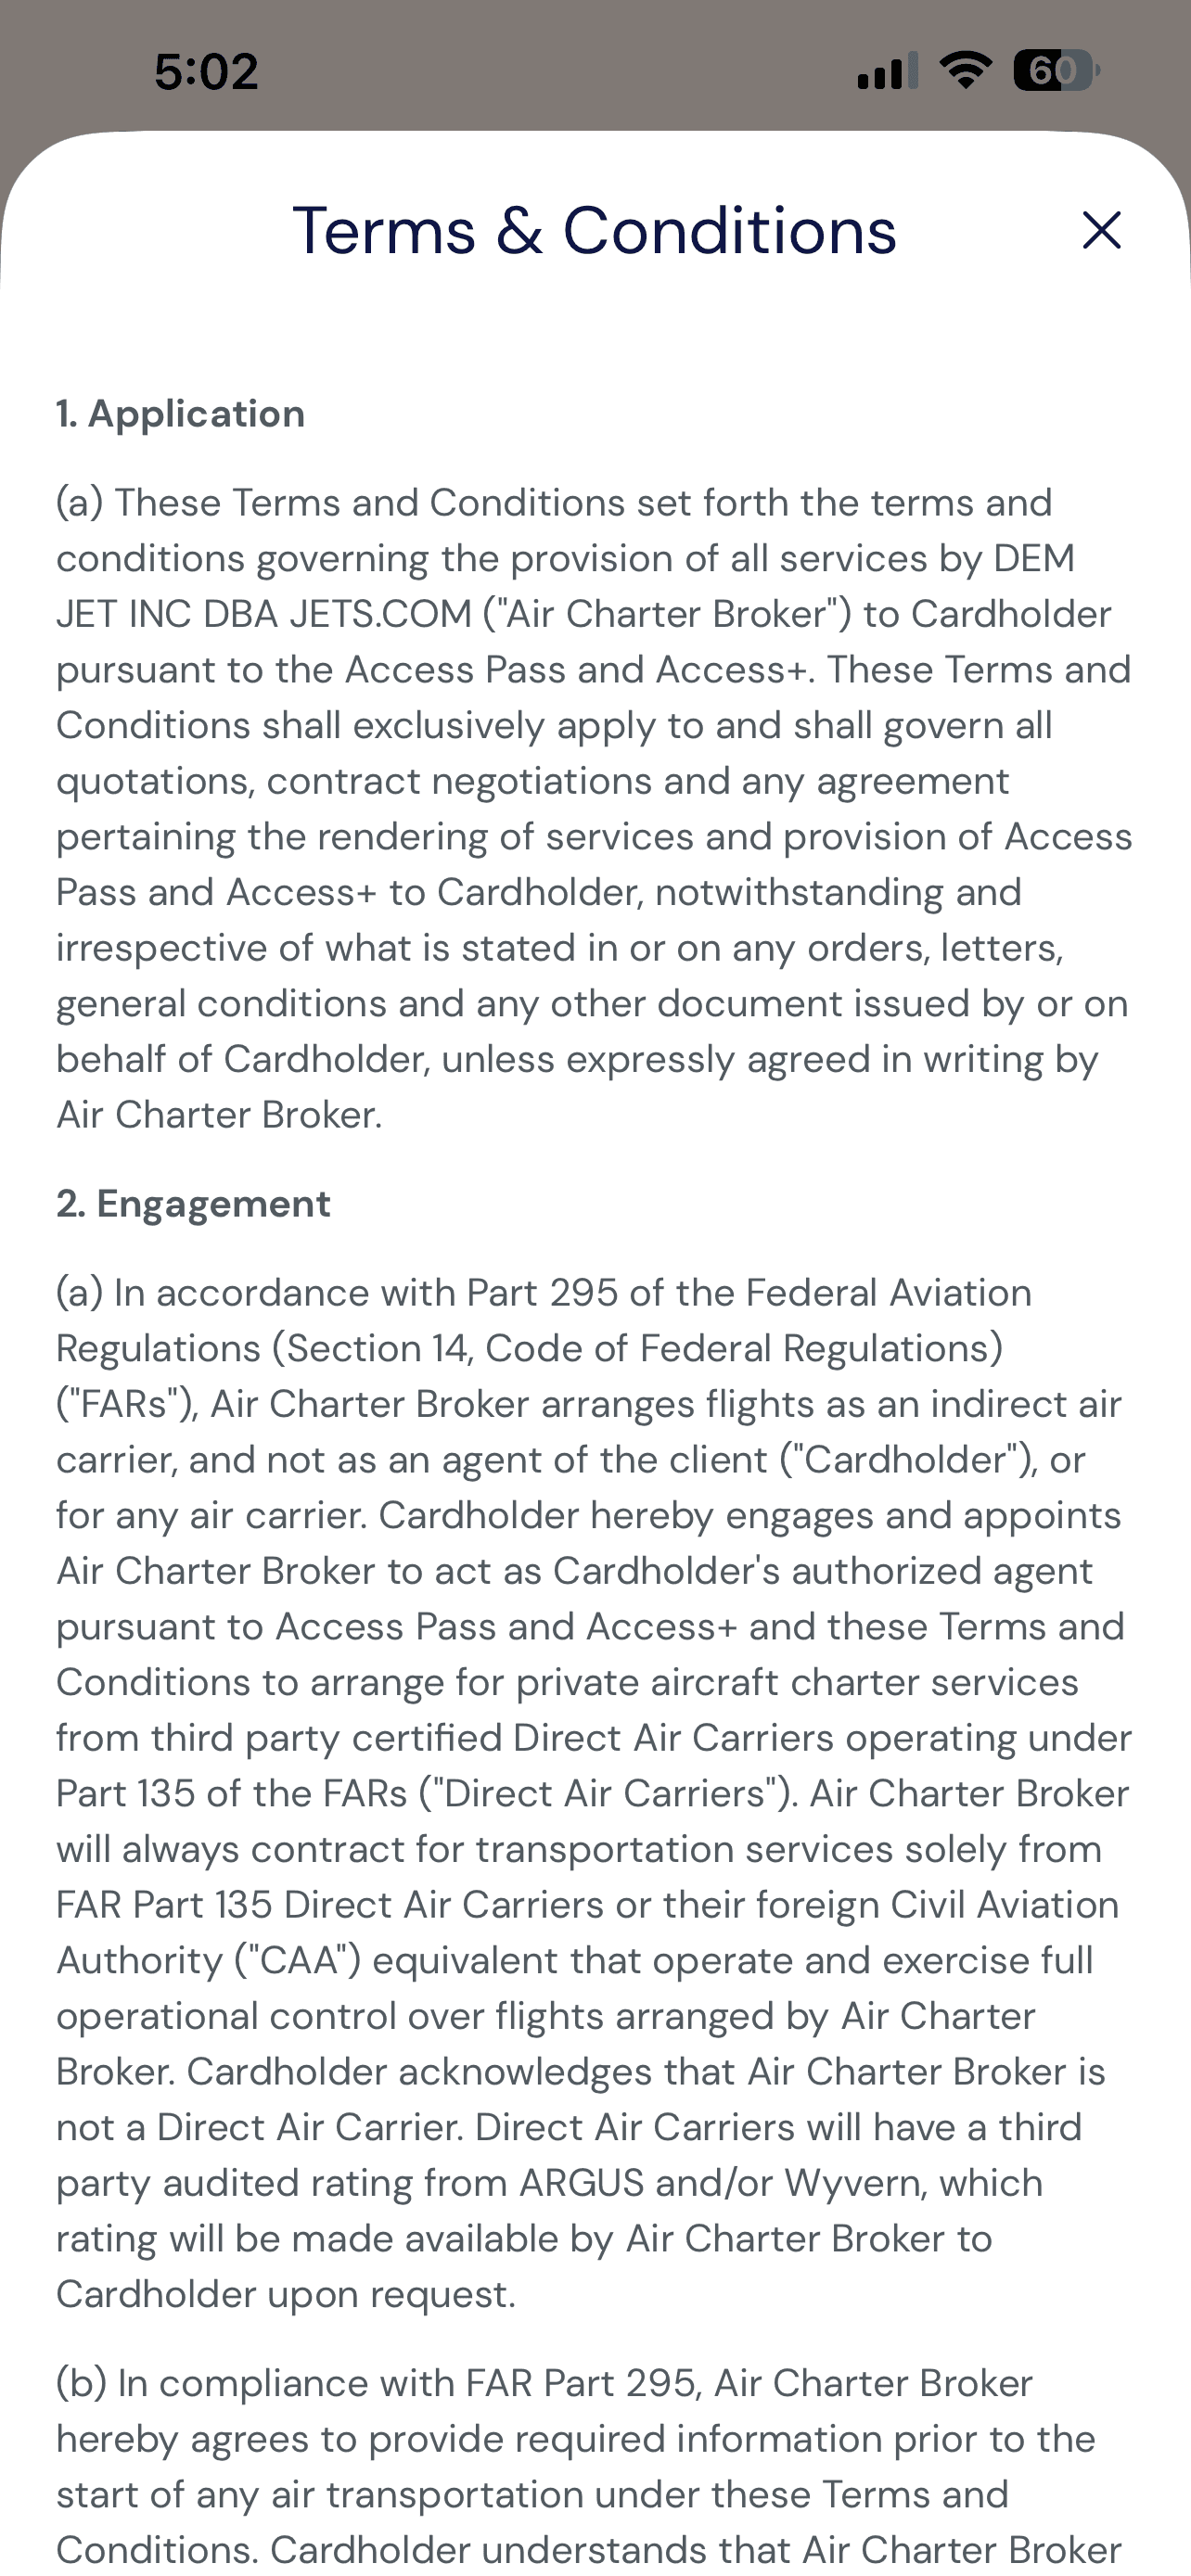
Read the Full Terms
Review your agreement.
Tap Terms & Conditions to open the full contract covering your application, engagement, safety certifications, and cardholder responsibilities.
- Scroll through the complete document in the app.
- Tap X to close and return to signing.
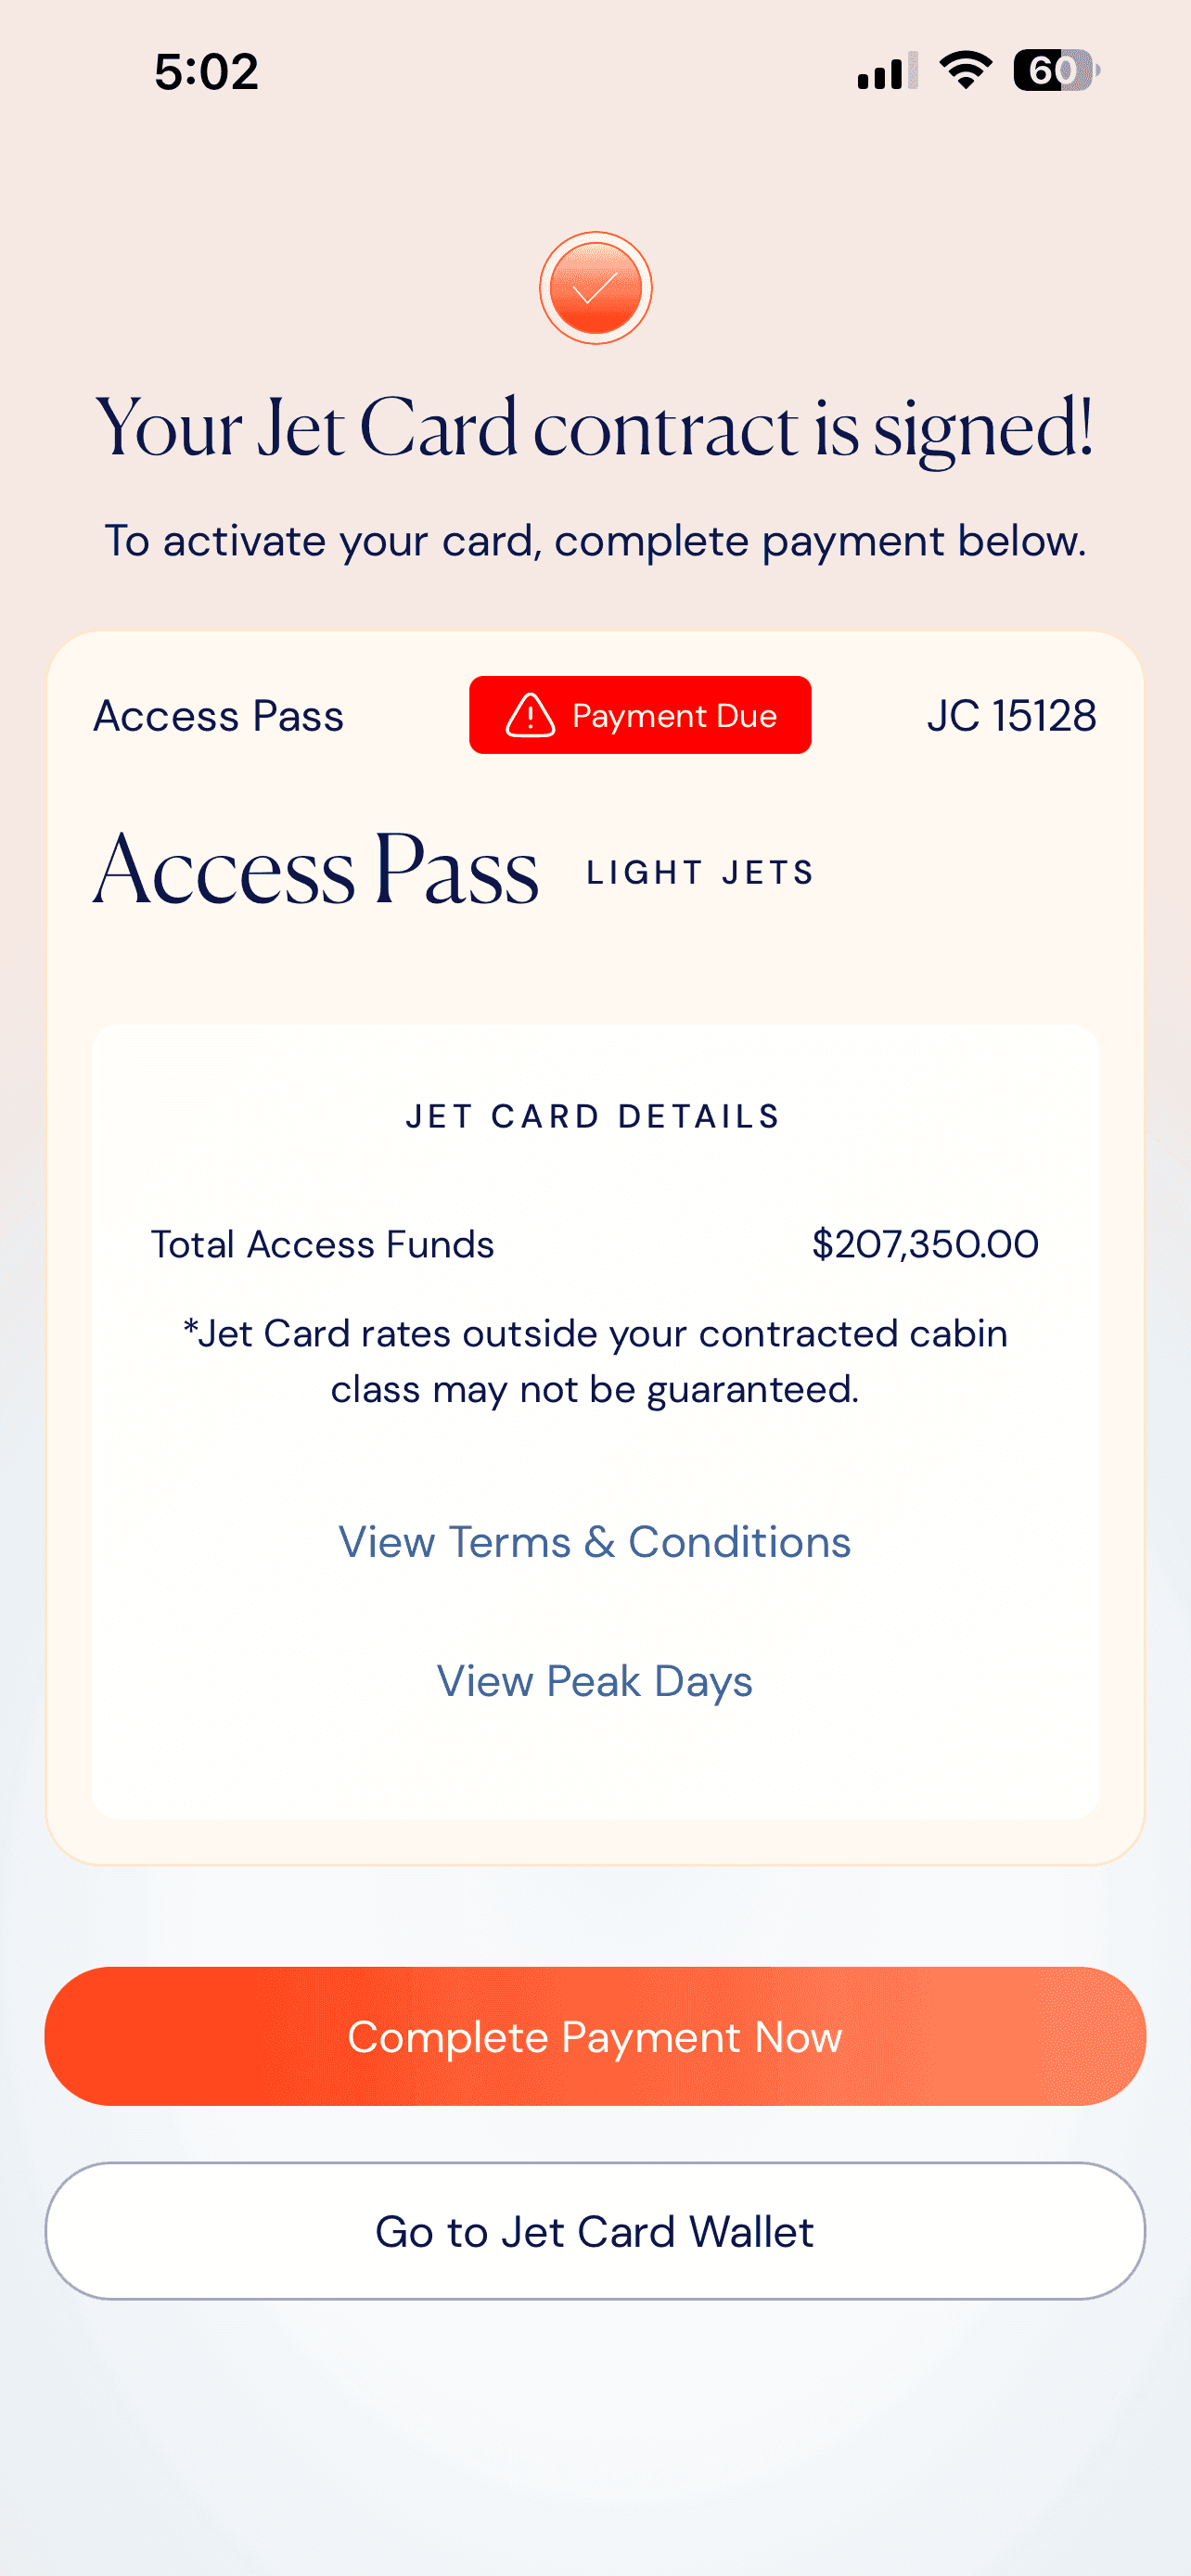
Contract Signed
Your Jet Card is issued.
Congratulations – your contract is signed. Your new Card shows a red Payment Due badge with your Total Access Funds. Tap Complete Payment Now to activate it.
- Card is issued, but stays inactive until payment is received.
- Tap View Peak Days to see premium‑rate dates.
- Prefer to pay later? Tap Go to Jet Card Wallet.
Peak Days are high-demand dates – holidays and major events – where surcharges or minimum flight times may apply. Review the calendar before booking around these windows.
Purchasing a Jet Card · Steps 7 – 9
Choose your payment method and submit your funds.
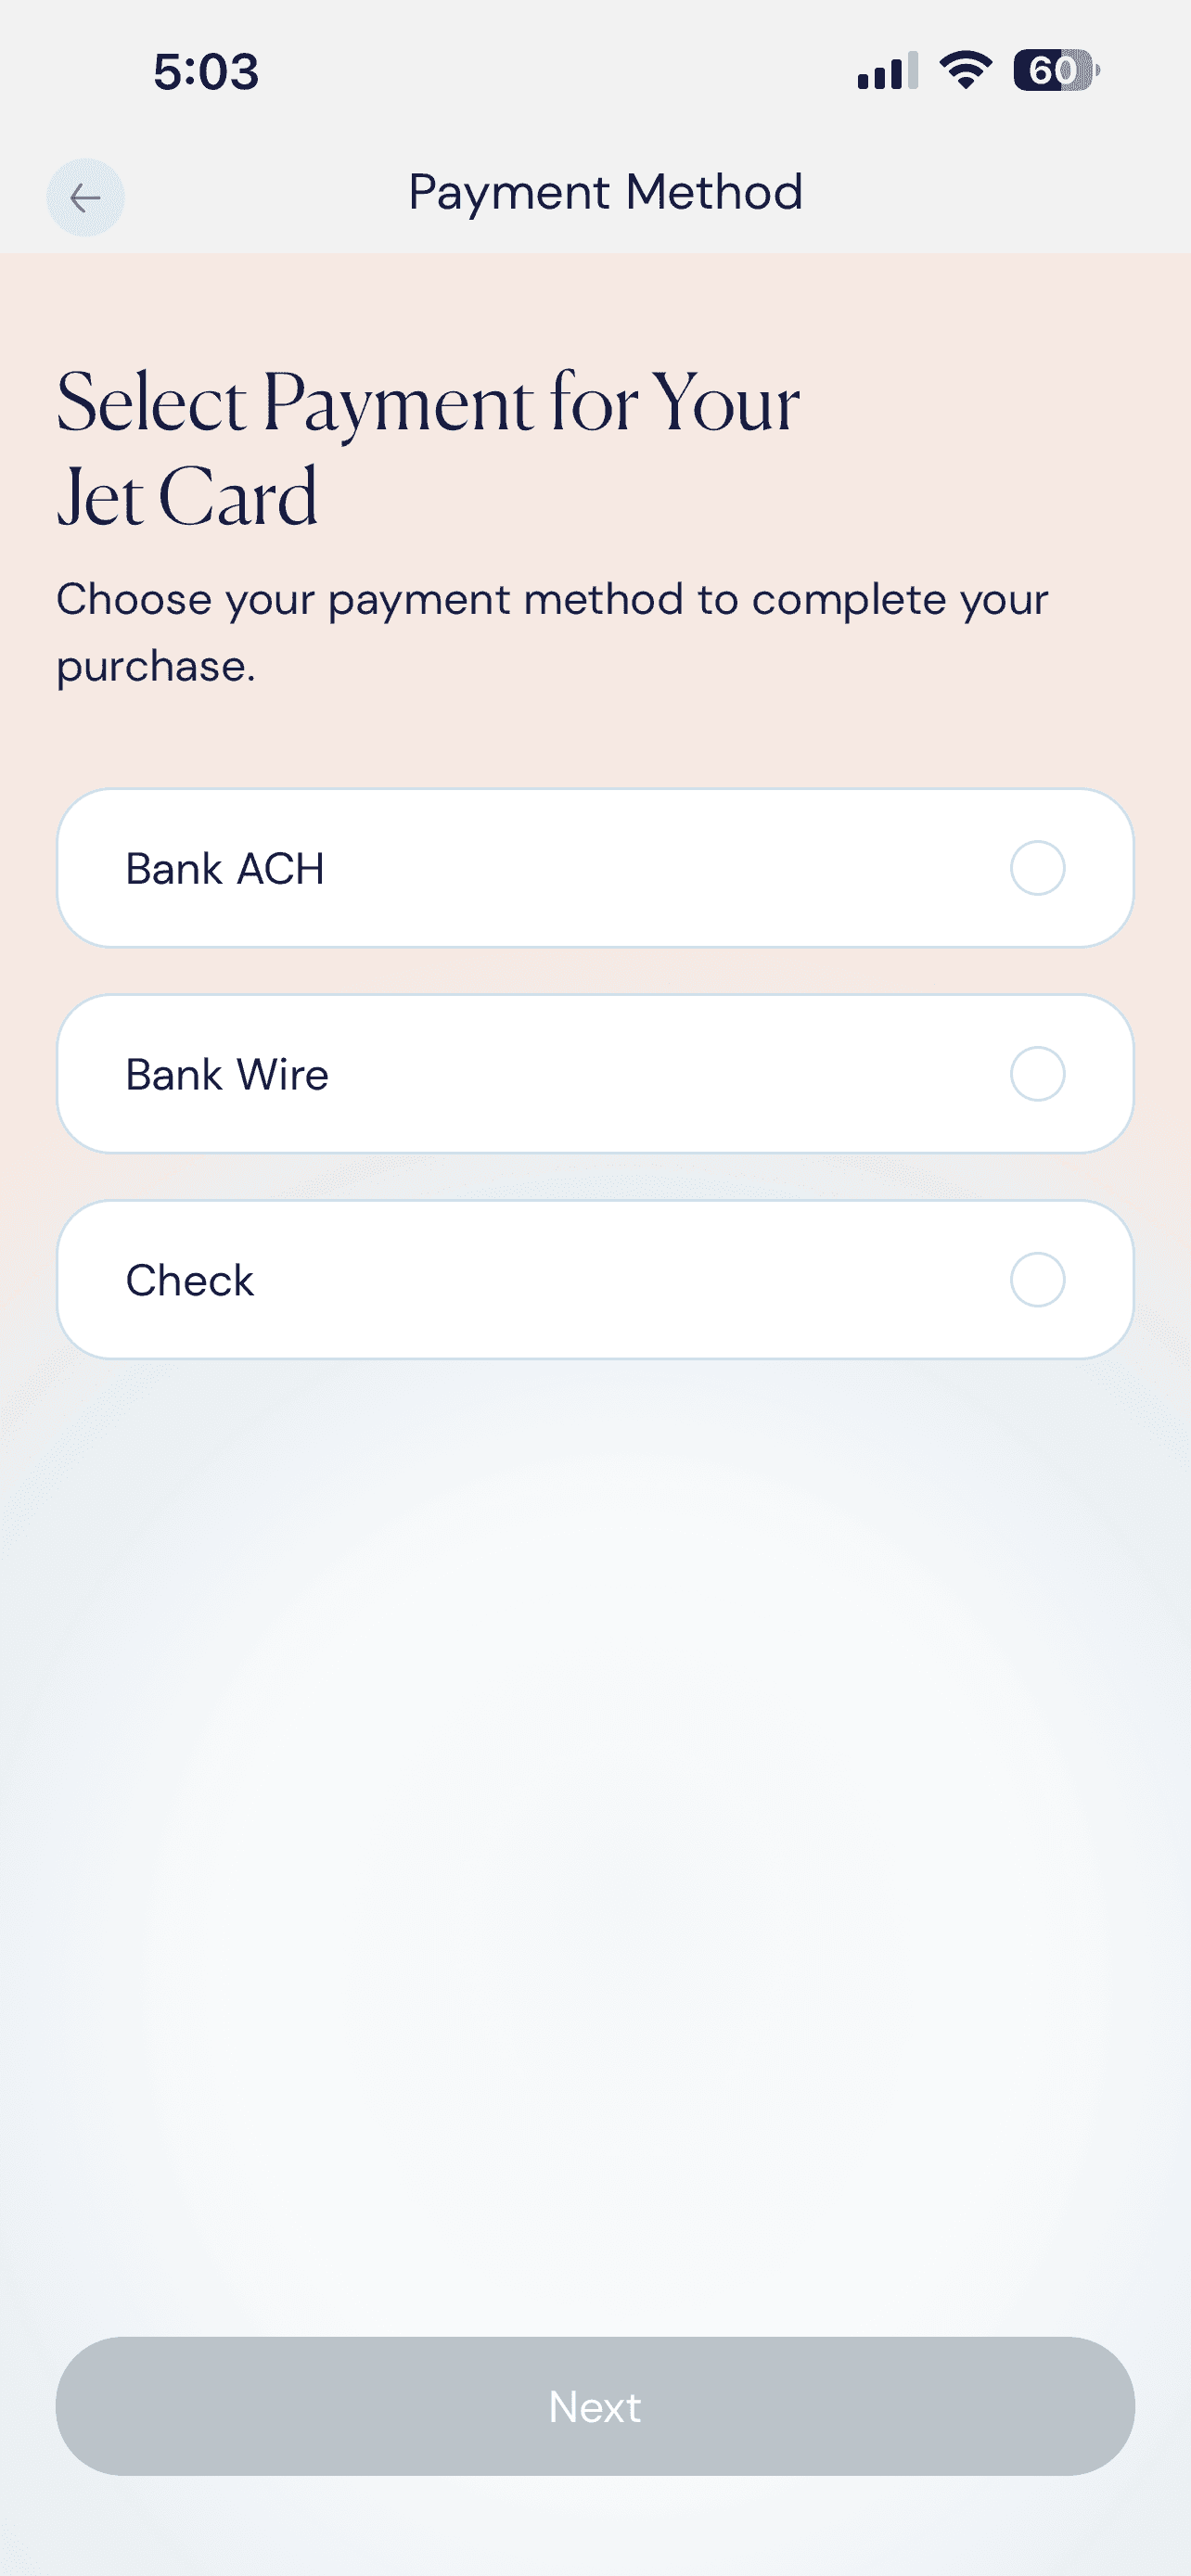
Payment Method
Select how to pay.
Jet Cards can be paid by Bank ACH, Bank Wire, or Check, with no credit card processing fee. Choose one and tap Next.
- ACH clears in three to five business days.
- Bank Wire clears same business day.
- Check clears in seven to ten business days.
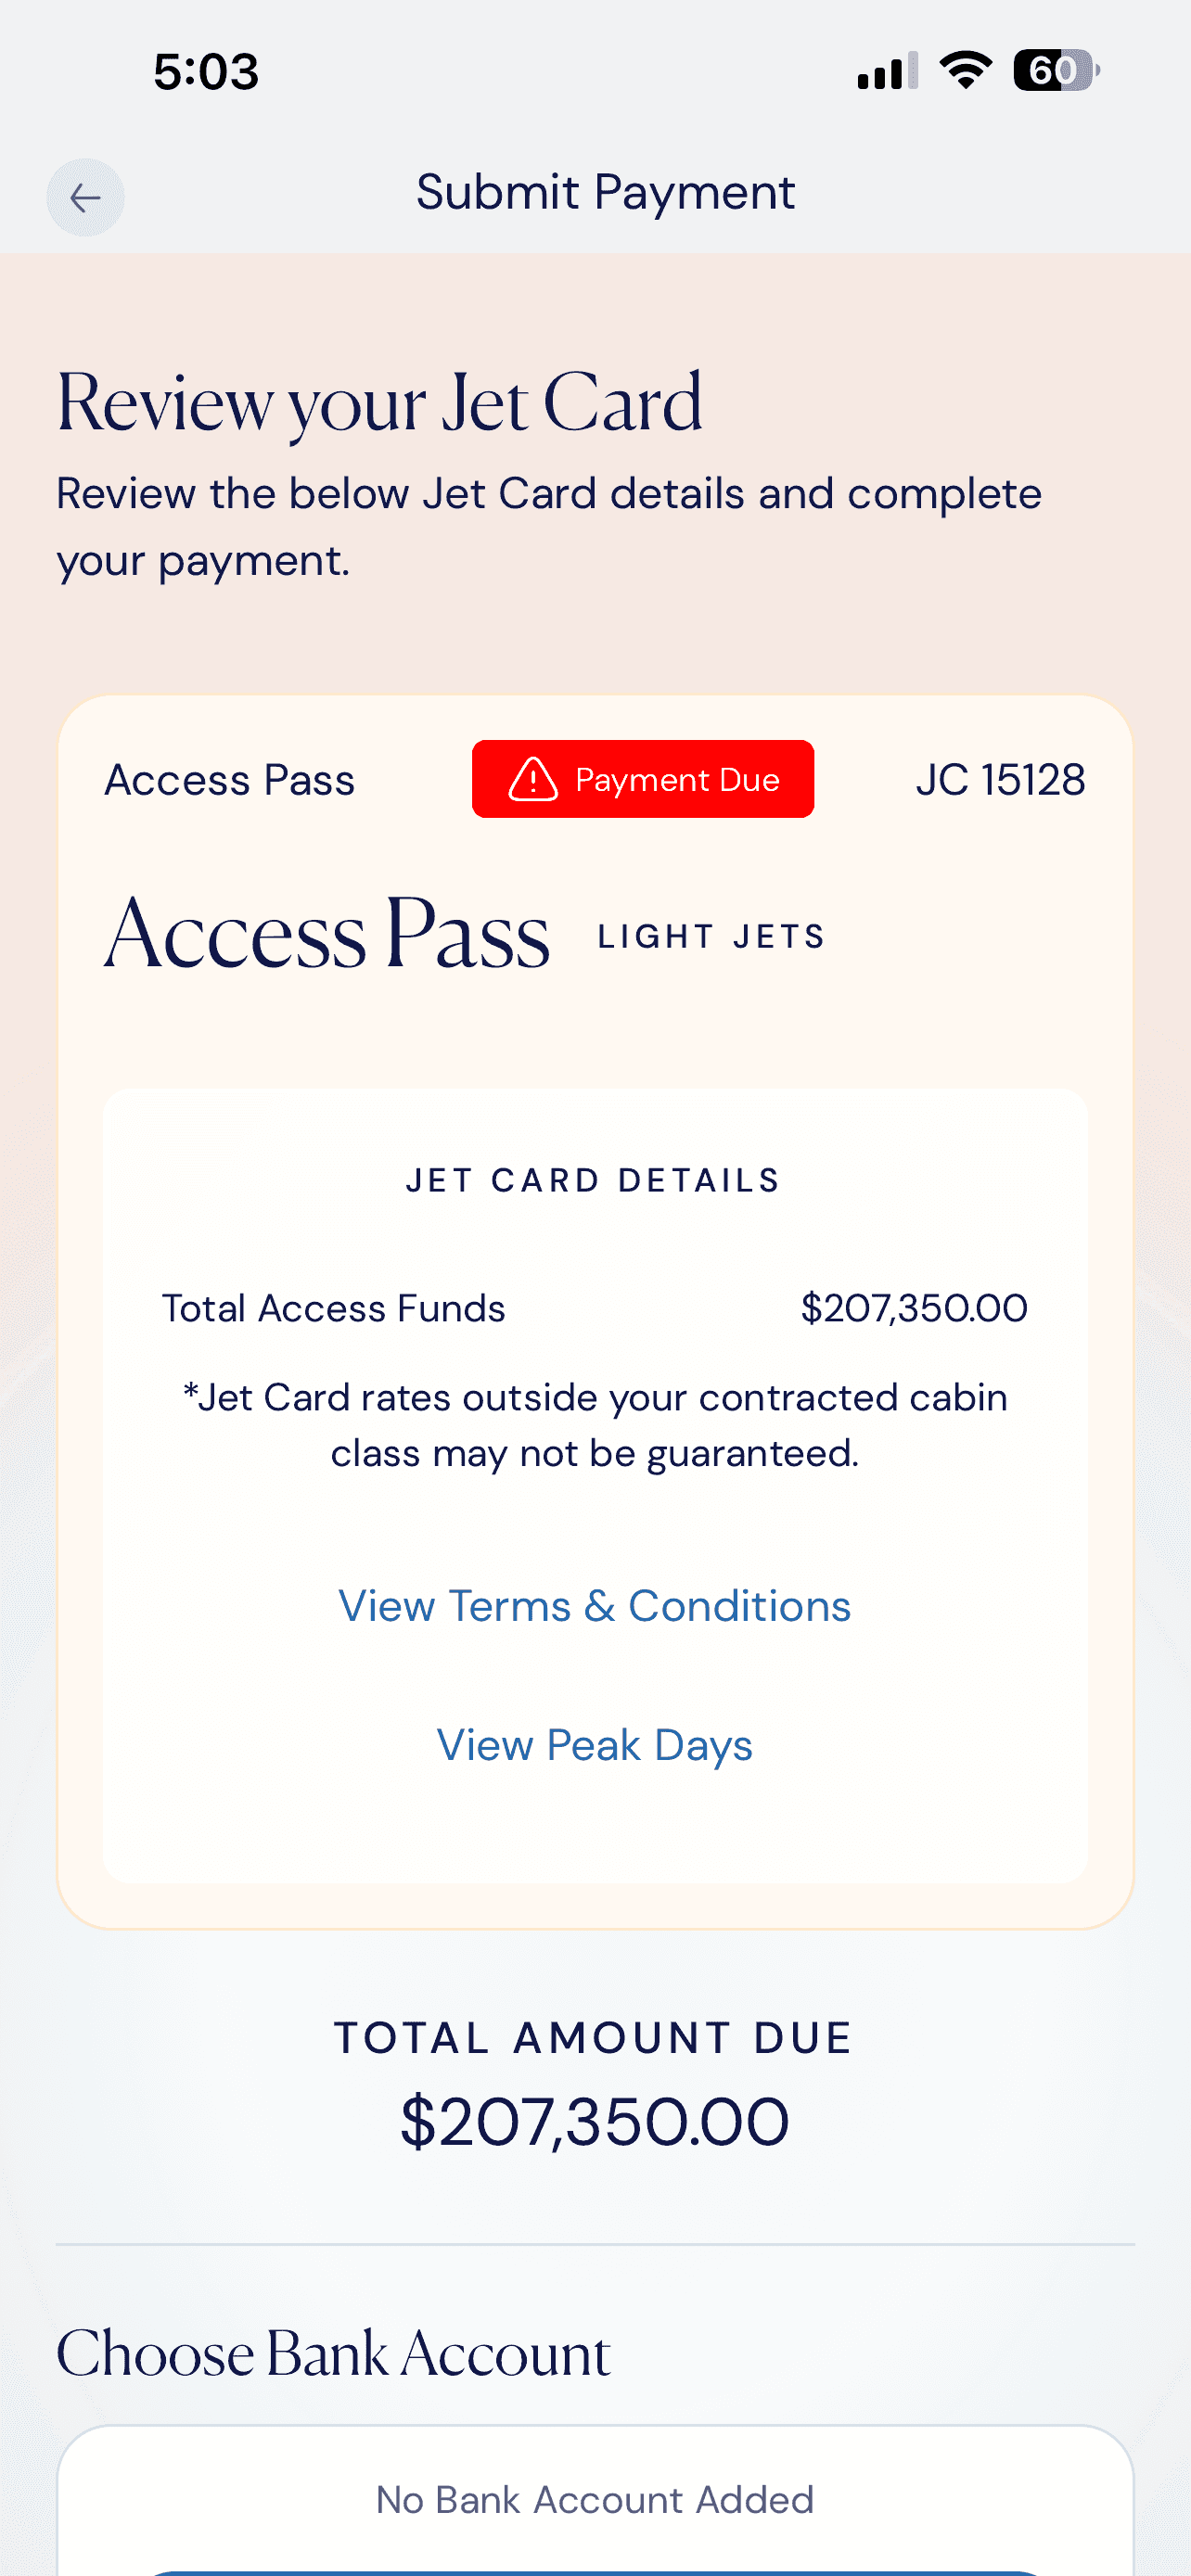
Review Your Jet Card - Bank ACH
Confirm your total due.
The Submit Payment screen recaps your Card, Total Access Funds, and the Total Amount Due. Review the details before adding your payment information.
- Reopen Terms & Conditions or Peak Days anytime.
- Your total reflects the program you selected.
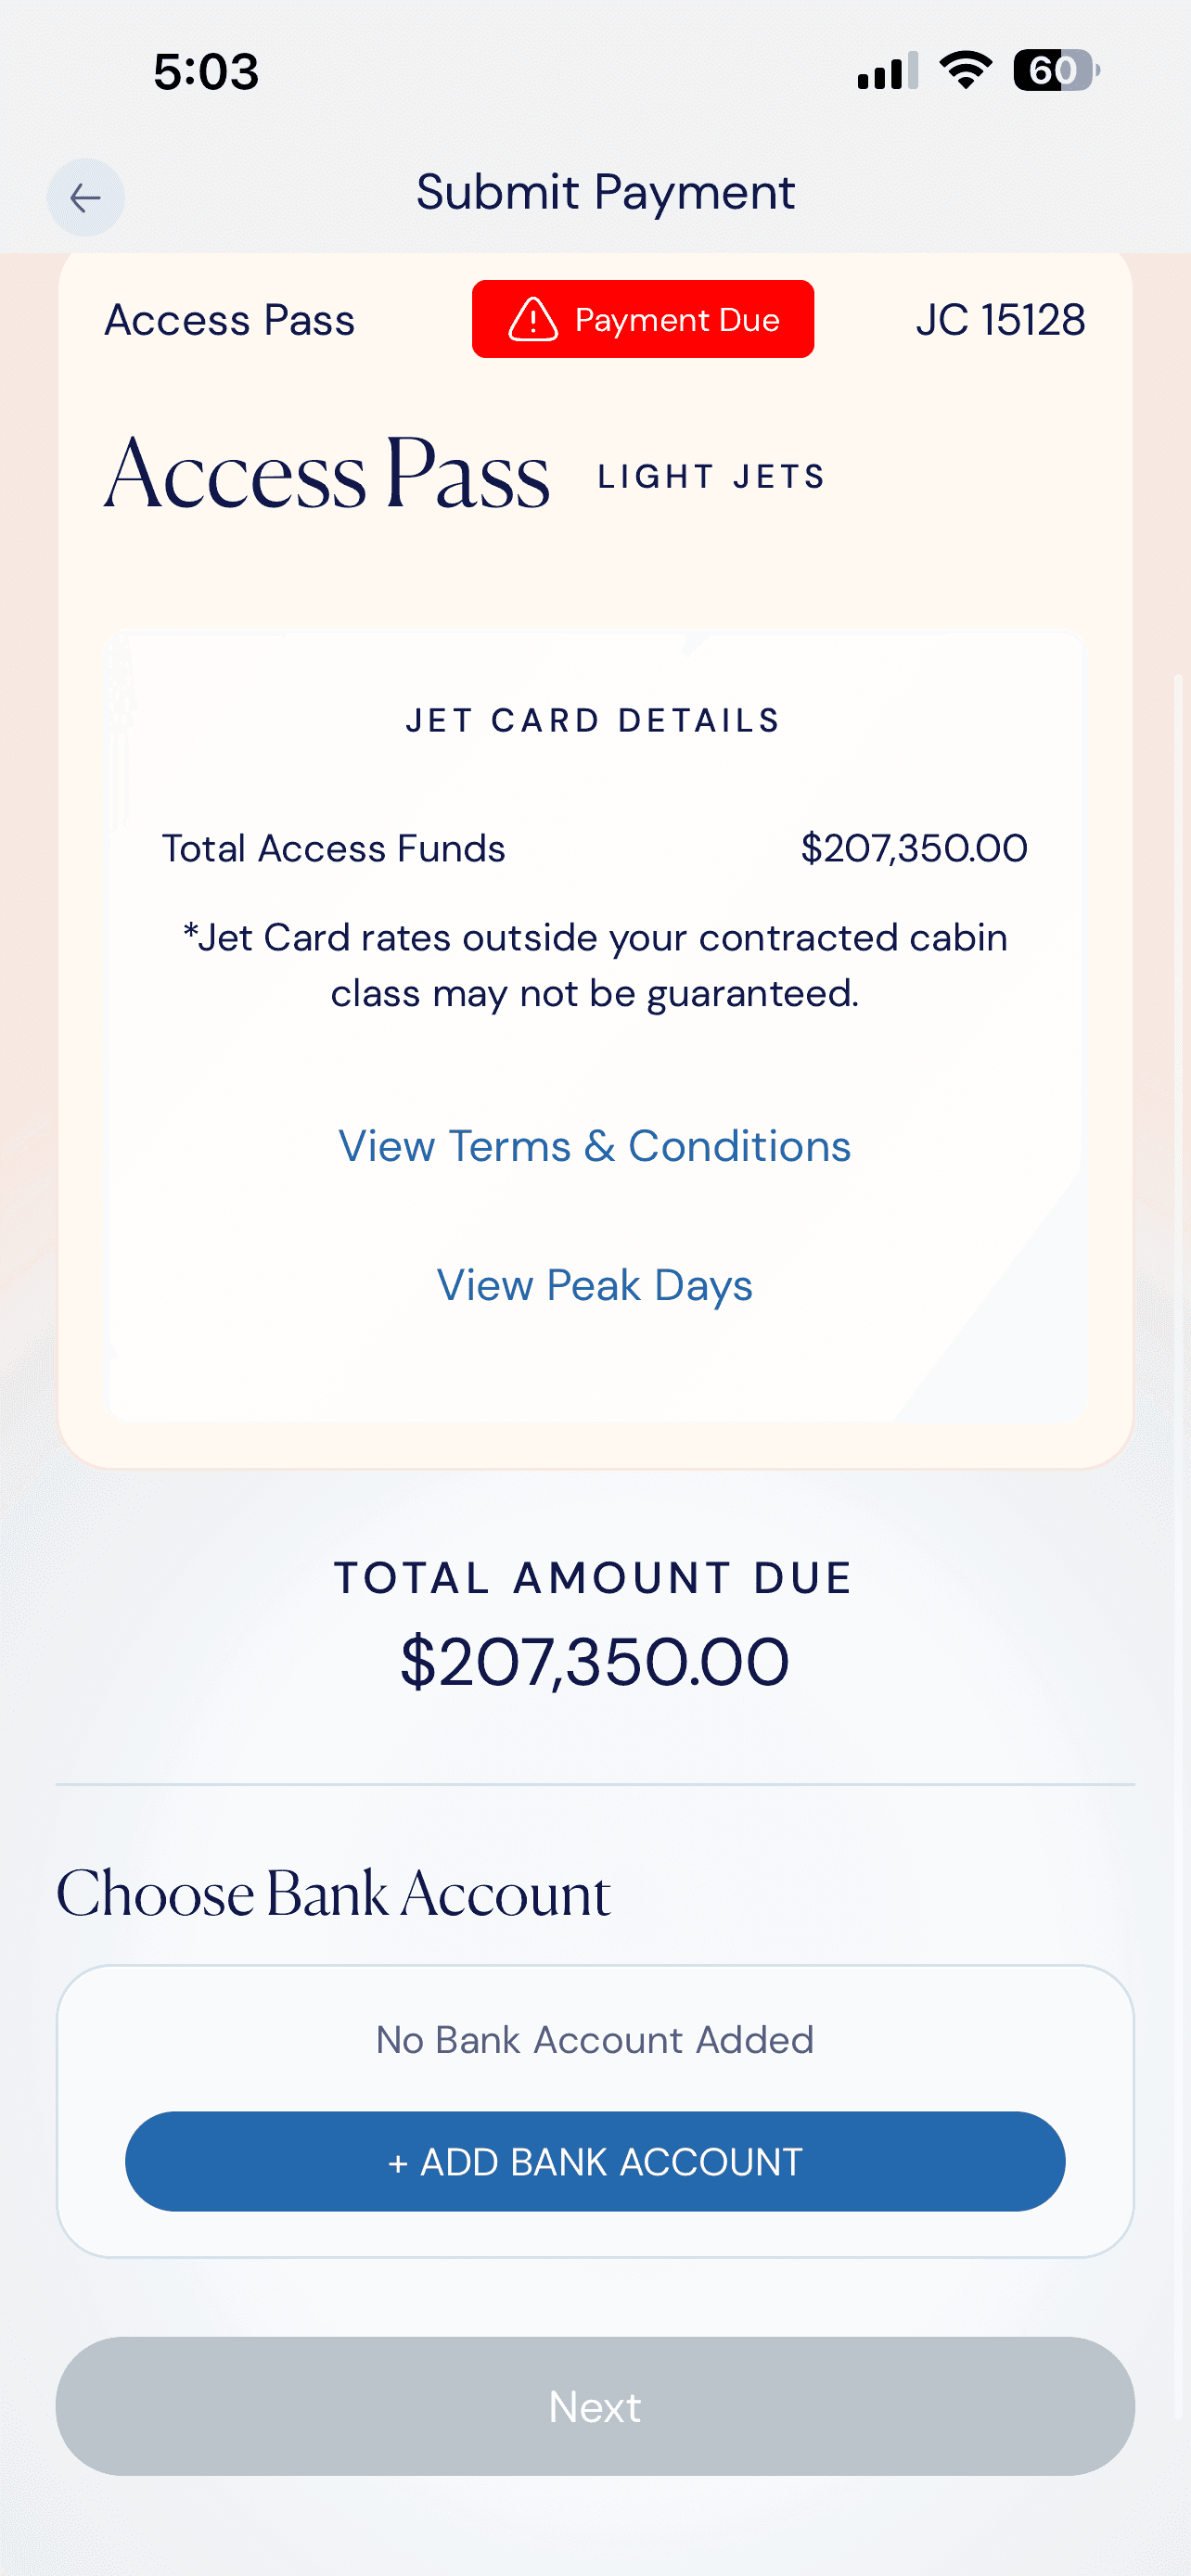
Add Bank Account
Link your account and submit.
Tap + Add Bank Account to enter your details, then Next to submit payment. Your Jet Card activates as soon as your funds clear.
- Saved accounts can be reused for future purchases.
- The Payment Due badge clears once payment is received.
Activation – Your Card carries the Payment Due badge until you have selected a payment option. Once your ACH, wire, or check clears, the Card moves to Active in your Jet Card Wallet and its hours or funds are ready to book.
Purchasing a Jet Card · Wire & Check
Complete payment by wire of check.
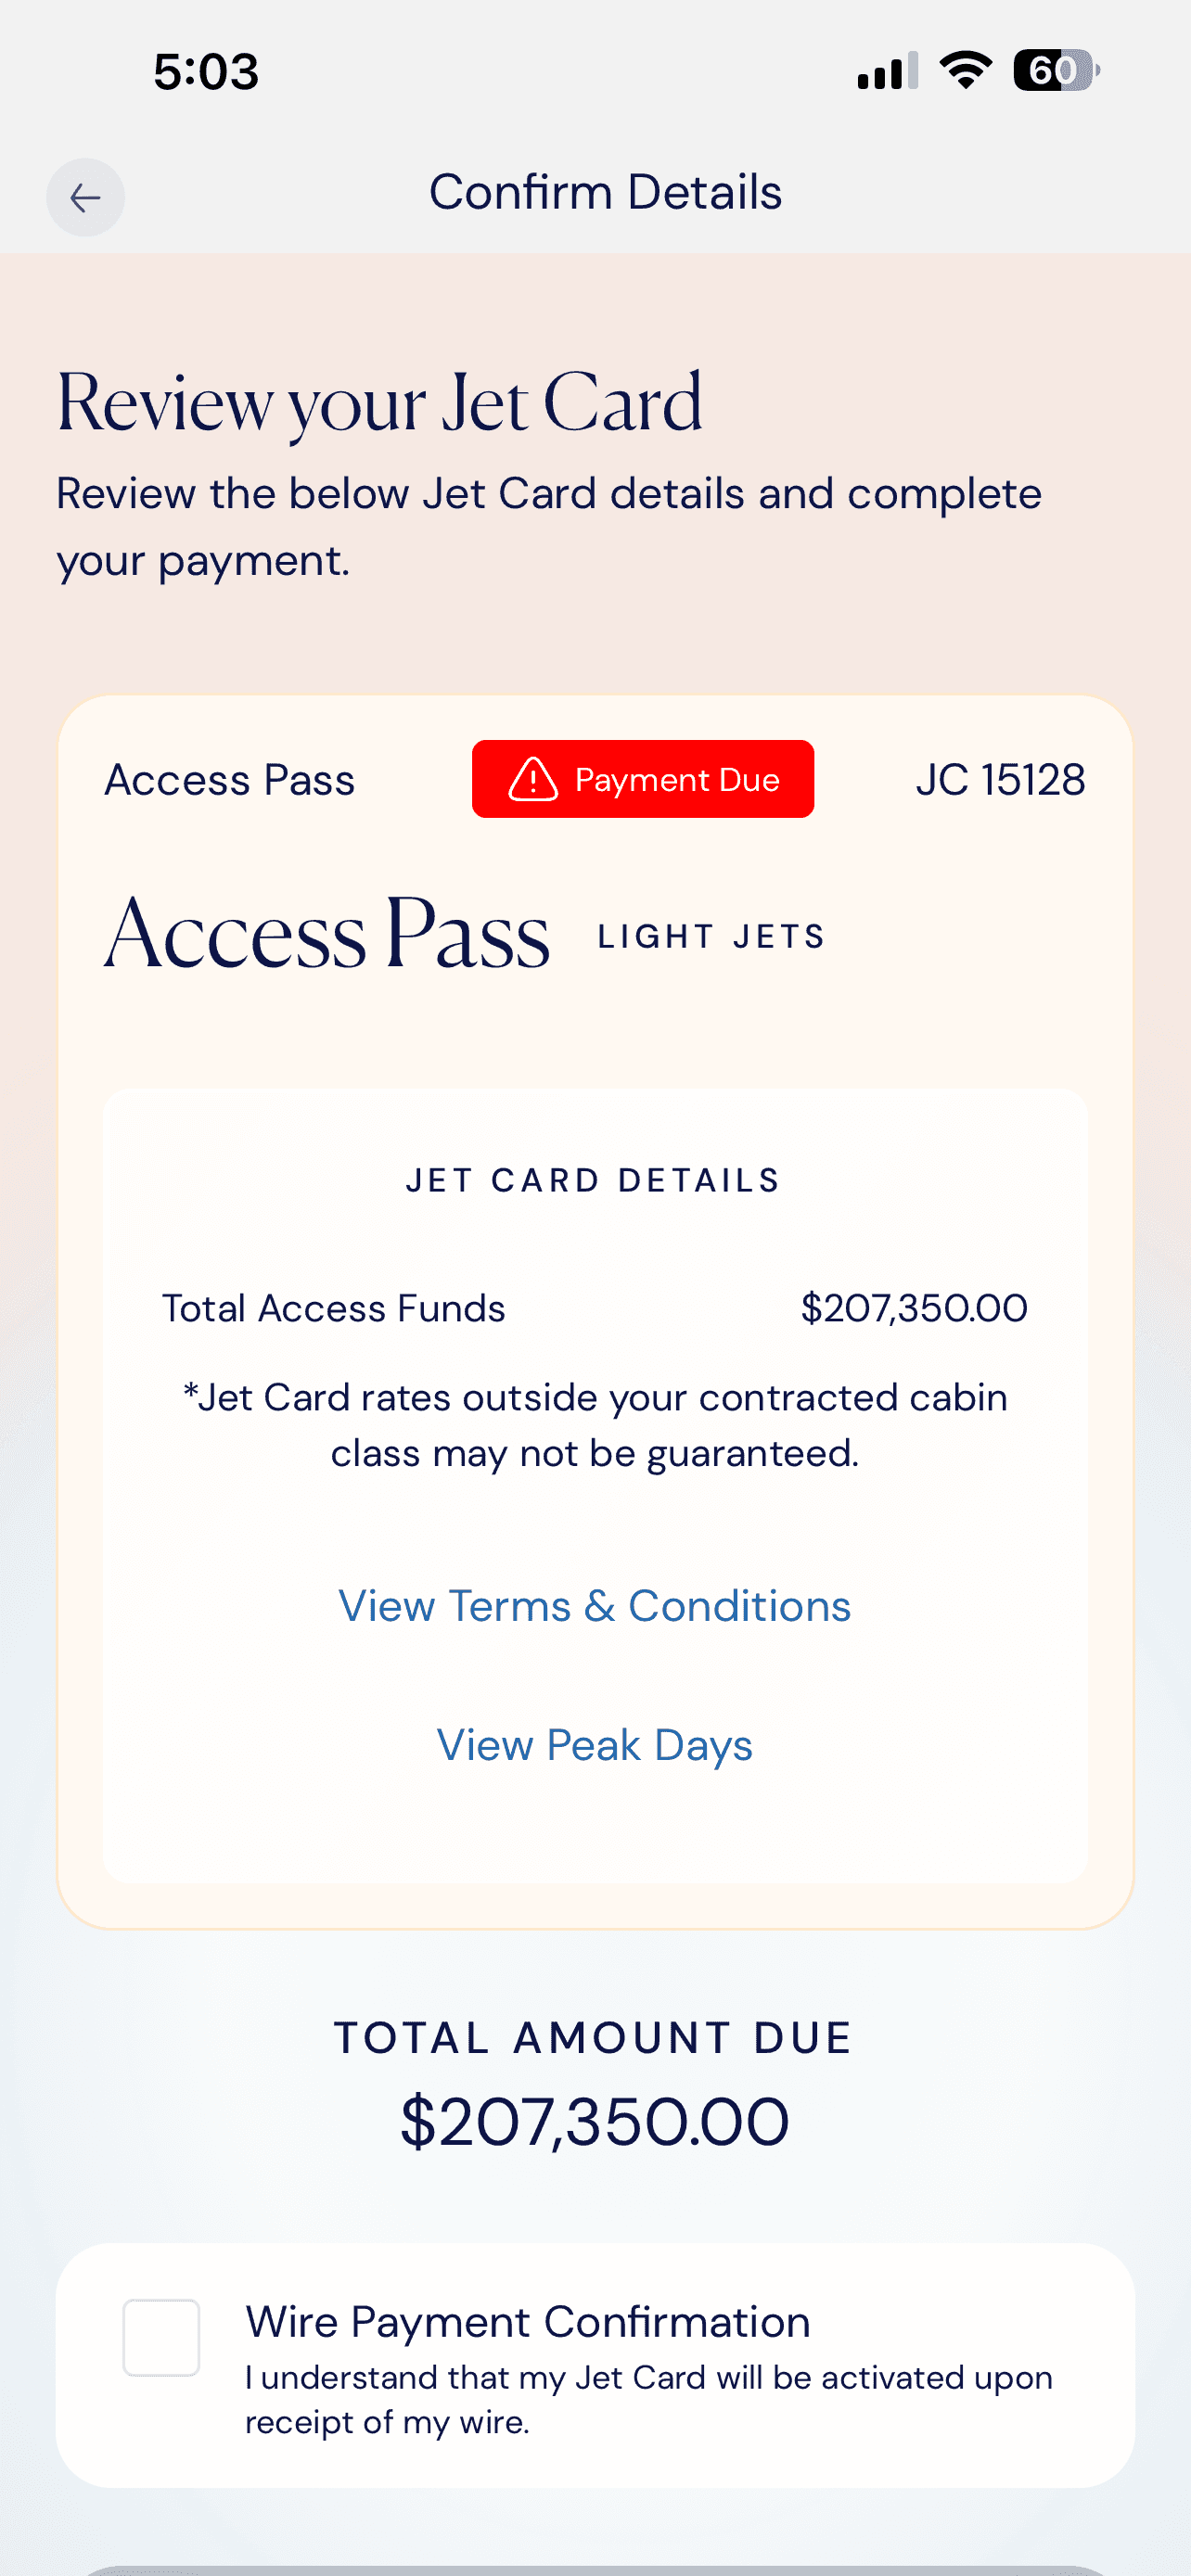
Bank Wire · Confirm
Review your amount due.
Selecting Bank Wire opens Confirm Details with your Card recap and Total Amount Due. A Wire Payment Confirmation checkbox appears at the bottom.
- You'll see the same Card recap as the ACH flow.
- Wire instructions are sent to you by email.
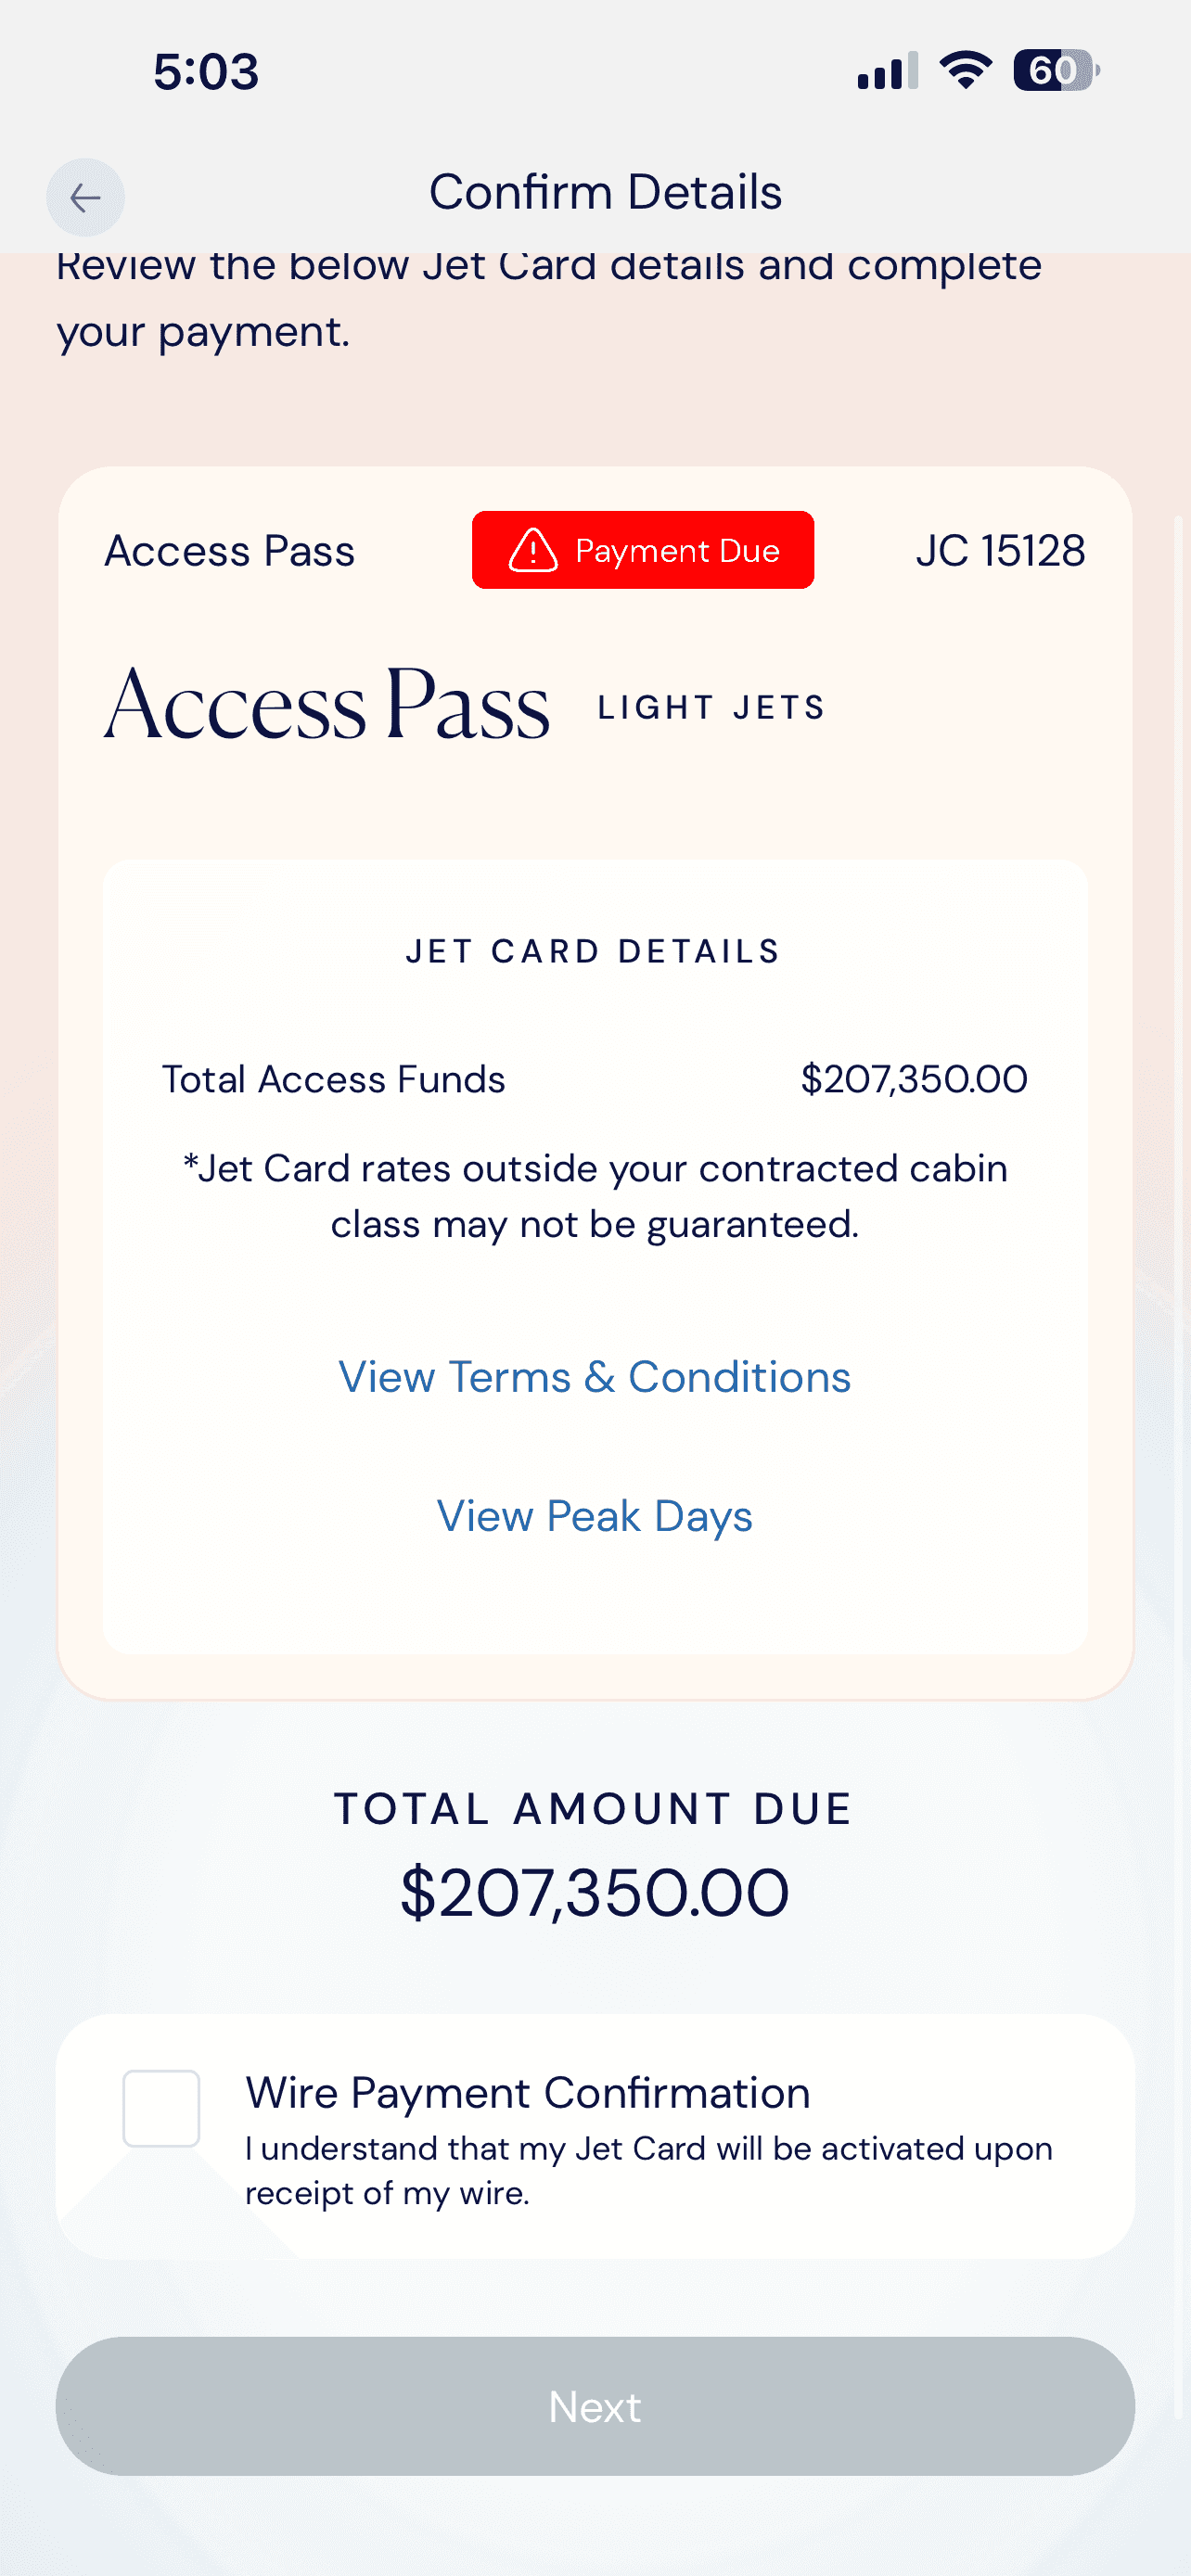
Bank Wire · Acknowledge
Confirm and continue.
Check "I understand that my Jet Card will be activated upon receipt of my wire," then tap Next to submit.
- Next remains disabled until the box is checked.
- Your Card activates once your wire is received.
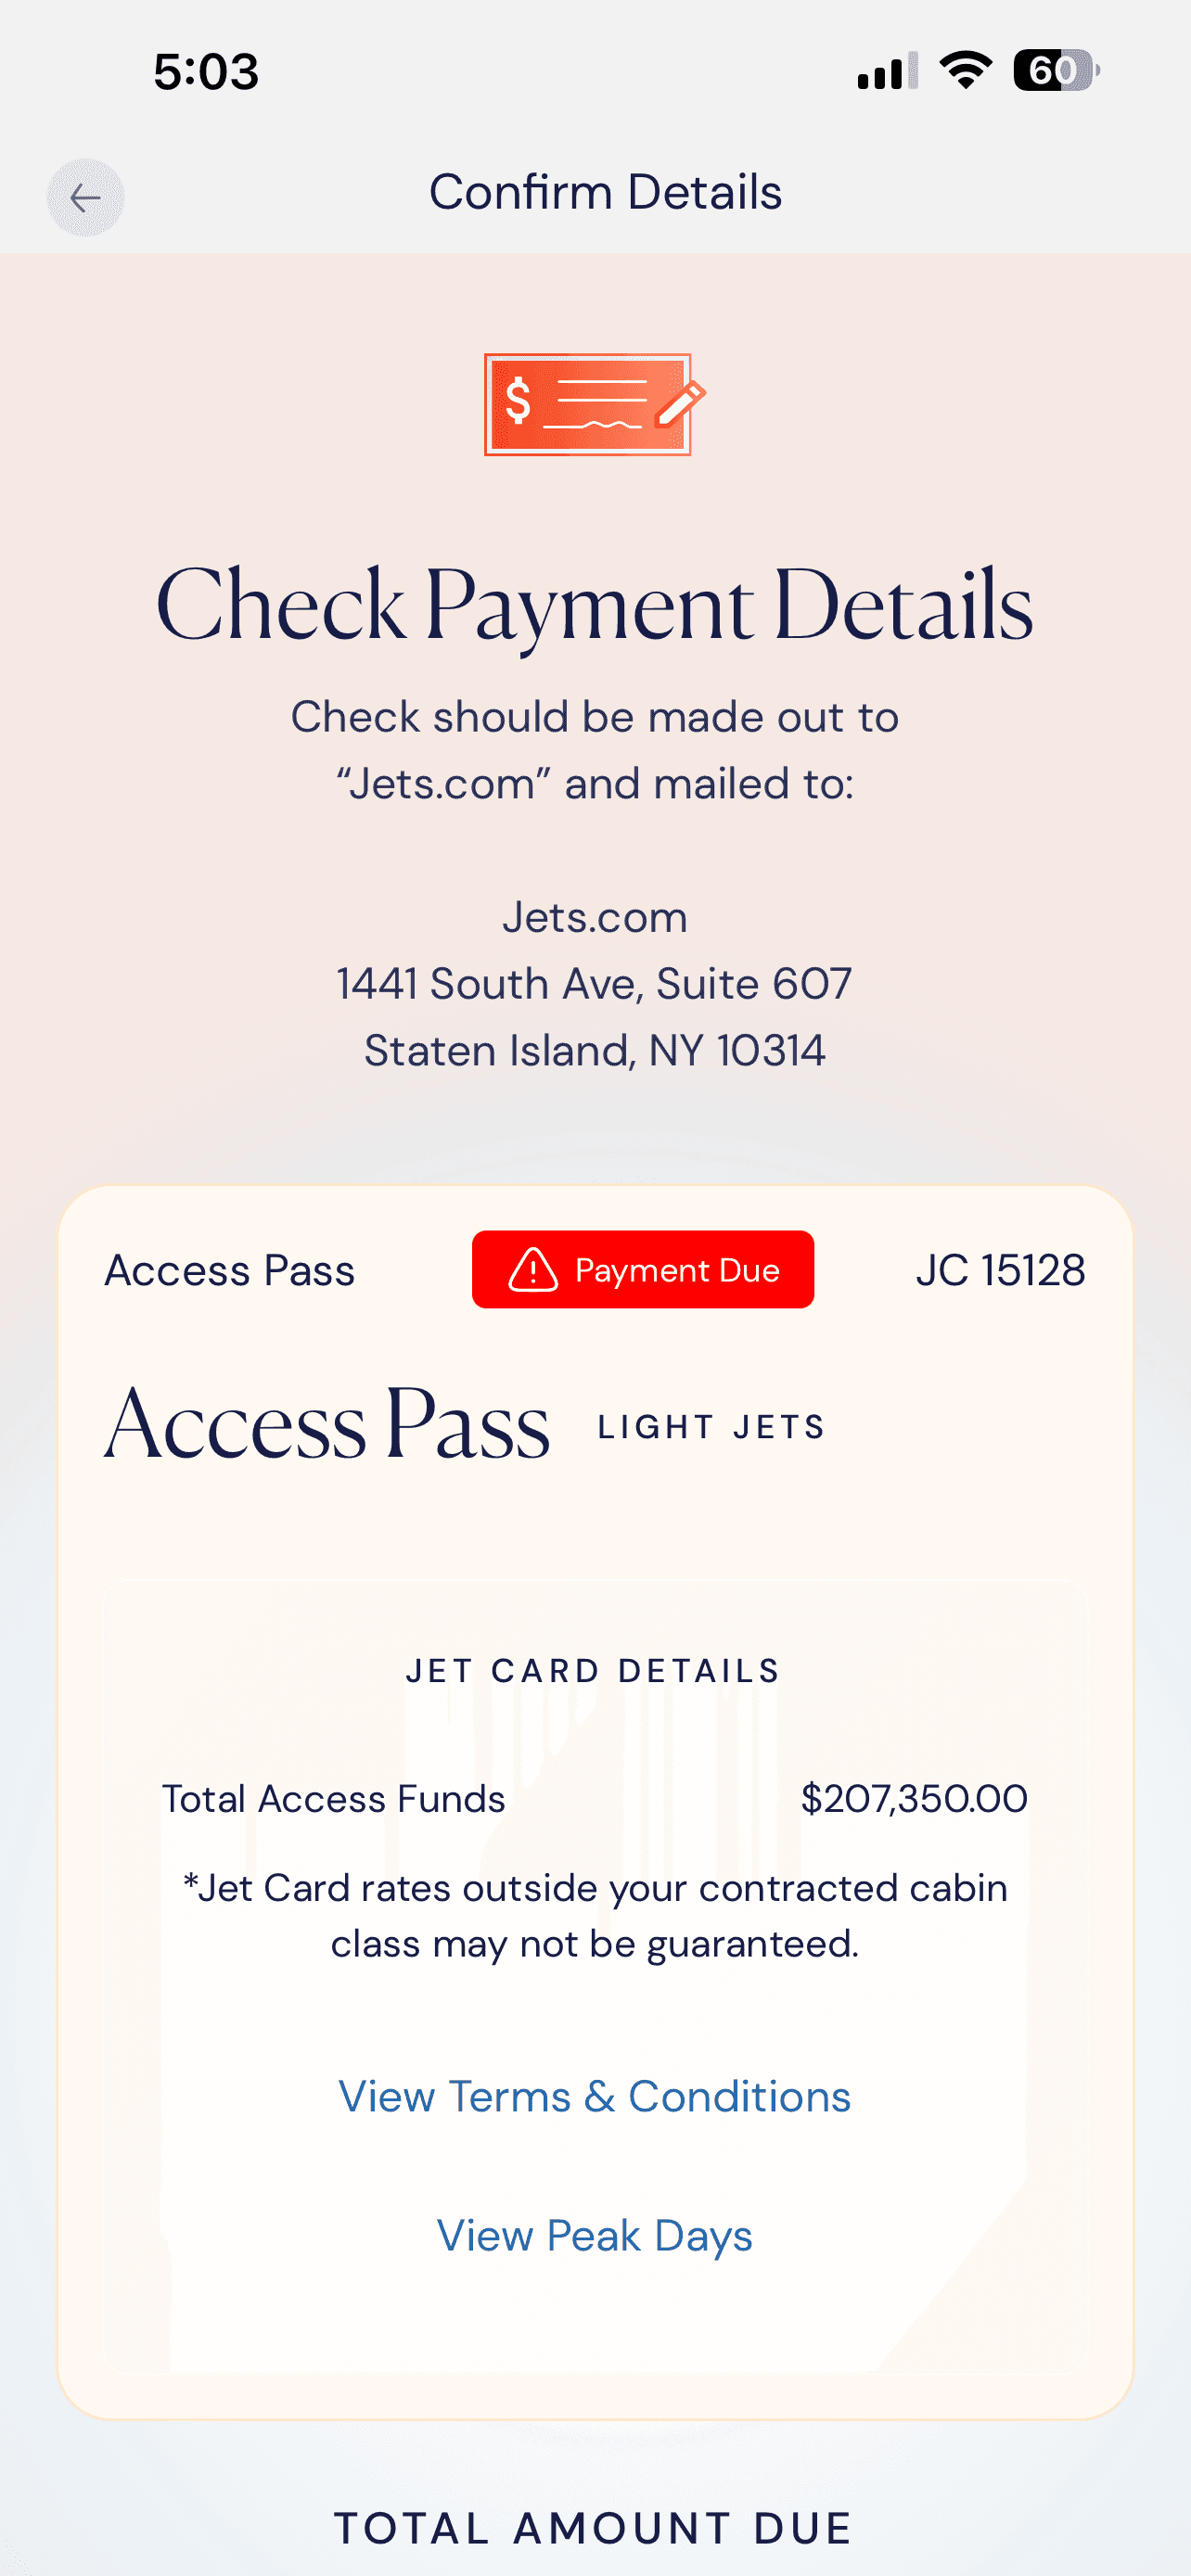
Check · Mailing Details
Where to send your check.
Selecting Check shows the payee and mailing address. Make your check payable to Jets.com and mail it to the address shown.
- Jets.com, 1441 South Ave, Suite 607.
- Staten Island, NY 10314.
- Scroll down for the Card recap and total.
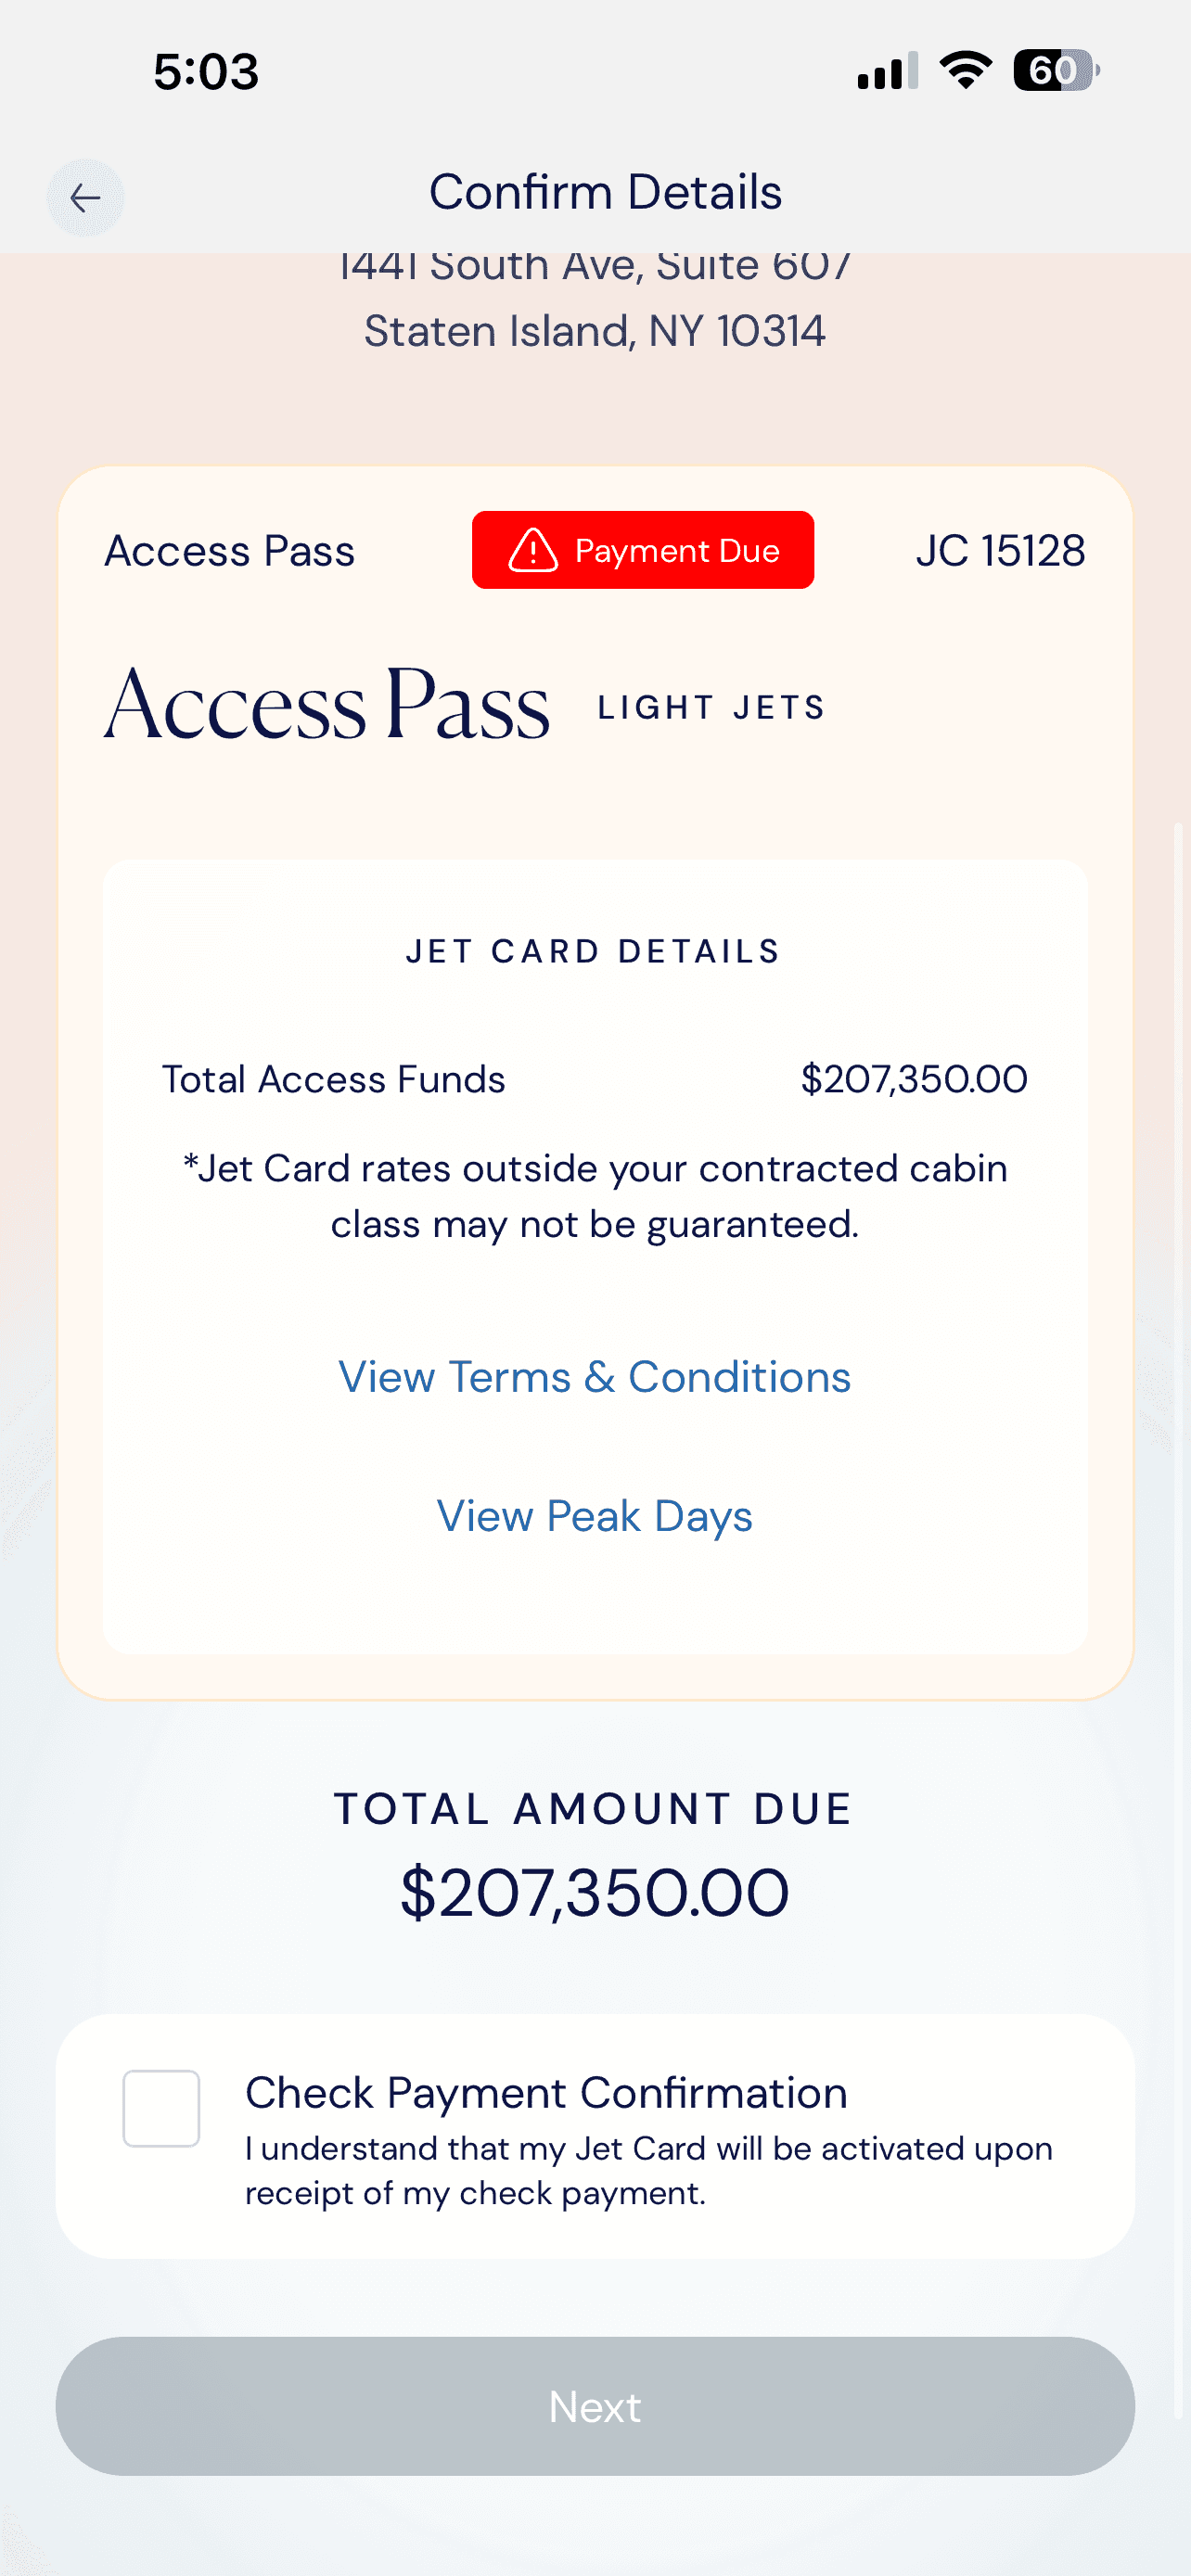
Check · Acknowledge
Confirm and submit.
Check "I understand that my Jet Card will be activated upon receipt of my check payment," then tap Next.
- Next remains disabled until the box is checked.
- Allow seven to ten business days for clearance.
Purchasing a Jet Card · Bank Wire
Send your funds and track your Card while it's pending.
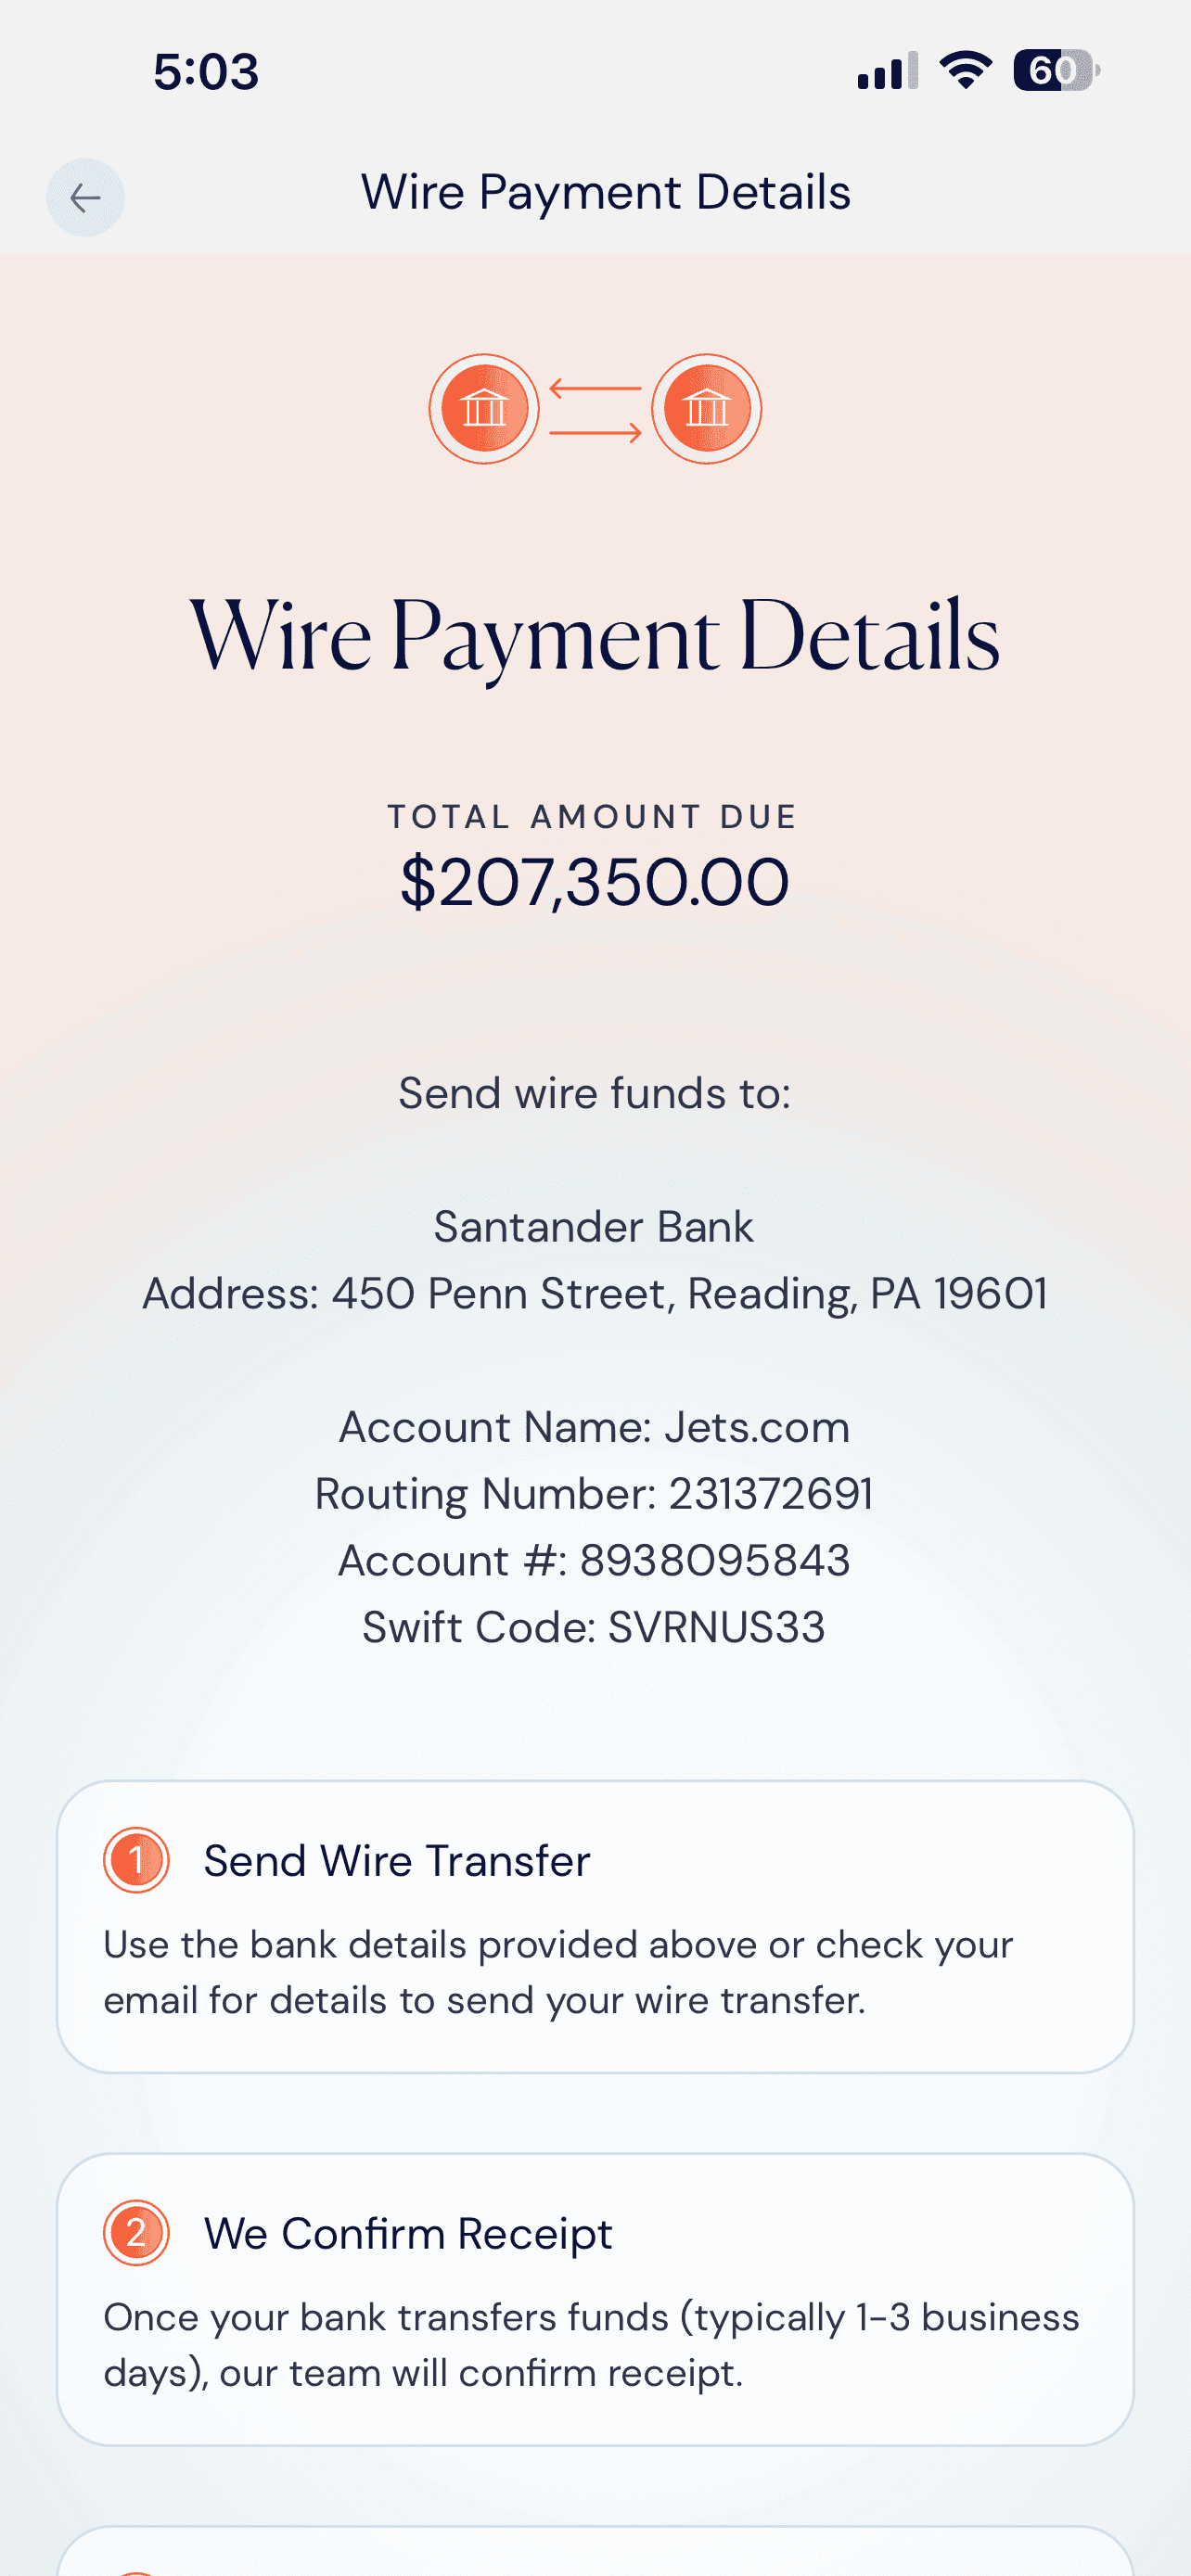
Wire Payment Details
Send funds to the listed account.
The app displays Jets.com's receiving bank details and your Total Amount Due. Send your wire using these or the ones emailed to you.
- Bank name, account name, routing number, account number, SWIFT code.
- The same details are sent to you by email.
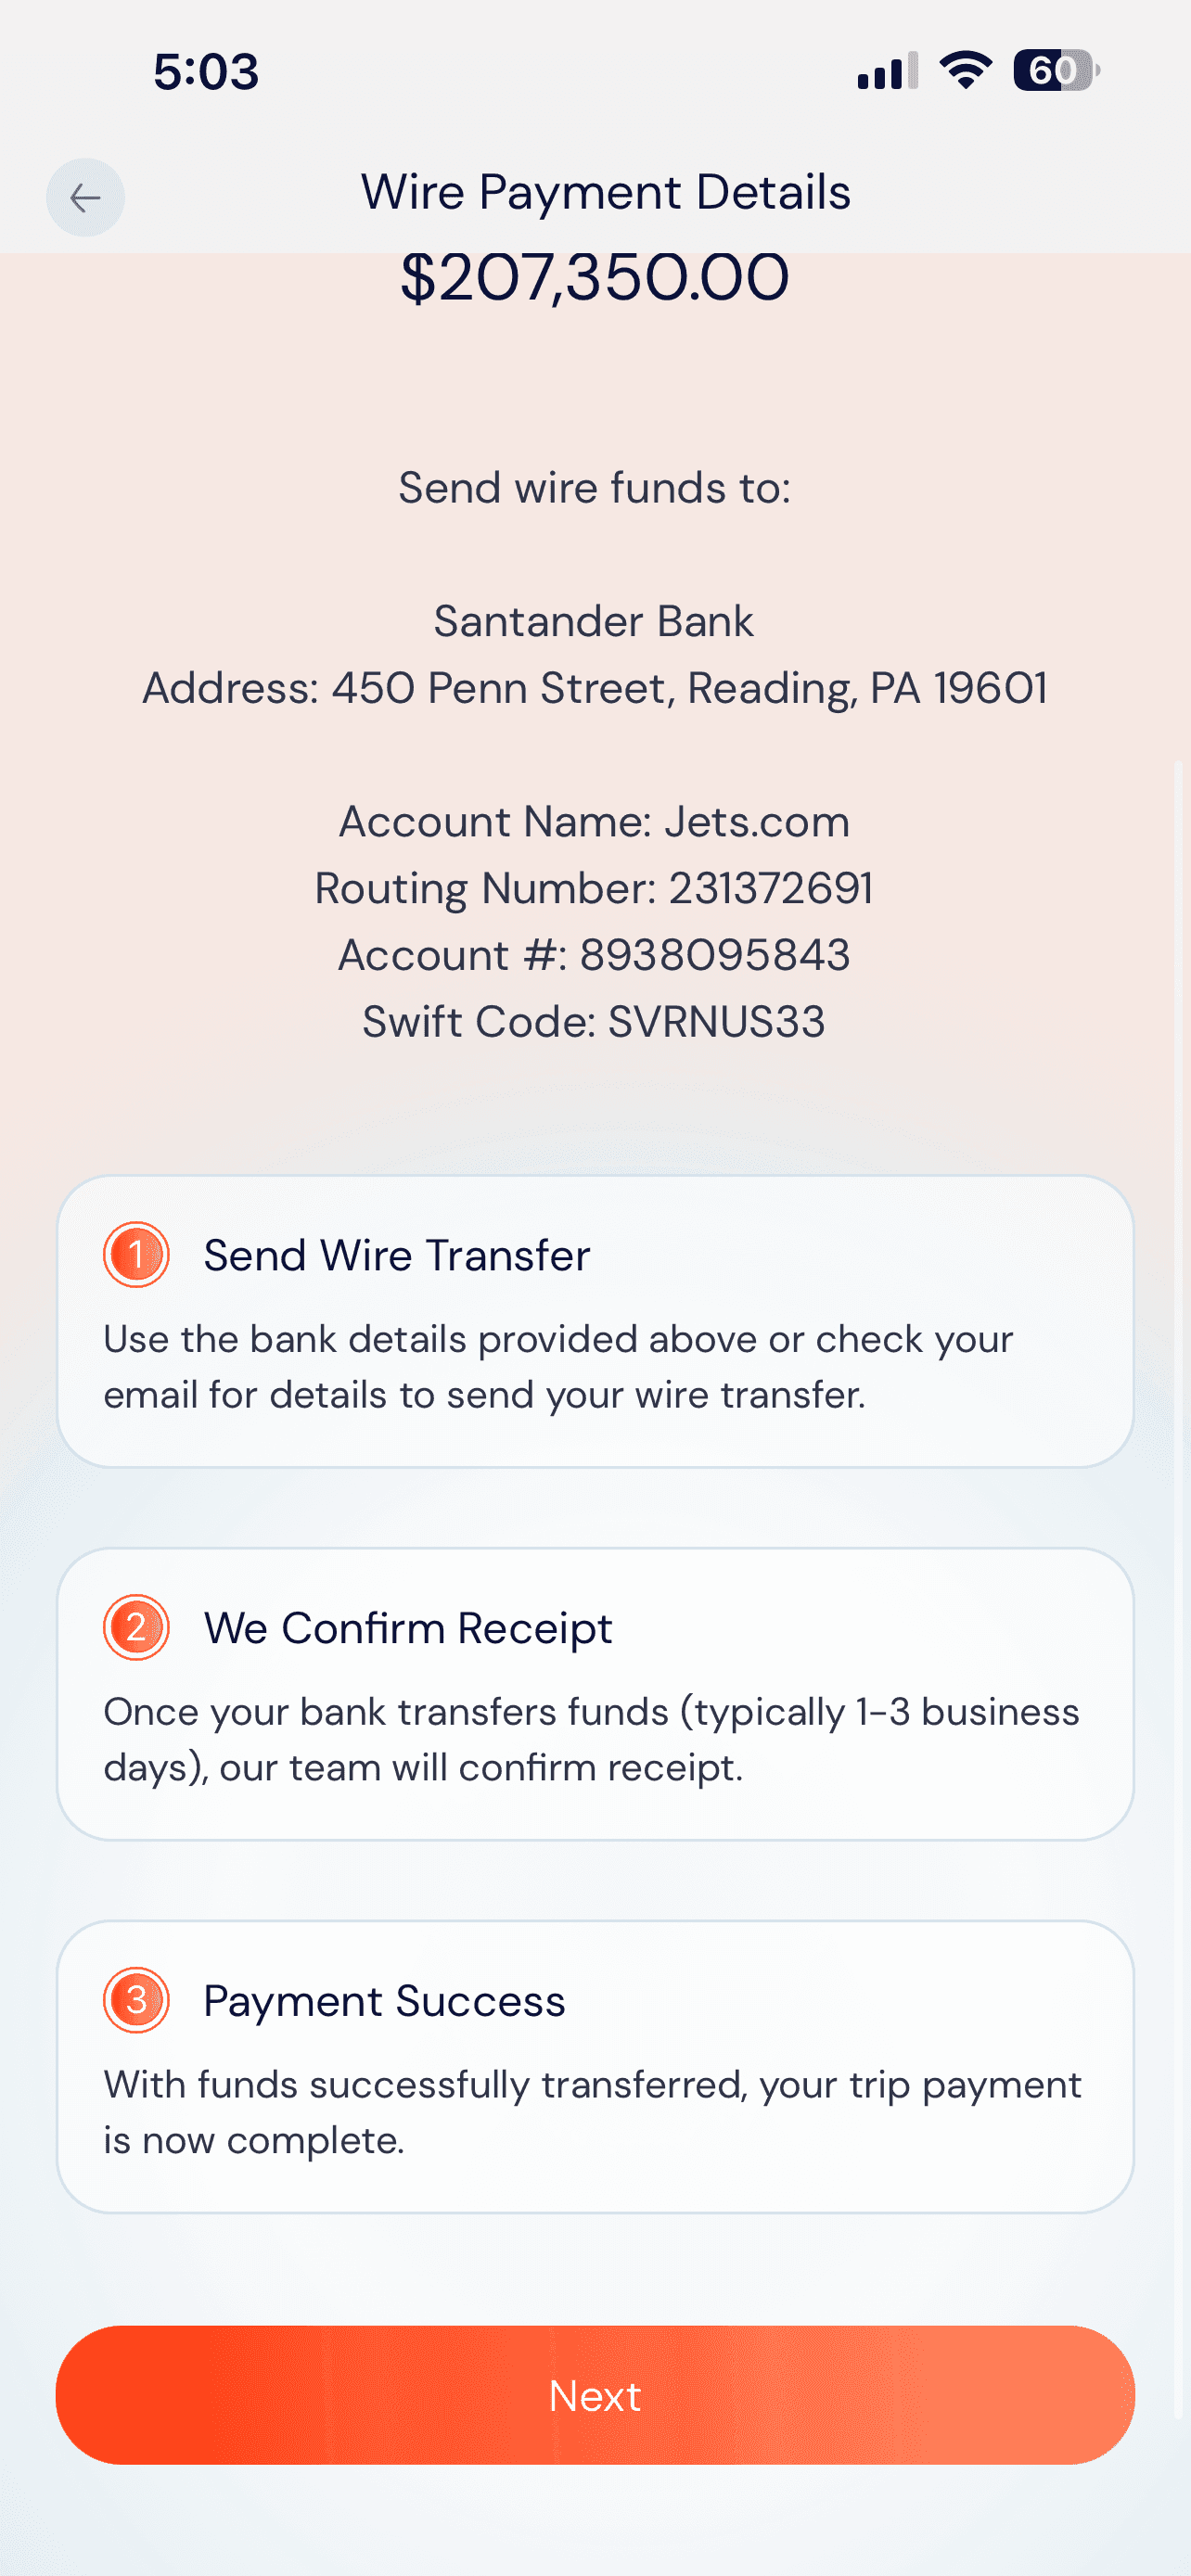
The Three Steps
Send, confirm, and you're set.
Three simple steps: send your wire transfer, we confirm receipt (one to three business days), and your payment is complete. Tap Next.
- Our team confirms your payment as soon as funds arrive.
- Your Card activates automatically on confirmation.
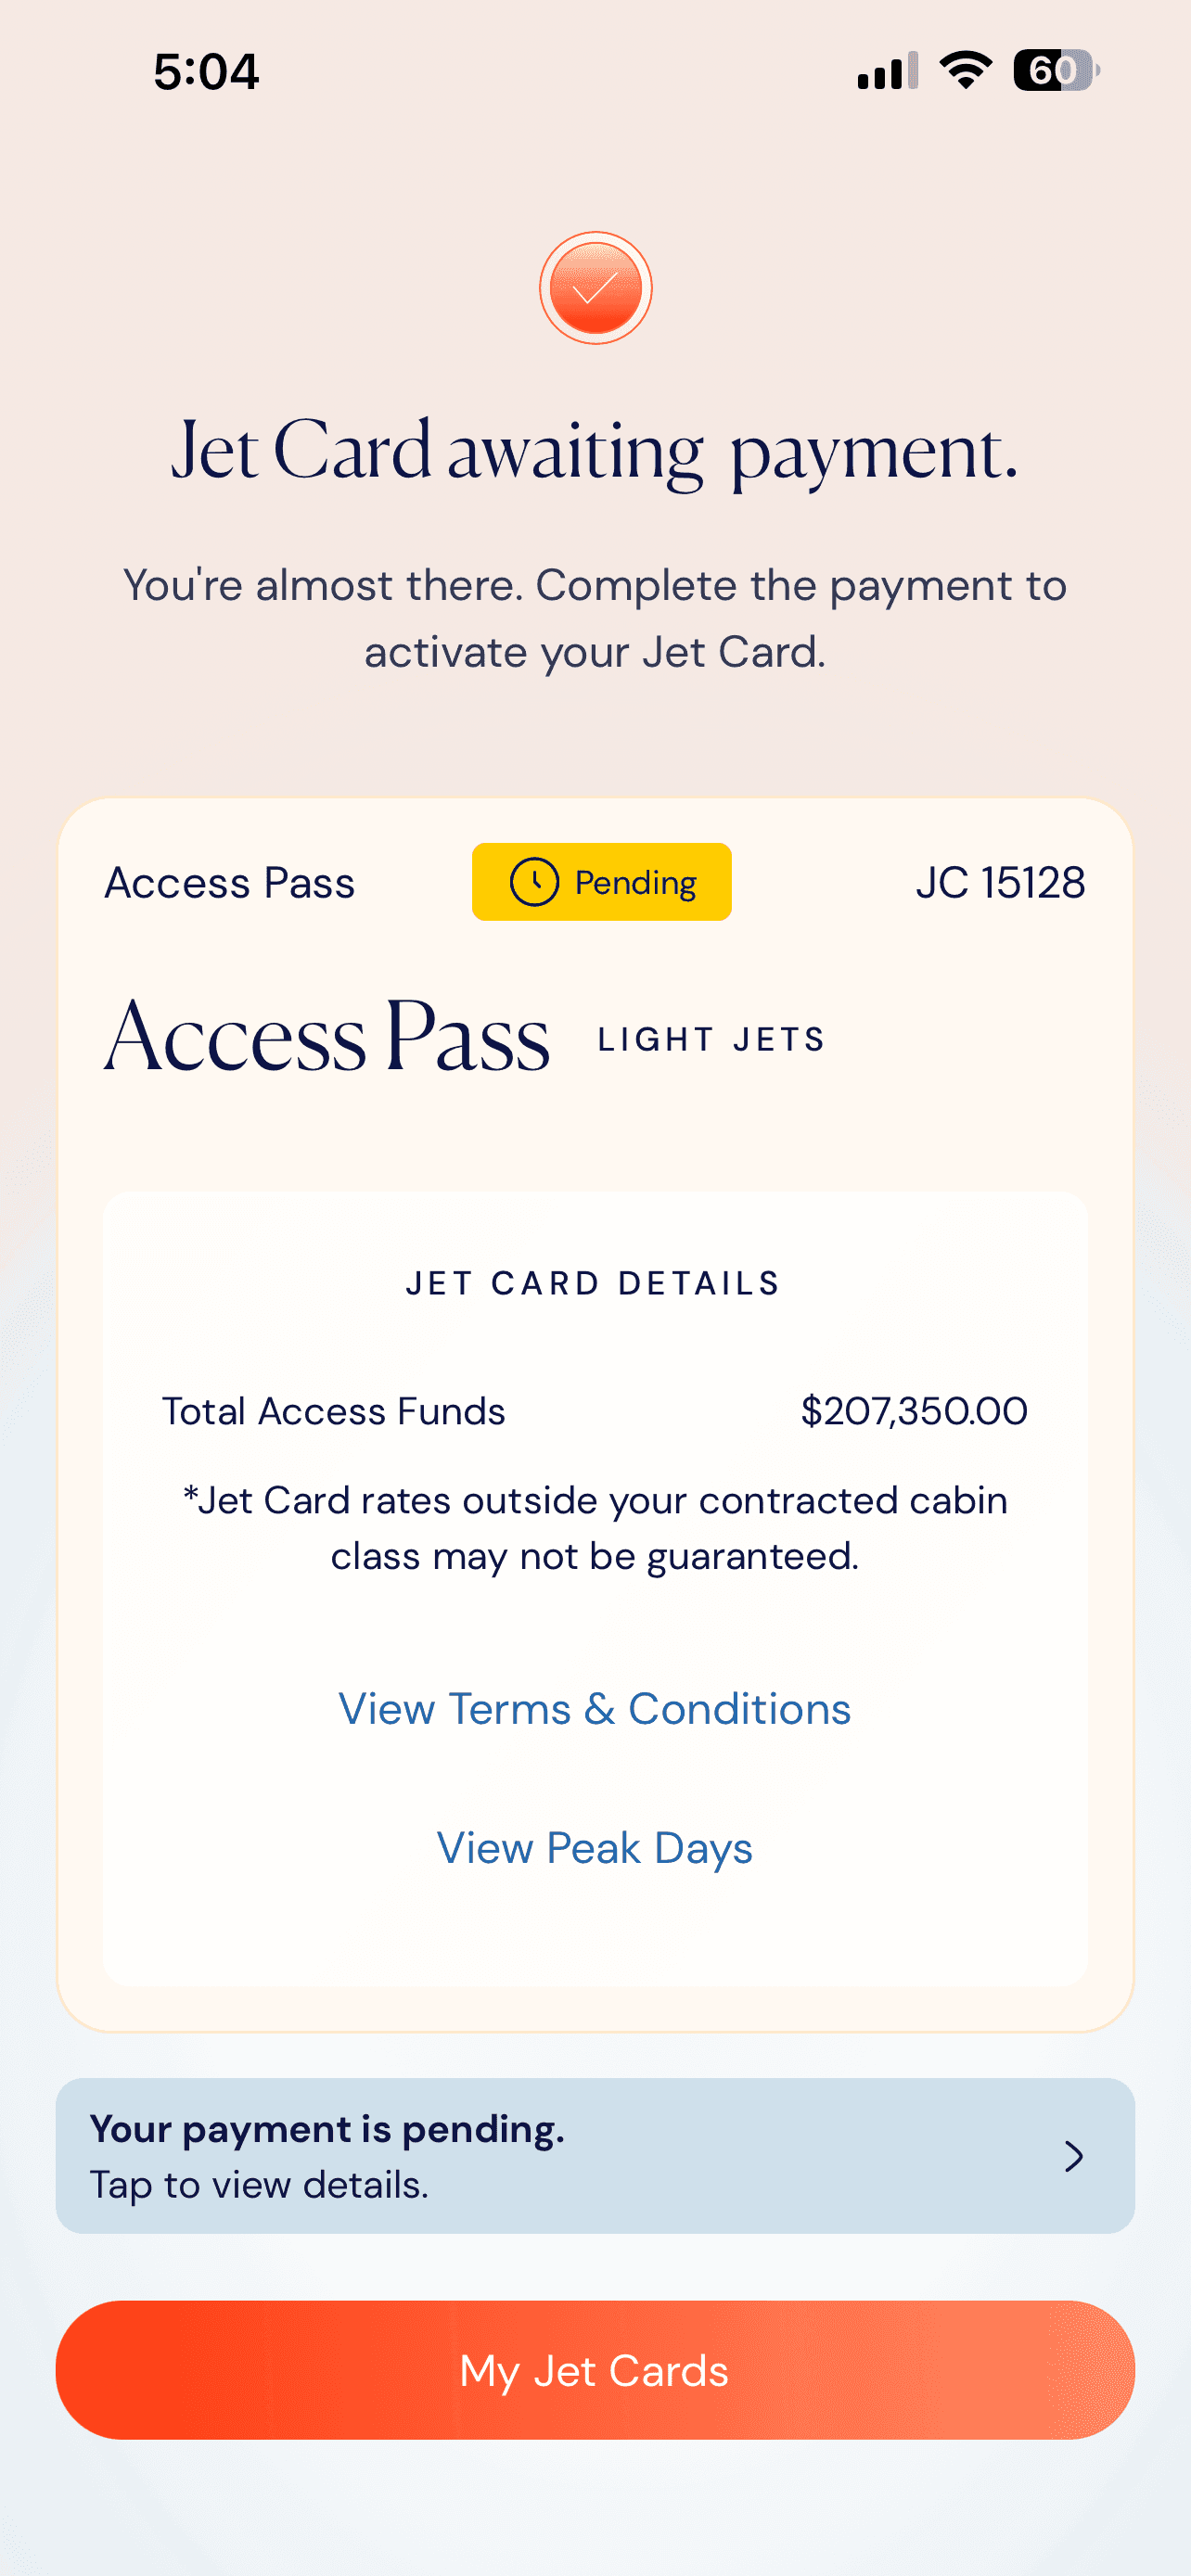
Awaiting Payment
Your Card is Pending.
Your Card shows a yellow Pending badge. Tap Your Payment is Pending for status updates, or My Jet Cards to view your wallet.
- The badge clears once your funds are received.
- Reopen your details any time
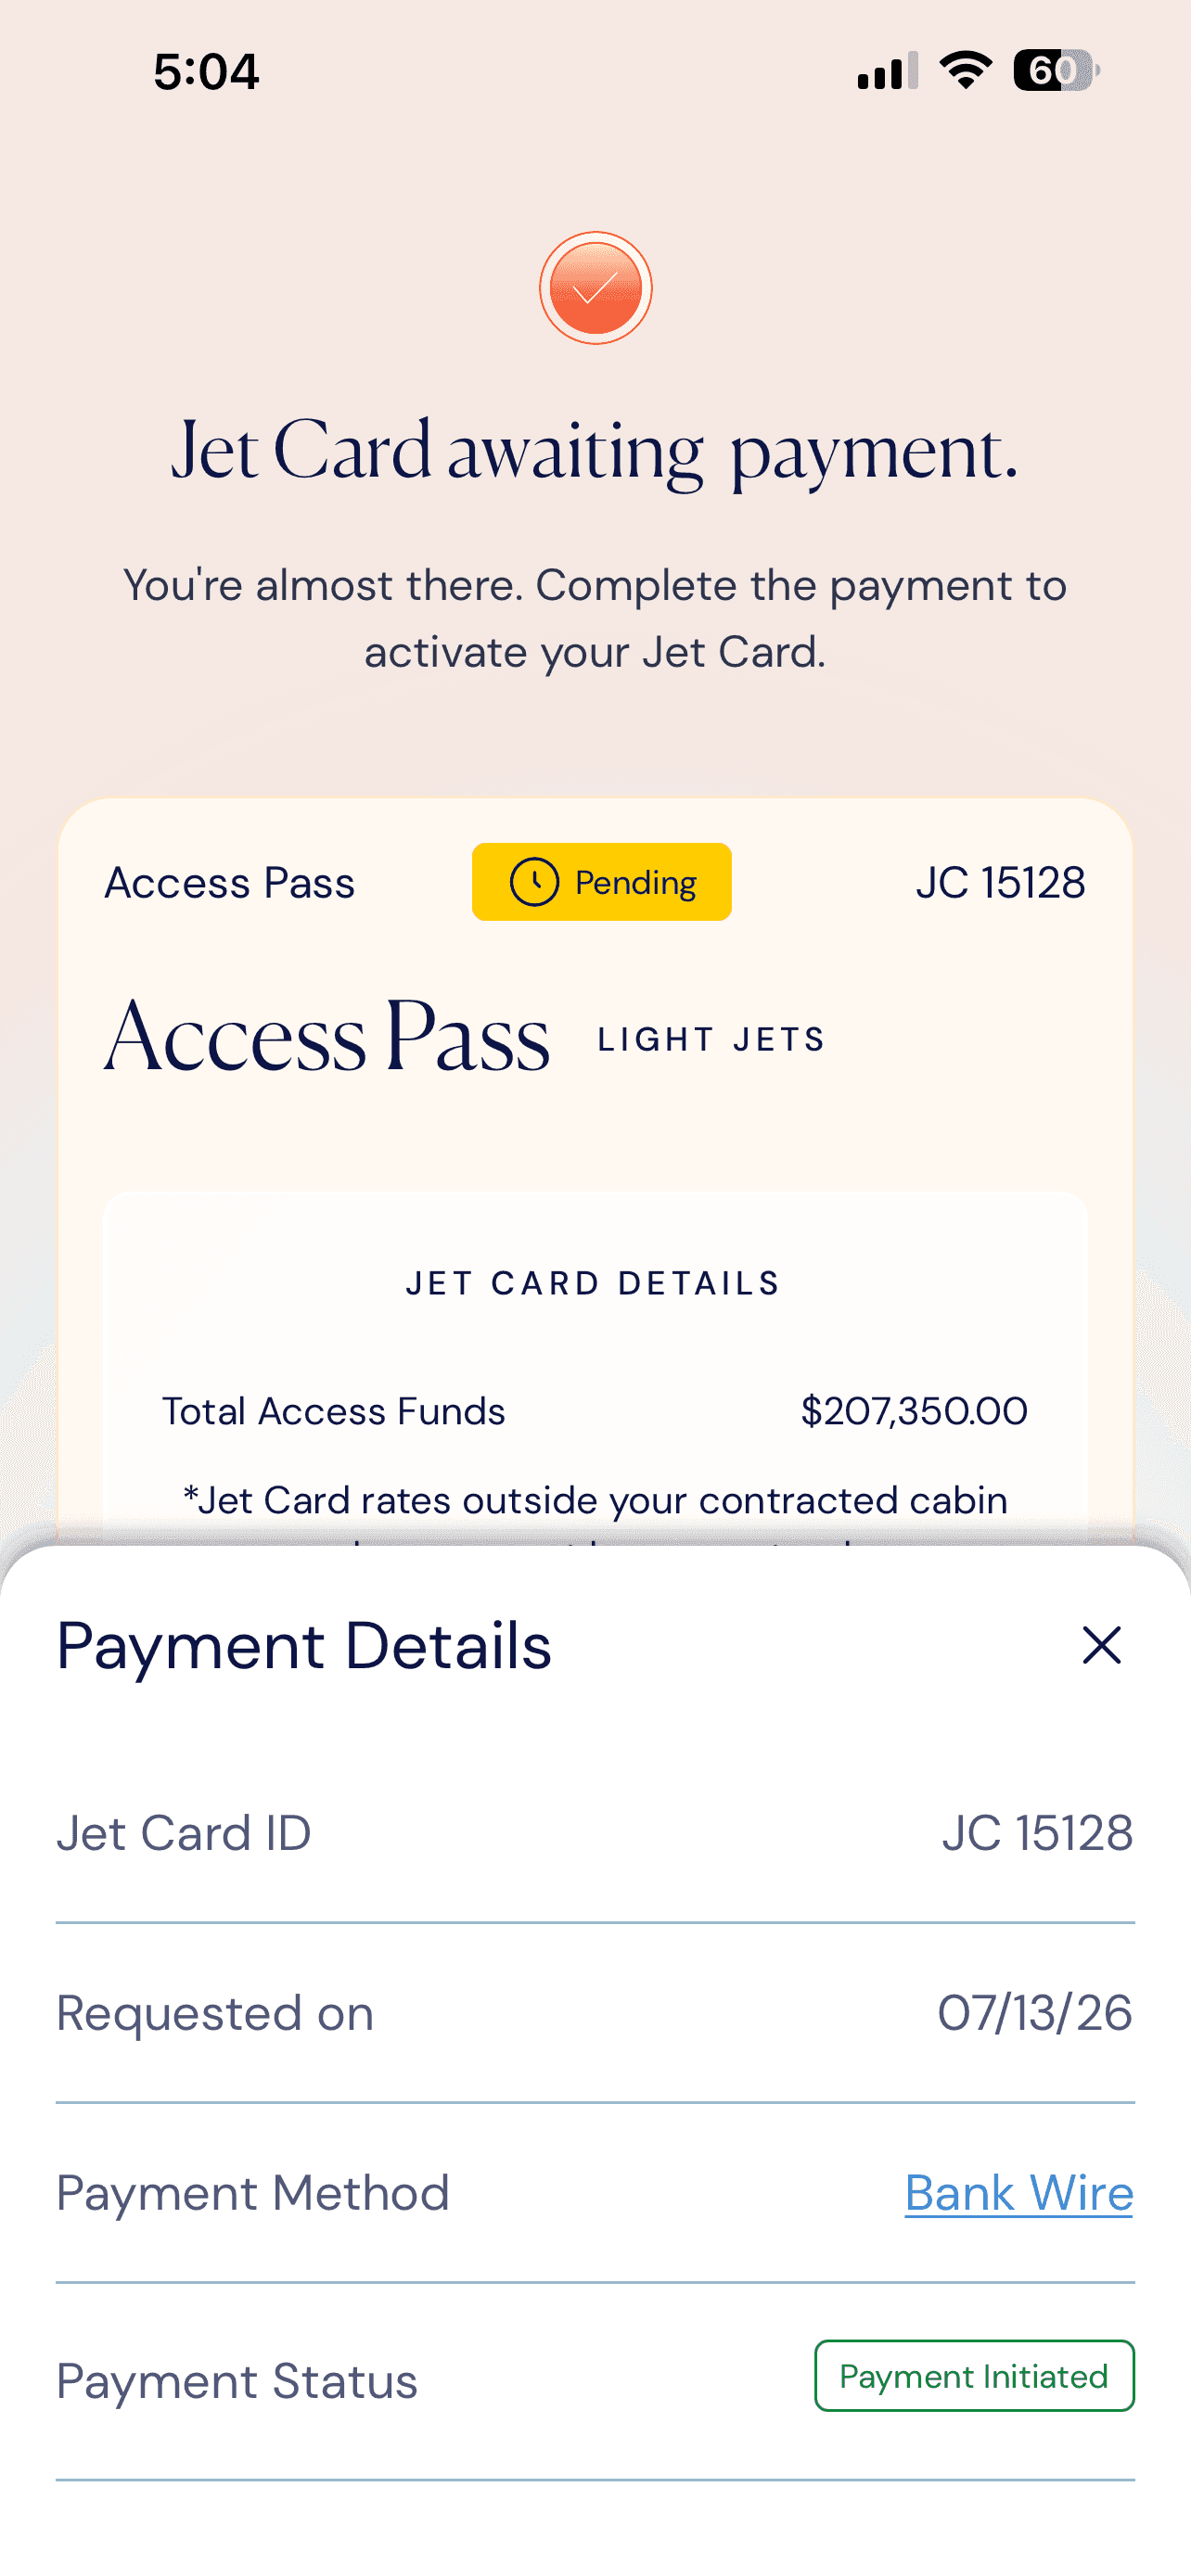
Payment Details
Track your transfer.
The details sheet shows your Jet Card ID, request date, payment method, and a Payment Initiated status while your funds are in transit.
- Tap Bank Wire to review your instructions again.
- Your status updates as funds clear.
Wire timing. Bank wires typically settle in 1–3 business days. Your card stays Pending until the Jets.com team confirms receipt, at which point it activates automatically and its funds are ready to book against.
Purchasing a Jet Card · Reference & Wallet
Revisit your wire details and track your pending Cards.
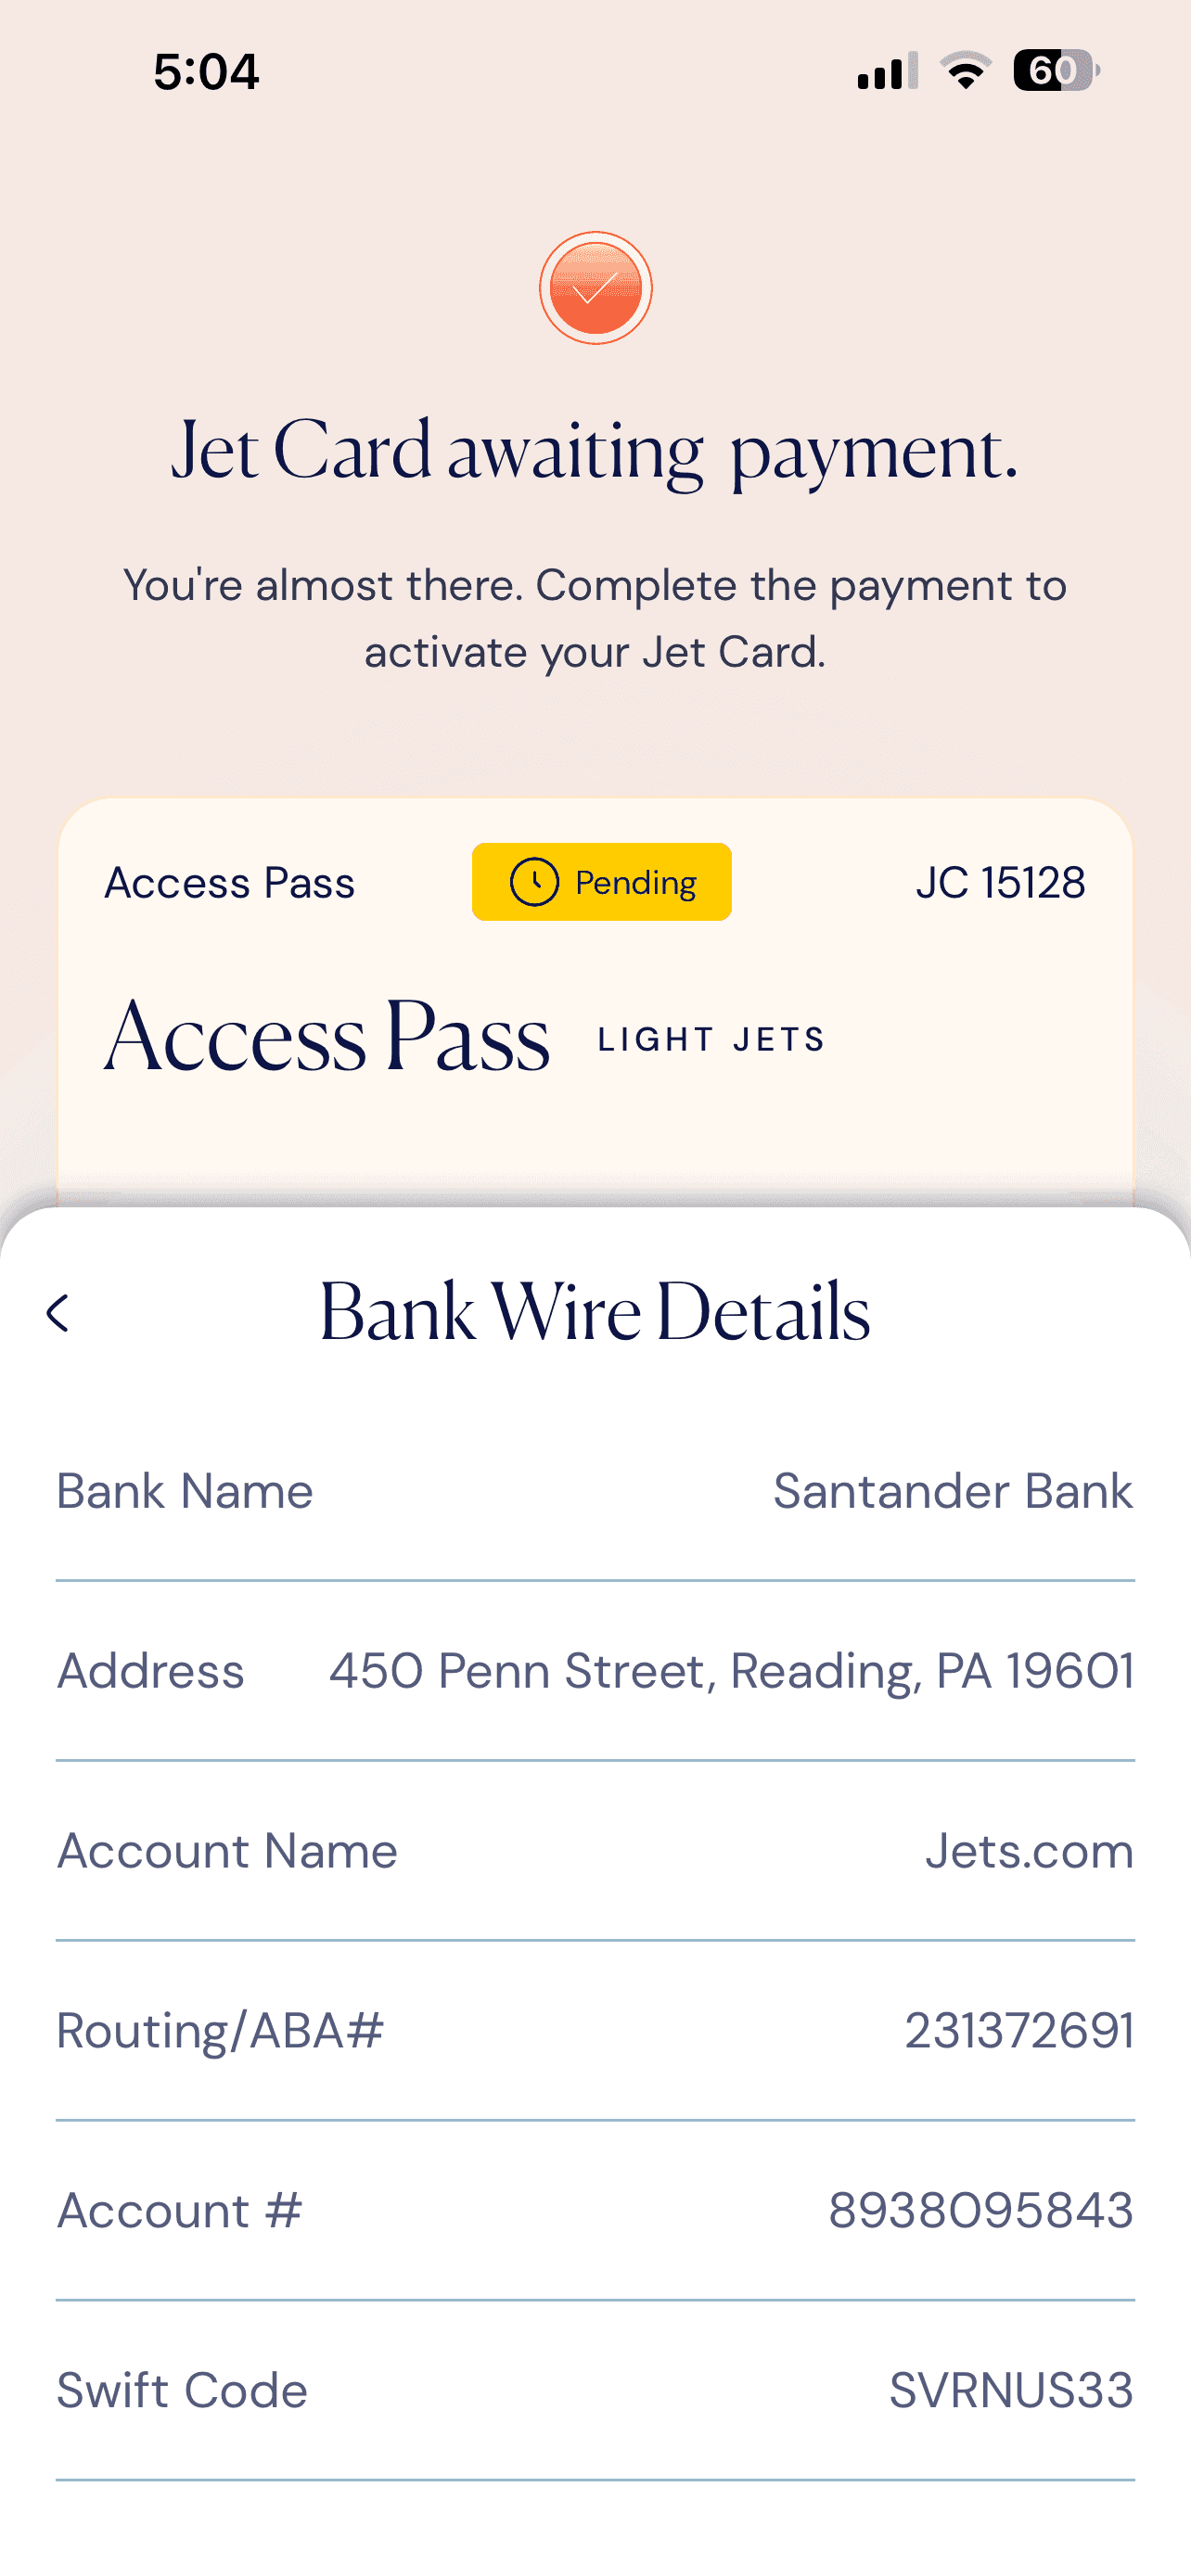
Bank Wire Details
Your full receiving-bank reference.
From Payment Details, tap Bank Wire to open the complete receiving-bank reference, ready to share with your bank at any time.
- Bank Name: Santander Bank.
- Routing/ABA, Account number, and SWIFT code.
- Account Name: Jets.com.
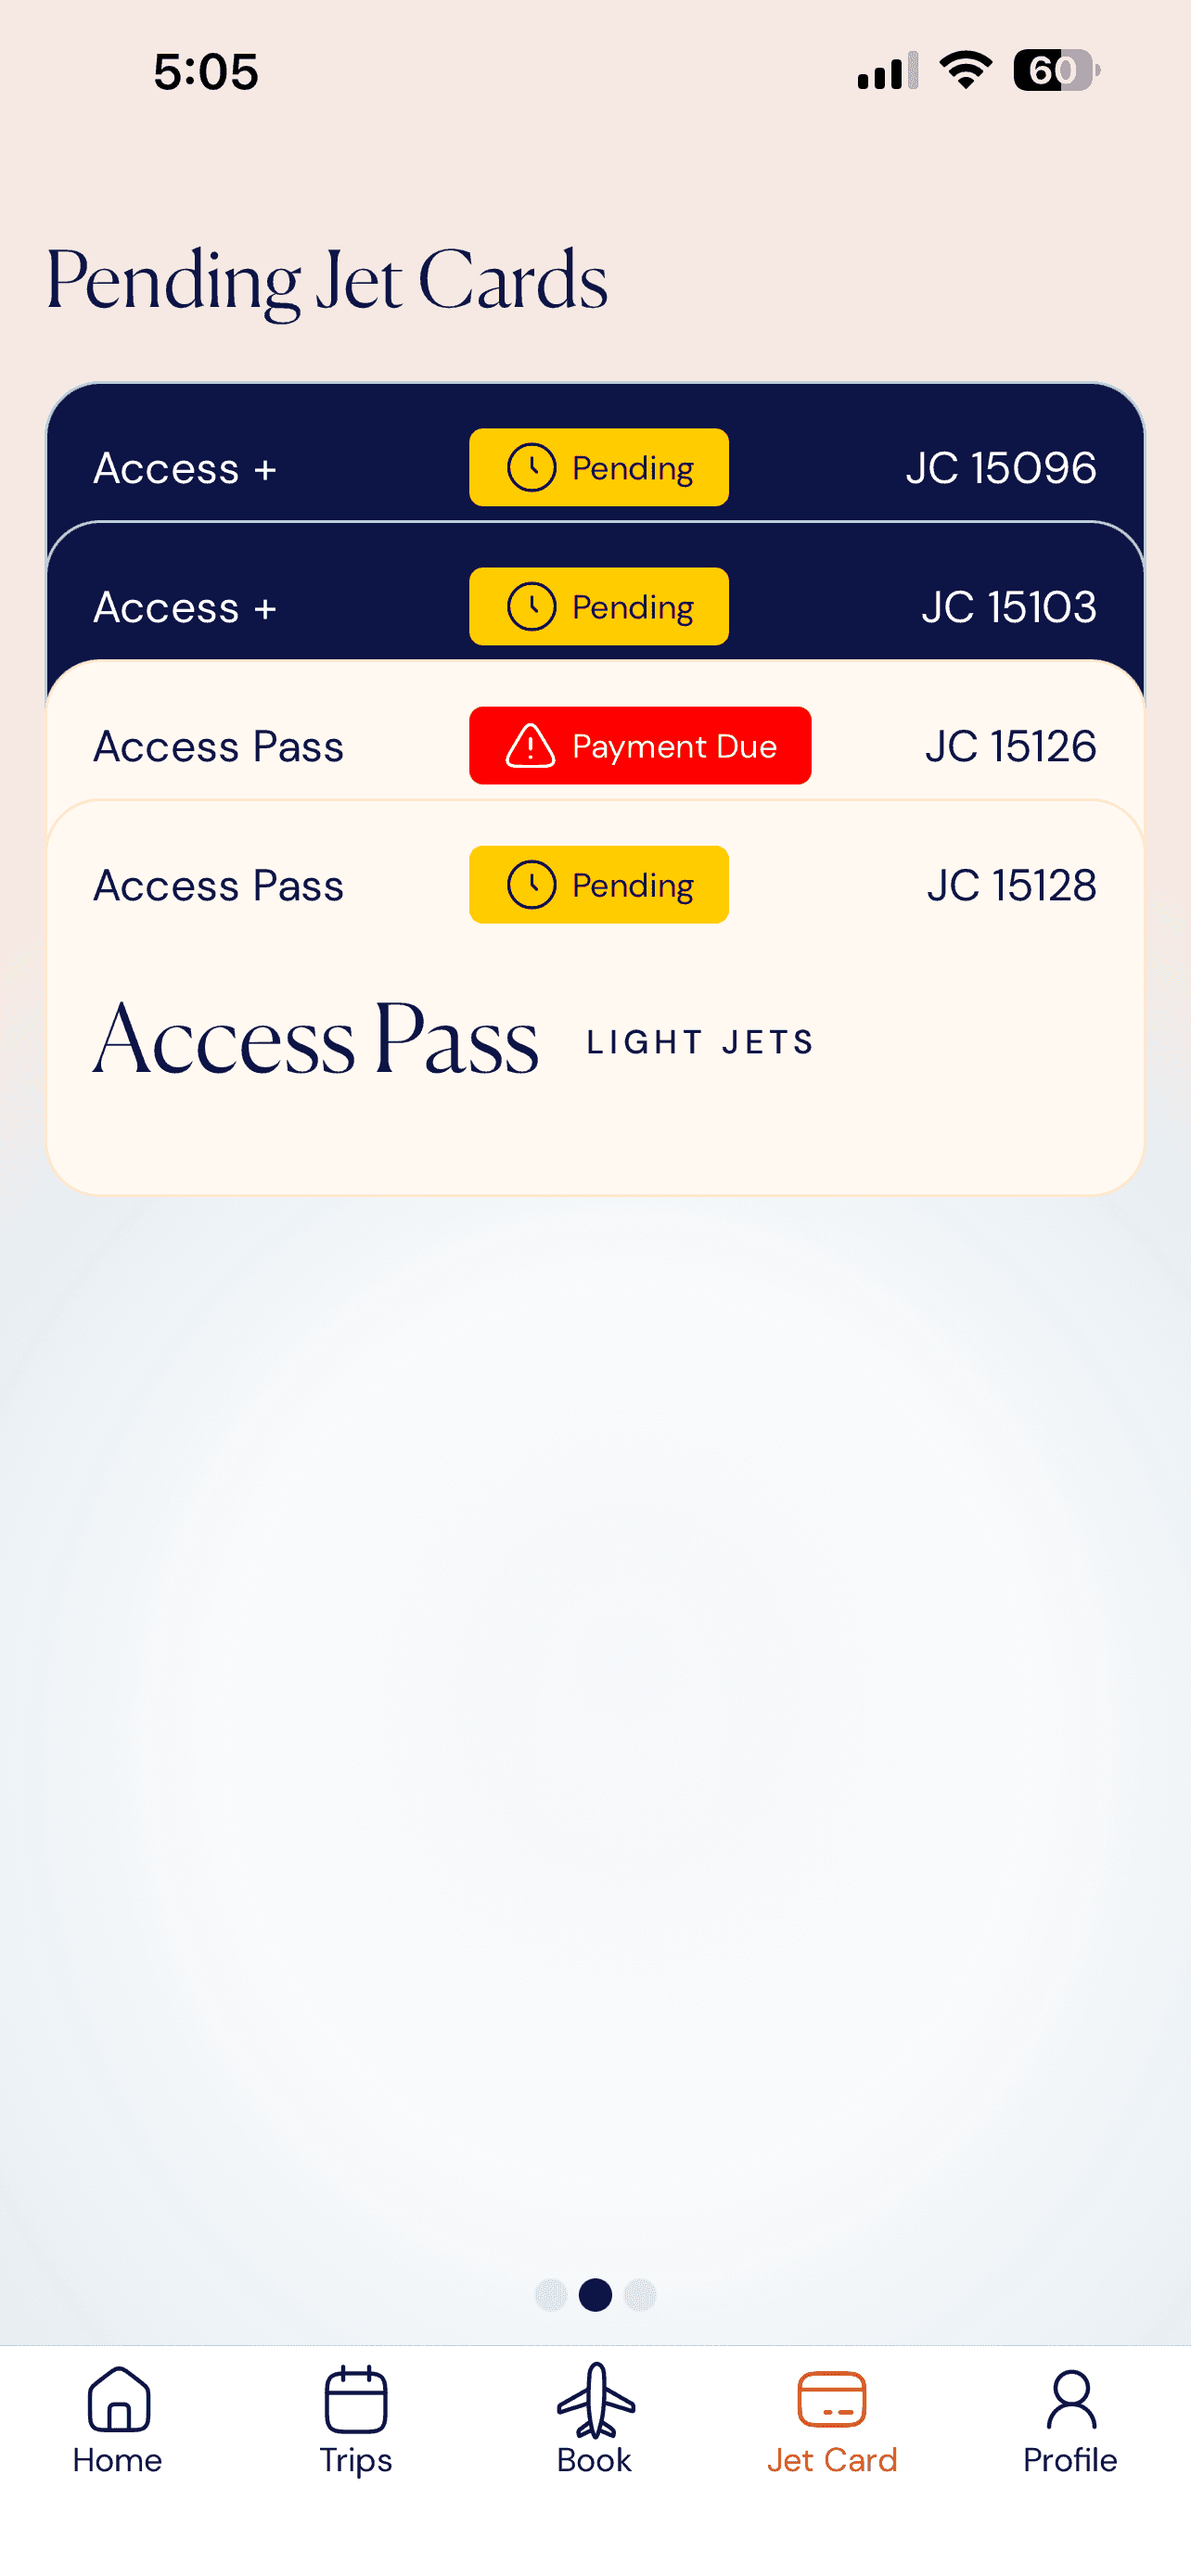
Pending Jet Cards
Find it in your wallet.
Your new Card appears under Pending Jet Cards in the Jet Card tab, alongside any other Cards awaiting activation.
- Swipe through the stack to view each Card.
- Cards move to Active once funds clear.
- Tap a Card to reopen payment status.
You're all set. Once Jets.com confirms your wire, check, or ACH, your Jet Card activates and moves from Pending to Active in your wallet — ready to book against for your next trip. The Sky Is Yours.
Reset Your Password
Forgot your password? Resetting it takes just a moment. Request a reset email from the login screen, enter the six-character code we email you, and choose a new password. Your account stays secure, and you’ll be back to booking in seconds.
Resetting Your Password · Steps 1 – 4
Request a reset email, then enter your code to choose a new password.

Welcome Splash
Tap Log in.
Open the Jets.com app and choose Already activated? Log in. to reach the login screen.
- Already activated? Tap Log In.
- New to the app? Tap Activate Your Account.
- Need an invitation? Tap Request an Invite.
Login
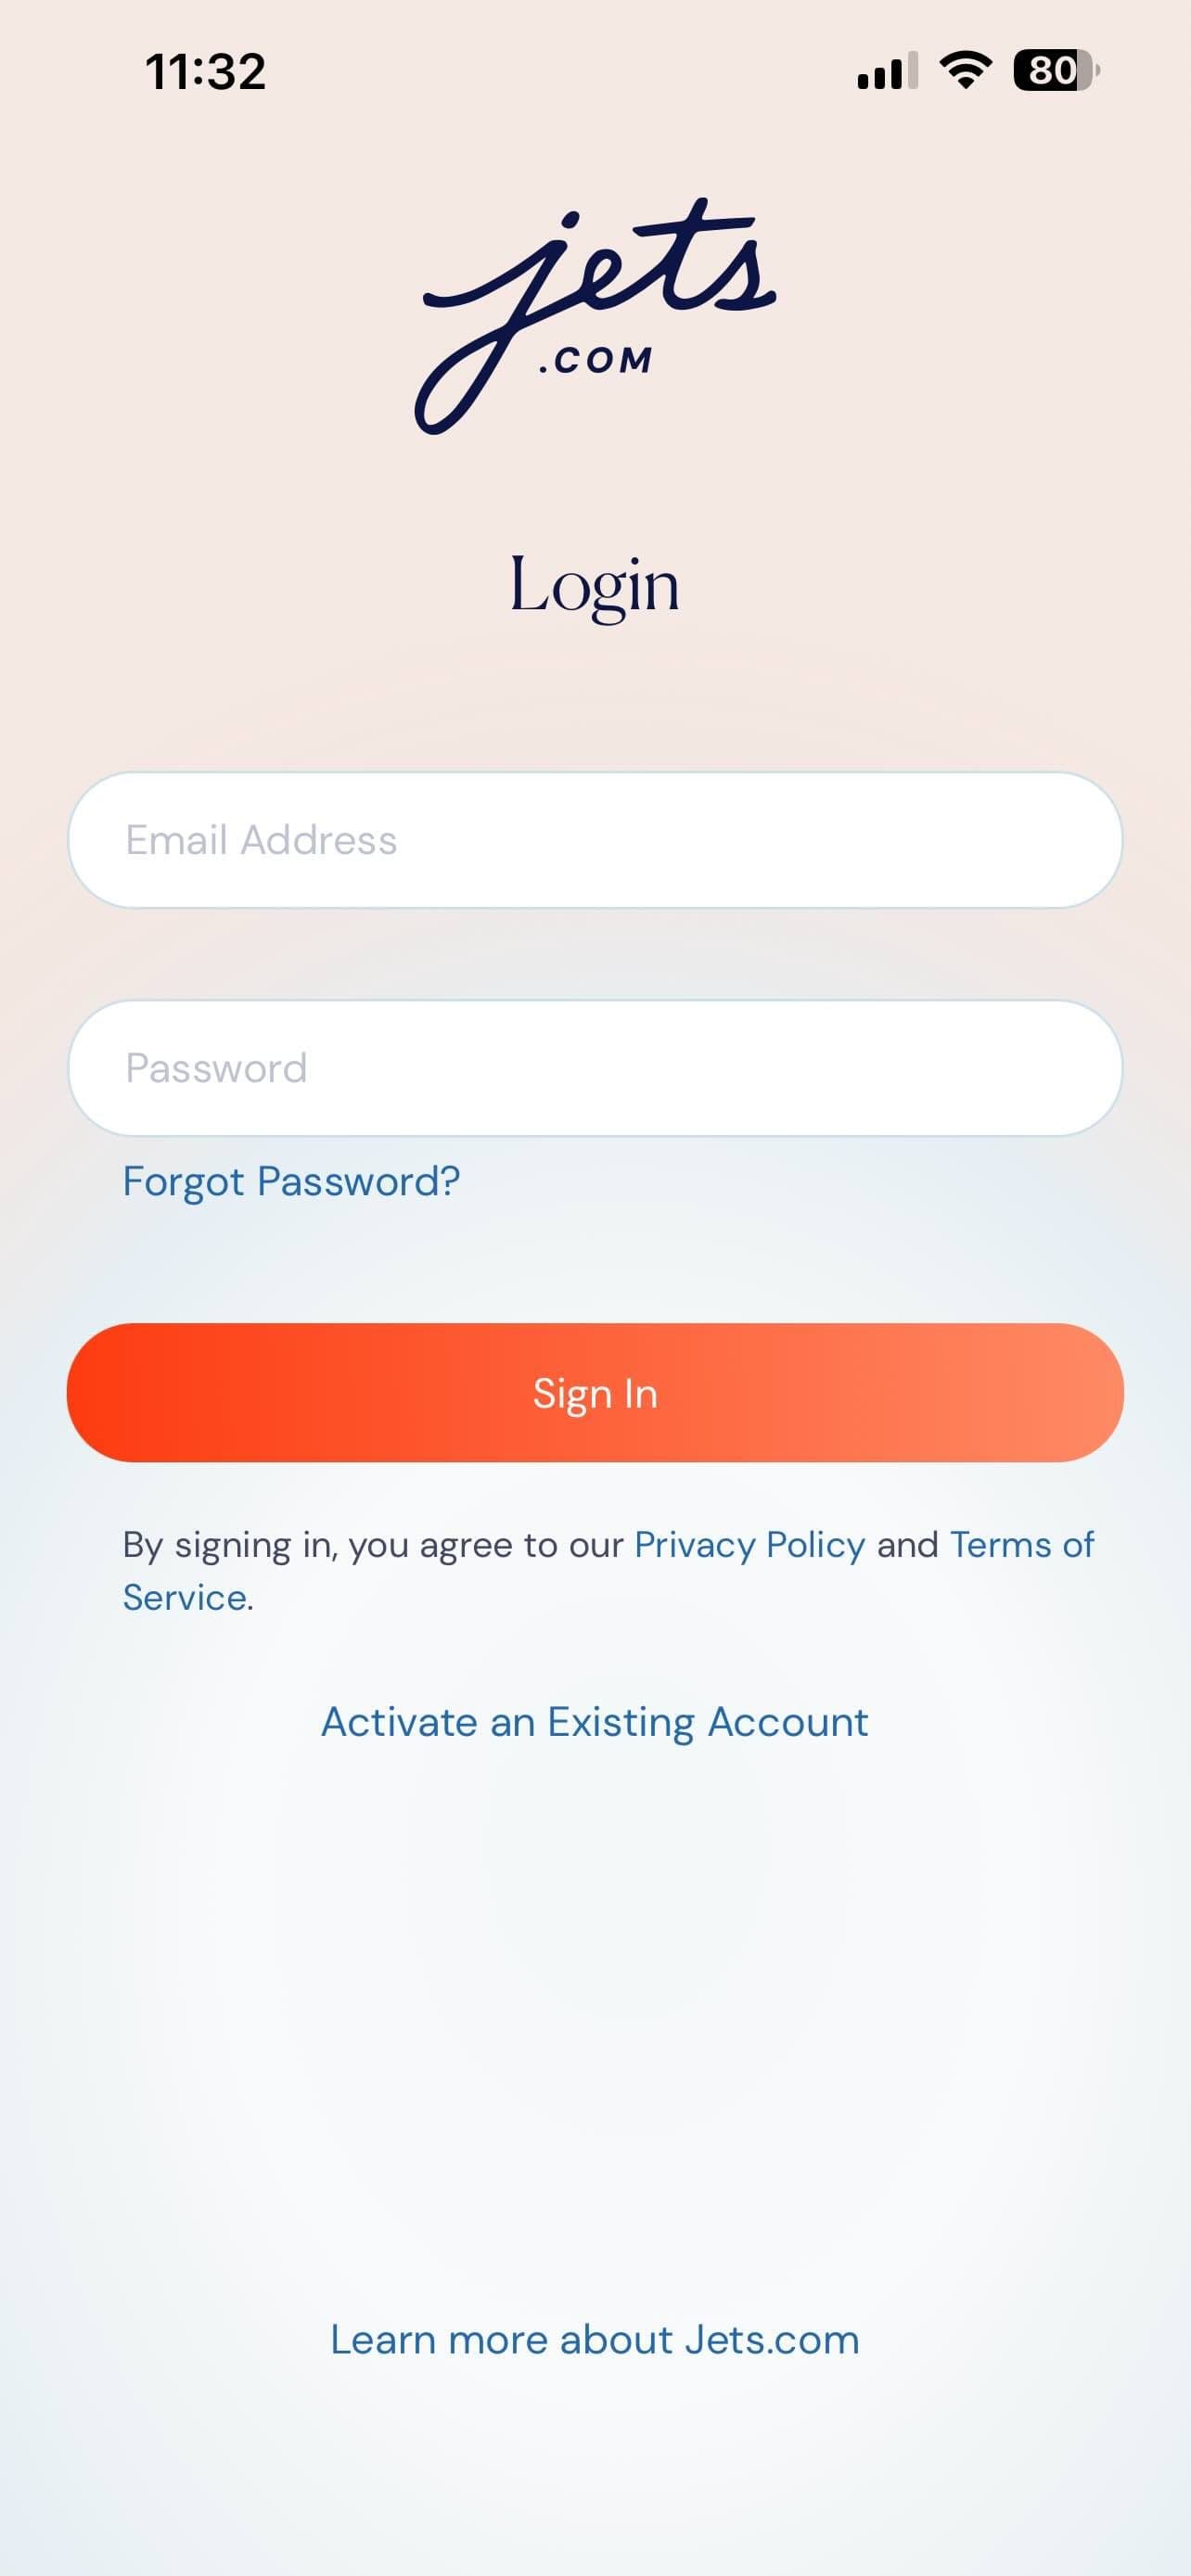
Tap Forgot Password?
On the Login screen, tap Forgot Password? just below the Password field to begin the reset.
- Found directly beneath the Password field.
- No need to enter your password first.
- Tap Activate an Existing Account if you haven’t activated yet.
Forgot Password
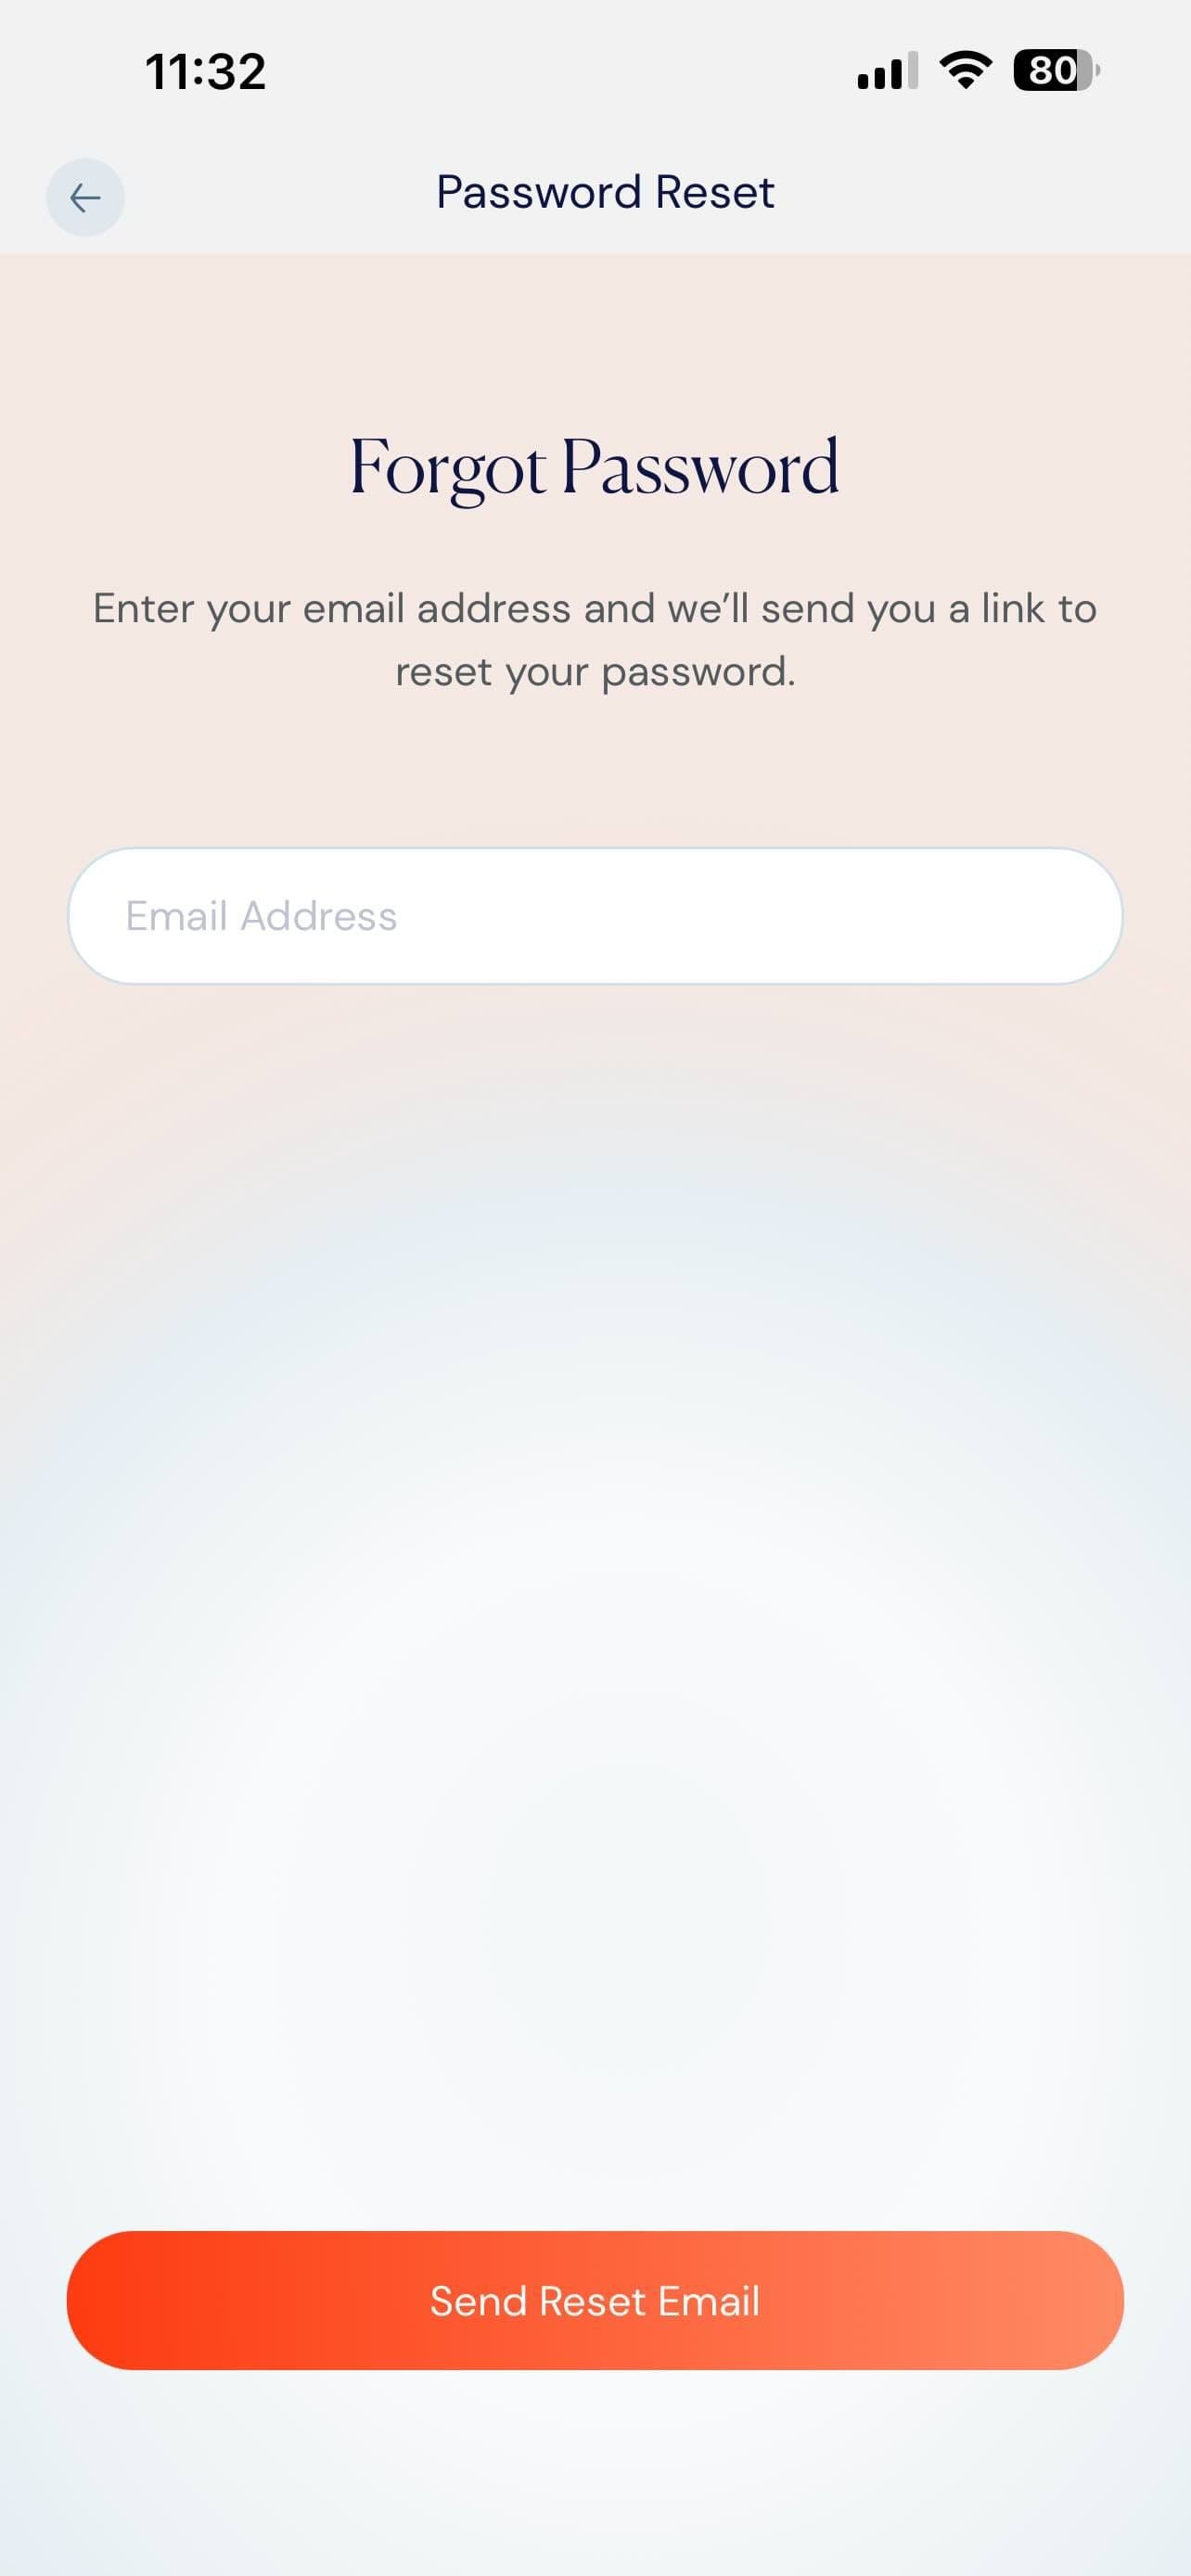
Request your reset email.
Enter your email address and we’ll send you an email to reset your password.
- Use the email address Jets.com has on file.
- Tap Send Reset Email to continue.
- Check your inbox.
Password Reset Code
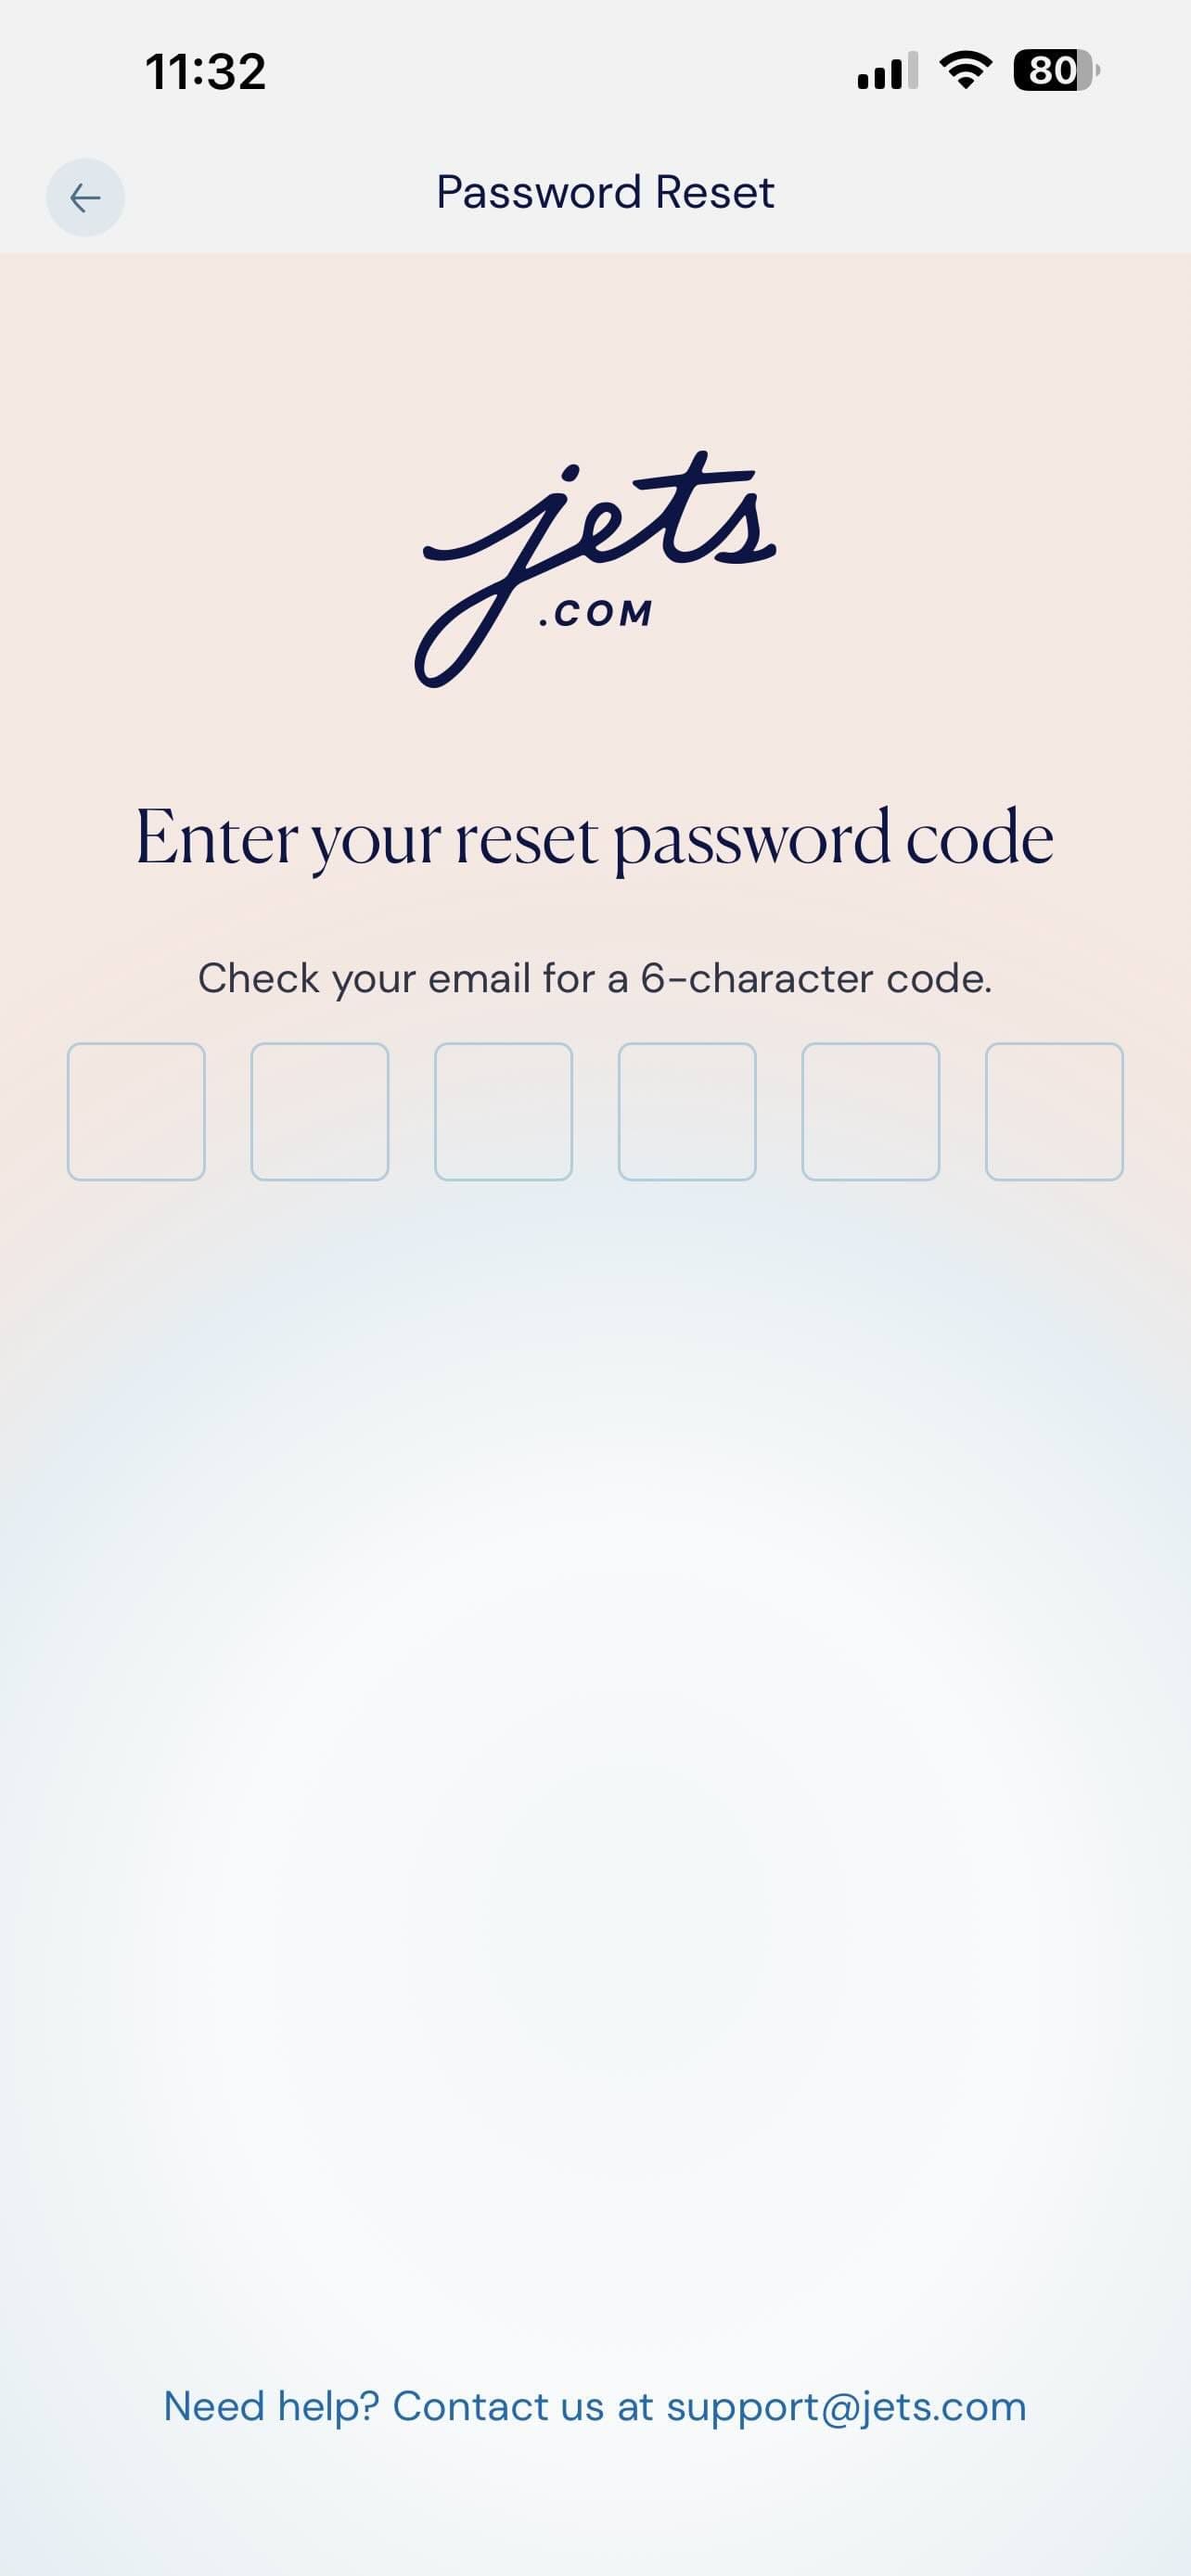
Enter your reset code.
Check your email for a six-character code, then enter it to choose your new password.
- Each character drops into its own field.
- Codes are case-insensitive.
- Need help? Contact [email protected].
REFERENCE
The Jets.com App Glossary.
A short list of terms you’ll see most often across the app, defined he Jets.com way.
Our two Jet Card programs. All-inclusive and prepaid, they price your trips in flight hours or flight funds.
An on‑demand booking for a single trip rather than a Card balance. priced in dollars and secured by a credit card hold.
Fixed Base Operator, the private terminal at an airport. Your team confirms your FBO as part of every trip itinerary.
Your single point of contact at the FBO on departure day. Required for every charter trip and designated during passenger verification.
A temporary credit card hold placed on your account when you submit a charter booking, released once your final payment clears.
Your fully‑loaded charter cost, flights, handling, segment fees, and FET. Shown twice on the Review screen: one figure for wire, check, ACH, one with the 3.99% credit card fee.
Need to reach us?
Your Private Aviation Team, on standby.
Every Jets.com client is supported around the clock by our client experience team. The fastest path is always the direct line to the person who knows your account.
[email protected]
866.631.0875
24/7 — every day of the year